Many digital photography cameras have included the ability to record high-definition video, beginning with the Nikon D90 in 2008. The Canon 5D mk II (2009) was the first DSLR to be widely employed in film and television. Because video recording is usually accompanied by audio recording, these cameras necessarily include a microphone. But depending upon your own need for high-quality audio, the in-camera microphone can be a poor choice for professional quality.
(For a larger view, click on the photo here.)
Film and television production typically record audio on dedicated audio recording equipment, rather than relying upon the video camera to record audio. The separate video and audio recordings are brought together in post-processing. However, in-camera audio recording is practical for one-person or two-person teams recording video at events or for ENG (electronic news gathering).
Broadly speaking, you have two choices: a “video mic” or a general-purpose microphone with a pre-amp. “Video microphones” include some small amount of amplification such that they connect directly to your camera, for example a DSLR, with no additional equipment required. This is a simple compact solution. Video mics are available from Rode, Sennheiser, and Sure.
Alternatively, if you employ an audio pre-amp, then you can use any microphones you want and can use different microphones in different situations. However, this adds another piece of equipment, making the total solution more bulky.
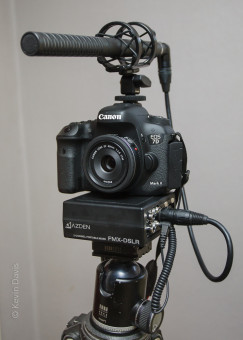
The photo here shows a general-purpose shotgun microphone, connected to a mixer/pre-amp, connected to a DSLR camera (Rode NTG2, Azden FMX-DSLR, Canon 7D mk II). The shotgun is mounted in a shock-absorbing mount that isolates the microphone from any camera noises, including operation of controls, auto-focus motor, or accidental knocking around.
Comparing this setup to the built-in camera microphone, there are four big differences. The external is directional, rejecting off-axis sounds, whereas the camera built-in mic is unidirectional, picking up sounds even from behind the camera operator. The external mic is cleaner, producing less unwanted background noise. And the external mic generally does not record camera noises, because it is mechanically isolated away from the camera. Lastly, as you can see in the photo, this is far more bulk than just the camera alone.
Power for the NTG-2 can be provided either by the FMX preamp or by an optional AA battery within the NTG-2. I have tested both setups and find no difference in audio quality. Either way is far better than the camera’s built-in microphone, particularly in situations where the audio source is quiet and requires significant gain.
You may be able to connect an external microphone directly into your camera without use of a pre-amp. Not all microphones require a pre-amp, but it is typically required for condenser microphones. Although I had partial success with this technique on a different camera, the combination of NTG-2 with Canon 7D mk II requires a pre-amp. In this specific case, I configure the camera internal gain setting to 25% and then use the adjustment knobs on the FMX. Alternatively, you can enable camera automatic gain; in this case, be sure to inform the pre-amp using the switch for this purpose.
Here is a short list of some popular audio pre-amps: Azden FMX-DSLR, Beachtek DXA, JuicedLink RM222, JuicedLink RA333, Sound Devices MixPre D.