Smoky Mountain Sunset

In Tennesee, anybody can enjoy Great Smoky Mountain National Park at no cost.  There are no entrance fees and no parking fees.  Apparrently this was part of the deal when the land was acquired (from native American Indians).  And you can simply drive to the top of Clingman’s Dome.

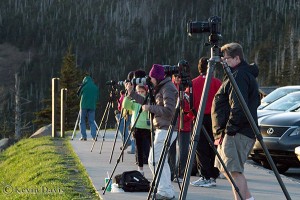
Any evening on Clingman’s Dome, there can be a bevy of photographers lined up to photograph sunset. (Probably sunrise too, but I have not witnessed that.)
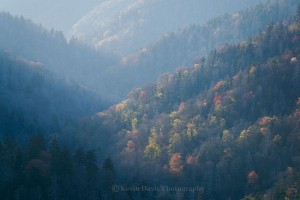
But as most photographers point their cameras toward the sun, they may miss out on some of the best scenes … which do not directly include the sun.

This image was shot with a micro-four-thirds camera (Panasonic Lumix G3) and captured as RAW.  While JPEG images have already been processed (by the camera), RAW images receive no processing.  In my experience, RAW images tend to look flat and require some post-processing (by me).  While this scene appeared well to my human eyes, the camera capture was very low contrast.  So the significant post-processing was to increase the contrast.


Winter Boots

If your photography travels this winter will take you down a trail or up a mountain, here’s a short summary of winter footwear for both warmth and safety.

Winter boots are also known as snow boots or pac boots. These are designed for walking, snowmobile, hunting, snowshoeing, etc.  The fit is typically loose and comfortable.
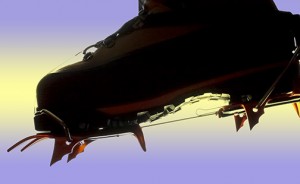
Mountaineering boots are very stiff and the soles have little or no flex.  The biggest reason for this is to allow the use of crampons. Truthfully, most mountaineering boots are designed with emphasis on ice climbing, to the detriment of walking comfort. Most feel rather big and clunky (like the shoes of television character Herman Munster). Some have a plastic shell much like ski boots. Perhaps the most important thing to know is that not all “winter” mountaineering boots have insulation for warmth.

Some insulated boots can have insulation that is removable; some don’t. If you intend to do any winter camping, choose boots with removable insulating liner. Overnight, keep the liners close to your body so they don’t freeze up.

Insulated mountaineering boots range in price from $250 to $850. However, it is not impossible to score a pair of boots on sale for under $200. You can also get used boots at stores that accept trade-ins.

Crampons (pointy metal teeth that attach to the bottom of your boots) are most often designed for ice climbing, but some are designed for trekking (hiking/walking). Crampons for climbing typically have 12 points (teeth), though some have 14. Trekking crampons typically have only 10 points.

Not all crampons fit any boot. Crampons attach to your boots either via straps or a metal bar at the front and rear. Straps can be attached to just about any winter boot or mountaineering boot. However, it is important to note that some crampons have more flex than others. If you plan to use crampons on non-rigid winter boots, look for strap-on crampons that have a good deal of flex in the middle.

“Step-in” crampons clamp onto your boots with a metal bar or clamp at the toe and heel, requiring mountaineering boots designed for this.  See the photo attached to this post. 

Some “hybrid” crampons (also called semi-step) have a metal bar/clamp at the heel and a strap at the toe.  But as with full-step-in crampons, your boot must have the proper design to accept this type of crampon.
 

Trillium

Here is a very different type of image from Katahdin / Baxter State Park.
 
 
Both painted trillium and purple trillium are common in the northeast forests and both have a very small window of time during which they bloom, maybe three weeks. Purple trillium are more difficult to photograph because the flowers have a nodding presentation (the flowers droop over and face the ground).
 
 
What always catches my eye is groups of these flowers. Typically they are solitary plants, so a cluster of them is a nice find. For this shot, I used a wide-angle zoom lens with an extension tube. Without the extension tube, focusing distance is perhaps 14 inches. With the extension tube, I can get much closer to the flower, reducing the distance about 50%.
Canon 5D mk II, ISO 400, f/14, 1/6 sec (on a tripod of course)
.

Katahdin

While Mt. Washington (New Hampshire) is the highest peak east of the Mississippi, the terrain of Mt. Katahdin (Maine) is clearly the most challenging “hiking” that I have ever seen (excluding technical “rock climbing”). Before hiking up to the Knife Edge via the Dudley Trail, I thought perhaps carrying a tripod might be a hinderance, so I left it at camp. In retrospect, this was a prudent choice; the Dudley is more rock climbing than hiking. I am not typically afraid of heights, but this trail gave me the creeps!

Atop the Dudley Trail is the infamous Knife Edge between Pamola Peak and Baxter Peak. Having now personally traversed the Knife Edge, I must tell you that words cannot do it justice. It is the most dramatic landscape I have ever seen in the northeast USA; beyond that, I am at a loss for words.


It is widely reported that Mt. Washington is home of the world’s worst weather. Truthfully, many mountains have the same weather; they just don’t have an observatory at the summit to record the facts. At Katahdin, when the weather turned bad, I left and went home.
.

Backpacking and Photography

Carrying a lot of heavy camera equipment on an overnight hiking trip … is a little crazy. It’s just too much weight. For a three-day backpack trip, you might need to carry 35 to 40 pounds of food, clothes, and camping equipment. Add to that 8 to 12 pounds of cameras and lenses, then another 8 pounds for a tripod, you are then carrying 60 pounds. I do not recommend it. That being said, I will do it on occaision to photograph remote locations.

But how to carry all this stuff? “Photo backpack” sounds perfect, but truthfully, these things are designed to carry camera equipment and not much else. Photo backpacks cannot carry all the food, clothing and camping equipment for overnight trips. A hiker’s backpack is necessary. I use a large backpack, stuff a camera bag inside of that, then make daytrips from camp, carrying only the smaller photo bag.

In the past, my camera bag on these trips has been a waist pack plus a small day pack. In fact, the LowePro Orion AW actually comes with both (at least mine did years ago). The waist pack allows fast access to camera equipment without removing a pack from my back.
For my upcoming trip, I will be using a Kata 3N1. This bag quickly converts from a two-shoulder backpack to a one-shoulder sling. On top of that, it has a small compartment at the top, just big enough for lunch and a jacket. Compared to the Orion AW waist bag, the small 3N1-10 is about the same capacity, while the larger 3N1-30 has twice the capacity and still provides fast access to equipment.

My large backpack is an old Kelty Super Tioga external frame pack. Because most hikers today use internal frame packs, most don’t realize that an external frame pack is still a good option in some cases. Some people seem to believe that external frame packs are relics from WWI and no longer manufactured today. Of course, this is false. Just as an example, the ancient and venerable Super Tioga lives on in 2009, though the name has changed. I recently ordered a replacement hip-belt for my Super Tioga, which simply is not possible with an internal frame pack.
.