Memory Cards – What Speed Do I Need?

Memory Cards – What Speed Do I Need?

CF, SD, and micro SD memory cards

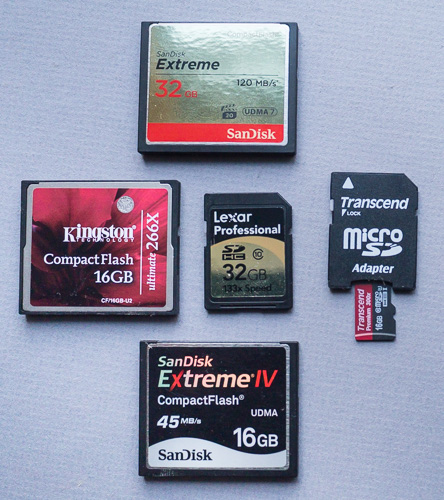
The photo here shows some of the memory cards I have used in my digital cameras.  The oldest is the SD card at center, rated at 20MB/sec.  The newest and fastest is at the top (SanDisk, CF card), rated at a maximum speed of 120 MB/sec.

Historically, CF cards have supported faster data transfer (read and write) than SD cards.  The reason is simple – a CF card can transfer 16 bits all at once, whereas a SD card can only transfer 4 bits at once.  Count the electrical contacts on an SD card – there are 9 pins.  Count the pin holes on a CF card – there are 50 pins.

SD-class-symbolsStandard SD cards (SDHC, SDXC) are deemed UHS class I.  A recent evolution of the SD card format has introduced SDXC UHS class 3.  These cards have 7 additional electrical contacts and allow faster data transfer up to a theoretical limit of 300 MB/sec (equal to the limit for CF cards).  These cards should be backward compatible with older cameras that support only the 9-pin UHS-I interface, but you will not see the speed advantage of the faster interface.

For historical reasons, the maximum speed of a memory card may be shown as a multiplier, such as 100x, 266x, etc.  The baseline is 150 KB/sec.  So 300x means 45 MB/sec (45,000 KB/sec).

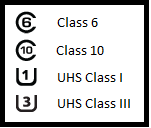
Instead of an”x” rating, CF cards will typically be labelled with a simple speed rating in MB/sec.  For SD cards, a speed class rating is newer than the old “x” rating .  Class 6 means that the card can support at least 6 MB/sec.  Class 10 means 10 MB/sec or more.

The speed class rating has been supplanted by the UHS speed class rating (Ultra High Speed).  UHS Class 1 means the card will support a write speed of 10 MB/sec or better.  UHS Class 3 (a.k.a. U3) means the card will support a write speed of 30 MB/sec or better.

 How fast does a memory card need to be?

Writing to the card and reading from the card are really two different considerations.  If you’re capturing 1080 HD compressed video, a momentary burst up to 30 MB/s is possible, but the sustained data rate is not that high.  You need a Class 10 card.  For 4K ultra-HD video recording, you need UHS Class 3.  If your card can’t quite keep up, your camera will likely abort recording.

If you are a sports photographer, capturing ten images per second may amount to 300 MB/sec but this speed need not be maintained constantly.  If your card cannot keep up, your camera will report “busy” for a second or two, during which new images cannot be captured.

At the end of the day, you need to upload the photos and video to a computer.  That’s when you want to have the fastest speed reading from a card.

 Card Readers

For years, photographers relied upon Rob Galbraith (http://robgalbraith.com) for his work measuring the read/write speeds of both memory cards and card readers.  Then Rob moved to a full-time job and could no longer maintain the database.  Recently there has been an update, seen here by PhotoShelter:

http://blog.photoshelter.com/2014/10/photoshelter-card-reader-database-why-you-should-upgrade/

Three tables are presented.  The first shows data transfer rate when reading from memory cards to a 2013 Mac Pro.  The second is the same, but using a 2014 Macbook Pro.  The third table regards XQD cards, which are new and relatively uncommon (notably, the Nikon D4 supports XQD cards).  Higher number means faster data copy – the numbers are MB/sec.

The fastest card readers for (SD and CF cards) are:

The best speed requires that you connect the card reader to a USB 3.0 port on your computer.  USB 2.0 is limited to 50 MB/sec, while USB 3.0 is limited to 145 MB/sec.

“You’re wasting time and not using your expensive gear to its full potential if you haven’t upgraded your cards and readers in the past two years or so.”
(Photoshelter, Allen Murabayashi)

I don’t entirely agree with Mr. Murabayashi.  If you haven’t upgraded your cameras, then you probably don’t need to update your cards and readers.  My general practice is to always buy new cards when I buy a new camera.


Drones for Aerial Photography, under $2000

Drones for Aerial Photography, under $2000

Kevin flying a DJI Phantom

The term “drone” is commonly used in pop media, more common than alternative terminology UAS (unmanned aircraft system) or UAV (unmanned aerial vehicle).   To my mind, a drone implies an automated military device – I prefer the term quadcopter.

As far as you or I are concerned, we serve as the remote pilots while standing on terra firma.  We operate a radio transmitter while the copter is equipped with a matching radio receiver.  Different radio systems are available and they are not all compatible.  For example, some communicate via a 2.4 GHz radio frequency, while others utilize a 5.8 GHz.  The differences are not limited to radio frequency alone.

Anything that is labeled as Ready-To-Fly (RTF) will include a radio transmitter that is compatible with the drone.  If the product is not advertised as RTF, it may not include a transmitter, which is preferable for anyone who intends to re-use an existing transmitter they already have.

  • 3D Robotics Iris+  … $750
  • 3D Robotics RTF X8 … $1,350
  • Blade 350 QX      – $470
  • DJI Phantom I … $400
  • DJI Phantom II Vison+ … $1,300
  • Gaui … 330X … $400
  • Gaui … 500X … $1,150
  • Gaui … 540H  / hexcopter (6 rotors) …  $600 does not include transmitter
  • Parrot   AR drone … $300
  • Quantum Nova … $320
  • Quantum Venture … $400
  • TurboAce Matrix … $900
  • HUBSAN  X4  H107C-HD
  • SteadiDrone QU4D … $1700
  • Walkera QR X350 … $400
  • Walkera QR 800 … $1,700
  • Walkera TALI h500  / hexcopter (6 rotors) … $1900

For aerial photography purposes, you need a stable device that is easy to control – consider electric copters only.  Gas-powered machines are loud, extremely fast, and potentially very dangerous.

The rotational force of a single-rotor will tend to rotate the entire machine; this is why traditional helicopters have a small tail rotor, to counteract the rotational force.  Coaxial dual-rotor designs solve the rotational force problem by spinning two rotors in opposite directions, but this reduces the total lifting force.  Multi-rotor copters, with four or more independent rotors, solve the rotational problem by spinning half the rotors in a clockwise rotation and the other rotors in counter-clockwise rotation.

I expect (but have not verified) that all of the copters listed above are capable of lifting a small camera.  In the cases of some smaller copters, I had doubts and so did not include those in this list.

Please note that most of these copters will rely upon rechargeable LiPo batteries, for which I offer two tips.  A single battery might give you eight minutes of flight or twenty minutes of flight – so do have more than one battery.  These batteries are relatively high power devices and there have been stories of such batteries causing fire, sometimes during the charging process.  Do use protective LiPo storage bags such as LiPo Safe.

The most commonly used camera for these copters is a GoPro 3 or newer (e.g. Go Pro 3, Go Pro 3+, or GoPro 4).  Personally, I have used the Hero 3+ Black Edition; while I find that it captures great video, I am not impressed by the still image JPEGs.  Listed here are some of the available small “action cameras”, all of which I expect are primarily intended for video.

  • CamOne Infinity
  • Contour+2
  • ContourROAM3
  • Drift Ghost-S
  • Garmin VIRB Elite
  • Gear-Pro HD Sport Action Camera
  • GoPro HERO3+
  • GoPro HERO4
  • Ion Air Pro 3
  • JVC GC-XA2
  • Mobius Action Camera Pro
  • Polaroid XS100i
  • Polaroid Cube
  • Replay XD Prime X
  • Sony AS20
  • Sony HS100V

The last component for aerial photography is perhaps the first component to select when building a new system.  A motorized/computerized gimbal is necessary for aerial video, to remove the unwanted effects of aircraft movement.  The gimbal holds the camera, detects aircraft movement, and automatically moves the camera to counteract the aircraft movement.  Without one of these devices, your level horizon will be ruined anytime the copter moves left or right.  Gimbals are often designed to match the size and weight of specific cameras.  So, if you are thinking of using a specific camera, you need to be sure that you can get a gimbal that accommodates that camera.


Canon EOS 7D mark II … is finally real

Canon EOS 7D mark II (image from Canon press release)

A month ago, I wrote of the Canon rumor mill and the forthcoming EOS 7D mk II.  Today, Canon officially announced that camera.

  • With 65 auto-focus points, your subject can anywhere in the frame (far away from center) and still achieve focus
  • Low-light shooting to ISO 16,000  (push it to ISO 51,400, but with added noise)
  • Excellent auto-focus in low light
  • Burst shooting at 10 frames-per-second
  • HD video at 60 frames-per-second
  • Uncompressed HD video output via HDMI connector
  • Built-in intervalometer  (with any other Canon DSLR, an external Canon intervalometer costs $130)
  • Priced less than $2000

—>    Canon EOS 7D mark II – first impression

—>    Scott Kelby’s first impression of the 7D mk II

I have been using the 5D mk II and chose not to upgrade to the 5D mk III when that was released (about 18 months ago).  The 7D mk II is the camera I was expecting and need for video and sports applications. (I do wish it had a tilting LCD screen.) On some points, Nikon’s cameras may still have an edge over the Canon 7D mk II.  For example, the recently announced Nikon D750 includes Wi-Fi, a tilting LCD screen, may yet have better image quality at ISO 12,800.  Yet, the 7D mk II price tag is $500 less than the D750 !

The whole Canon vs. Nikon thing is so over-done.  Both companies succeed in pushing each other to  new heights.  Fact is … my lenses and other accessories are all Canon and I don’t care if a particular Nikon camera has one additional feature.  Cameras are like shoes … the most important feature is how it feels to you.


The Next Big Thing – The “Buzz” Around New Cameras

Regarding possible upcoming cameras, the rumor mill regarding Canon cameras is ridiculous. Back in 2007, the rumors were circulating about the upcoming EOS 5D mark-II, which was not actually available until 2009.  Sometimes, I wonder if the manufacture is secretly feeding the anticipation buzz.

OLYMPUS DIGITAL CAMERA

I am patiently awaiting the EOS 7D mark-II, a revision of the 7D.  Over the past 12 to 18 months, rumors have been cropping up every month and the predictions just keep slipping further out, month by month.  The latest rumor suggests the camera will be announced the Photokina show in September 2014.


Why 7Dm2?  Because it promises a few features that would be useful to me.  First, faster auto-focus and high-speed shooting for sports (maybe 10 frames/second), similar or better than the existing 7D model. Second, auto-focus for video similar to the 70D, which was released several months ago.
These features are not curiosities that I simply “want”; these are limitations in my current DSLR, which I seriously need to remedy.

Canon to make Big Splash in September

If the camera is announced in September, there is only a very small chance that it would actually be available to purchase by end of this year.

Ultra-HD – Cameras For 4K Video

Until now, 4K (also known as ultra-high-definition, or UHD) was the realm of cinema … movie theaters.  But 4K televisions began to enter the retail stores in 2013.  We will surely see more of this in 2014.

In parallel, we have been seeing consumer cameras that support 4K, many of them selling for less than $1000 US.  This poses a technical challenge for small film makers … a data rate four times higher than HD.  (May have to update your video-editing equipment.)

Here is the history of 4K cameras costing $5000 or less.

Blackmagic Production Camera  (2012)
JVC GY-HMQ10   (2012)
GoPro Hero3        (2012)
GoPro Hero3+      (2013)
Sony PXW-Z100   (2013)
Sony FDR-AX1      (2013)
Sony A7s               (2014)
JVC FDR-AX100   (2014)
JVC GY-LSX2        (2014)
Panasonic GH4     (2014)
Panasonic FZ1000 (2014)

How to replace the lens of a GoPro Hero camera

How to replace the lens of a GoPro Hero camera

The lens included with a GoPro Hero 3+ has a focal length of 2.5 mm and has a field of view akin to a 14mm lens on a full-frame DSLR. It is “fisheye”. You can set the camera to a narrow capture setting, but this will crop the image, discarding some of the pixels.

Replacing the lens mount in a GoPro Hero3+


Super wide is fine if you are attaching the GoPro to your helmet or a surfboard.  For me, the stock Hero3 lens is too fisheye and I want a narrower field of view.

There are many available replacement lenses, but most lack the quality required to capture 10 megapixel images.  Most lenses are good enough quality to capture 5 megapixel images. I found two companies that sell a 5.4mm lens, having a 60 degree field of view, and rated as being sufficient for 10 megapixel images:  RageCams (USA) and Vision/Dimension (Germany).

On paper, these two products seem equivalent, but there are a few important differences.

  • The 5.4mm lens from RageCams is easier to install. The lens from Vision/Dimension requires disassembling the camera and replacing the lens mount.
  • If you do it yourself, the cost of a 5.4mm lens from RageCams is higher than the cost of a 5.4mm kit from Vision/Dimension.
  • If you don’t want to mess with the camera yourself, you can pay RageCams to do the replacement for you.  The cost of parts and labor is more than the cost of the GoPro Hero3+ camera
  • The Vision/Dimension lens includes infrared filter for daylight use.  The RageCams web site states that an IR filter will cost you an extra $55.


Huh?  What’s the problem deal with the lens mount?

The lens mount is a standard M12 lens mount, a simple threaded barrel.  To change the lens, you theoretically unscrew the existing lens and screw in another lens.  However, if I understand this correctly, there is a subtle quirk to the GoPro lens mount, which may mean that your new replacement lens will not focus properly.  The lens mount is a female-threaded tube, but apparently the full length of the tube is not threaded; the front-most part lacks threads.  If your new replacement lens has a short barrel length, you will be able to screw it in, but the distance to the image sensor will be too close for proper image focus.  The 5.4mm lens from RageCams has a slightly longer barrel than the same lens from Vision/Dimension.

Lens replacement options

Option 1:
Ship your GoPro Hero camera to RageCams and have them replace the lens. This is both the simplest option and the most expensive option.

Option 2:
Buy a replacement lens from RageCams and replace it yourself.

To grip the lens with a pliers, you first need to remove the decorative plastic ring on the outer body of the GoPro.  This part is quite simple and you can find videos on YouTube that show how it is done.

The lens is fixed in place with a bit of thread-lock.  To unscrew the lens, you probably have to apply heat to the lens with a heat gun (without melting anything).  Again, there are helpful videos on YouTube.

Option 3:
Buy a replacement kit from Vision/Dimension and replace it yourself.  This kit includes the lens and a lens mount that is fully threaded.  Replacing the lens mount is a bit difficult
www.vd-shop.de/instruction-replace-gopro-lens-a-80.html

Option 4:
Install an adapter that allows you to use almost any lens.  While this enables the use of high-quality lenses and allows the use of variable-aperture lenses, it necessarily makes your GoPro physically larger and heavier.  Refer to this link: www.back-bone.ca

I bought the Vision Dimension kit.  While the price of this kit seems significantly less than cost of a comparable lens from RageCams, there are hidden costs.  Shipping from Europe to the USA cost me $45 and then I received a bill from Federal Express for an import duty of $20.  In the end, buying from Vision Dimension did not save me as much money as I had thought it would.

Looking at the photo at the top of this blog, you can see “10MP” (10 megapixel) is printed on the lens.  Also printed on the lens (not visible in this photo) is “IR Cut”, indicating that a daylight IR filter is present.

Disassembling a $400 camera, that has really tiny parts, is not a task for the faint of heart.  A video from Vision Dimension demonstrates the procedure; you can view that before making your decision.  To avoid this hassle, pay a bit more money and buy the lens from RageCams.

If you replace the lens yourself …

You have somehow replaced the lens … and now need to adjust it for sharp focus.

  1. Start by setting the approximate focus; load the GoPro app on an iOS or Android device to achieve a live preview of what the camera is seeing.  When the focus looks good, here is an extra step to ensure that the focus is as good as possible.
  2. Temporarily make a few markings on the outside of the lens; I attached five small pieces of white tape.  Adjust the lens to each mark, one at a time, and capture a photograph.
  3. Study the resulting photos at high magnification and pick the sharpest photo.  Adjust the lens to the corresponding lens mark.
    Repeat the procedure on a finer scale.  I captured three photos, one on center, one slightly to the left, and one slightly to the right.

You do need a dab of glue or thread-lock to prevent the lens from turning inadvertently.  You might put this on the threads before inserting the new lens.  I was afraid that this might inhibit lens adjustment, so I adjusted the lens first, then unscrewed the lens, added a dab of glue to the threads, and re-inserted the lens. The trick to this is to count the number of revolutions when unscrewing the lens, so that you can easily get back to the point of sharp focus.  Personally, I counted 13.5 turns of the lens.  (In retrospect, the glue I used did not set quickly and I could have applied it before first inserting the lens.)

Finally, note that the new lens sticks out a bit further from the Hero camera body, compared to the original lens.  It’s probably not going to fit in the waterproof housing.  The Vision Dimension kit includes a spacer ring that you put between the Hero and the housing.  The RageCams web site advises that you remove the foam cushion from the rear door of the housing.

In the end, I am disappointed with the image quality from the Hero3+.  While I believe this is largely due to the camera, I have not as yet proven/disproven the claim that this lens is good enough for 10 megapixels.


New DSLR designed for Wildlife Photography

TheDigitalPicture.com breaks news of a top-of-the-line DSLR for wildlife photographers.
Reading some of the features, I arrived at … Birds in-flight focusing mode!?  Wow!  Animal Eye Tracking!?  Amazing.  A built-in sound generator to produce animal calls.  Incredible … maybe literally, not credible.

But of course, today is April Fools day.  Well played, Sean and Bryan.


Announcement: New Canon DSLR for wildlife photography


Epson Printer

A year ago, I almost bought an Epson 3880.  Last week, I did buy an Epson printer, but opted for the 3000 instead of the 3880. Here is are a few reasons:

(1) the 3880 will print 17×22 paper, which is one size larger than the 3000
(2) the 3000 will feed both sheet paper and rolls
(3) the 3000 has built-in wi-fi
(4) the 3000 costs $300 less than the 3880 (after mail-in rebate)
(5) both the 3000 and 3880 use medium-size ink cartridges
specifically, 80ml volume  (compared to 59ml for the R2000)

Between the years 2000 – 2010, Epson has been the standard bearer among semi-pro inkjet printers.  Canon has since taken some of that market share from Epson.  The Canon Pixma Pro-10 competes directly with the Epson 3000 and is comparably priced.  The Canon may print a bit faster and includes 50 sheets of paper with the printer (worth $45).

Epson also offers larger printers (for 17″ wide and 24″ wide paper); Canon does not.

The real cost of a printer is not the printer itself, but the cost printing.  The per-sheet cost is primarily a combination of paper and ink.  For more info regarding per-sheet cost:
http://www.redrivercatalog.com/cost-of-inkjet-printing.html
(The cost of paper can vary widely as there are many choices today for paper.)

UPDATE:
One week after selecting/buying this printer, I stumbled upon this recent review of the R3000:
http://thewirecutter.com/reviews/best-photo-inkjet-printer/


Photograph Amusement Park Rides at Night

Bright colors.  That’s pretty much what it’s all about when photographing amusement park rides.  Daytime photographs pale in comparison to night photographs of the rides.

Long exposure of midway rides (at Washington County Fair)

This photo here is from the Washington County Fair (Rhode Island).  Although there was a fabulous pink sunset, I did not see it in time, so missed that photo opportunity.  In this photo here, there is just a hint of the pink color in the bottom left background.

The best time is dusk.  Just after the sun sets, there is still some light in the sky, but it’s darker than the lights, resulting in some contrast.

OK, so … it’s dark.  Can your camera make a photograph?  Sure.  But you may need a long exposure, longer than 1/30 second.  This shutter speed for this photo here is 1.3 seconds.

A slow shutter speed implies the camera could move slightly during the exposure and mess up the photo.  So you need to stabilize the camera.  Tripod is the right solution to this problem, but in this example here I had a monopod (just one leg).  With the camera on the monopod, I braced it against something solid.  A telephone pole will do; in my case, it was an above-ground pool, on display near the midway.

The last ingredient in this photo is, of course, the zoom effect.  With the camera set to 2-second delayed shutter.  I pressed the shutter button and poised my hand on the zoom ring of the lens.  When the shutter clicked open, I rotated the zoom ring.