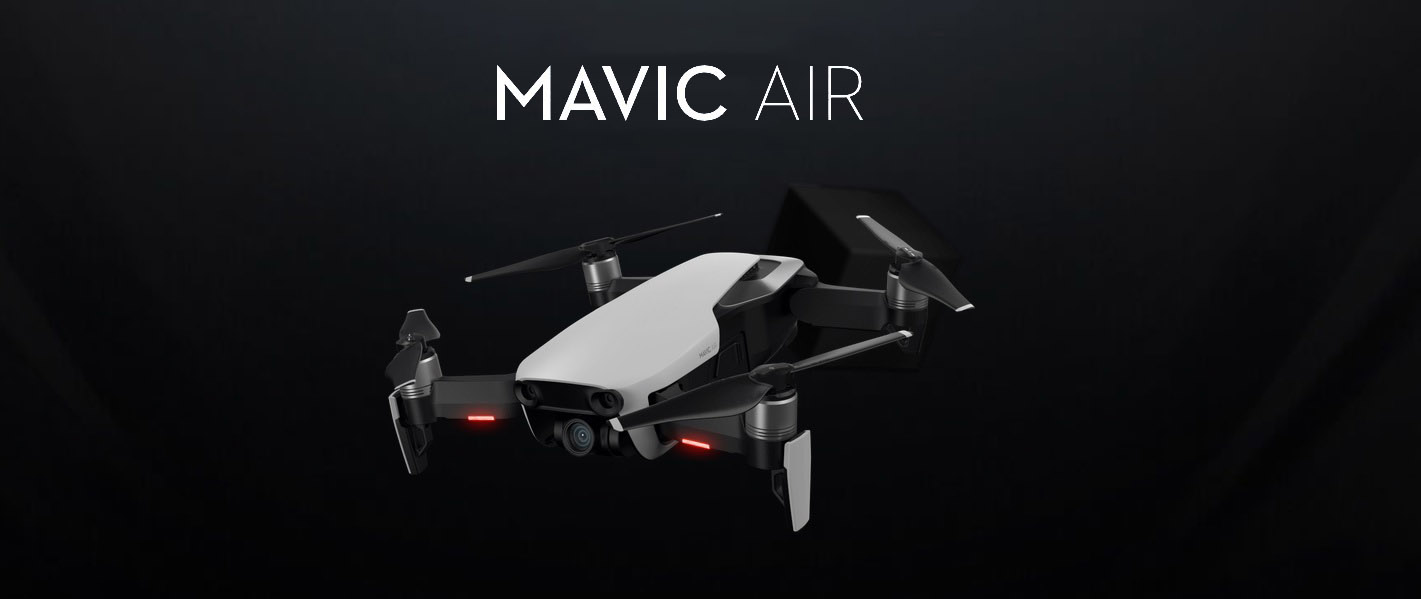
January 23, 2018 – DJI officially announced the new Mavic Air, which again raises the bar for ease of use and safety for aerial drones. Having watched the announcement live this morning, here are the essential details I have noted (somewhat filtered according to what I find most interesting). So, for those interested in aerial drones or aerial photo/video with drones, here is what you need to know in 60 seconds.
Physical
Half the size of Mavic Pro and 41% lighter
Antennas concealed within the landing legs (away from the body)
8GB internal storage + SD card slot
USB type C port
Controller is pocketable, removable control sticks
Available in black, white, or red
Camera
1/2.3″ image sensor (same size as Mavic Pro and Phantom 3 Pro)
4K video
12MP still photos
HDR capture mode
360-degree panorama, auto stitching up to 25 images
New 3-axis gimbal, improved vibration dampening, better image stabilization
Flight control
Intelligent flight modes, including improved auto-tracking moving subject and two new quick-shot modes
Controllable with hand gestures (up to 19 feet)
Advanced pilot assist can automatically go around obstacles
More stable, can withstand wind speeds up to 22 mph
Fly Safe geo system – information about airspace restrictions
Pricing
$799 complete
$999 with accessories (extra battery, extra propellers, carrying case, etc)
Availability
Shipping Jan.29, 2018.
(I am guessing that demand will be high for this product and it will take some time for DJI to fulfill all the orders.)
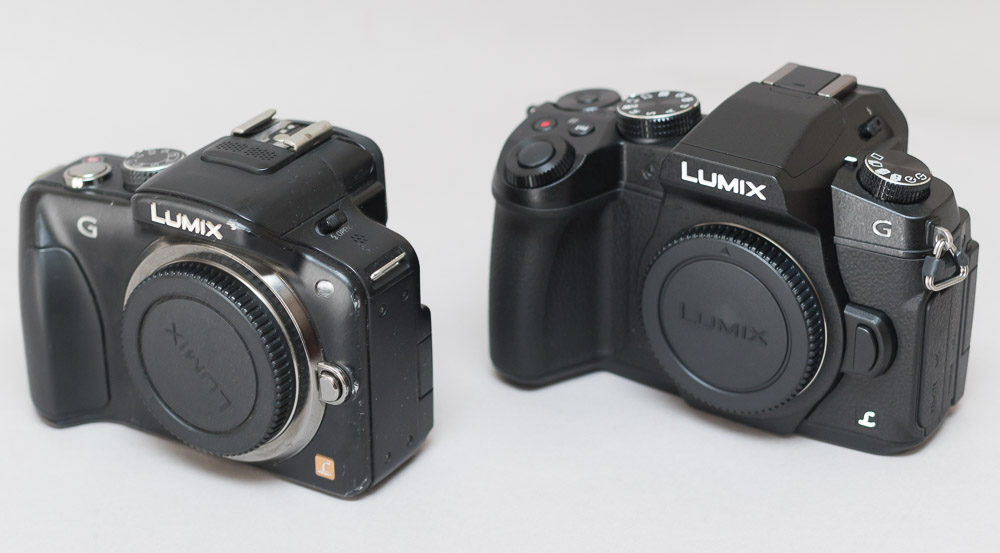
Panasonic has long maintained two similar MFT camera lines, DMC-G series and DMC-GH series. In general, the G series has been intended as mid-level cameras while the GH series has been a bit more high-end, but the differences have not always been obvious. All of the G and GH series cameras are system cameras with interchangeable lenses and hot shoe for external flash.
While I do own and use DSLR cameras, I have used Panasonic Lumix cameras as smaller alternatives. My typical day kit (less gear than a multi-day kit) includes a camera body, two lenses, and minor accessories. My Lumix G series kit is half the size of my DSLR kit.
While camera features improve with each generation, the MFT image sensors in the Lumix cameras seems to not change very much. The resolution has remained 16 MP up until the new G9, which introduces 20MP in the same FT/MFT format. In low-light, the RAW image noise is less than excellent but isn’t bad. Comparing the G3 to the G85, I see a small improvement in the newer camera, but it is small. It effectively gives me one more stop; the G85 noise at ISO 3200 is comparable to the G3 at 1600.
Features
After considerable study, here are the notable feature changes (notable in my opinion) starting with the G3 and moving to the very latest G9 (which I believe will ship later this month).
The G5 camera layout and handling is essentially the same as the G3
9 fps vs 6 fps
“Live MOS” image sensor has technical speed improvements, but same resolution.
Video recording supports MP4
Higher resolution in both the LCD display and the EVF
Eye-sensor below the EVF
Larger handgrip
The G7 layout and handling is significantly updated (compared to the G5)
4K video recording
OLED touch screen
4K photo mode
Wi-fi
The G85 camera layout and handling is essentially the same as the G7. Here are the important feature enhancements in the G85.
In-body image stabilization (sensor-shift type)
9 fps vs 6 fps
49 focus pts vs 27
Higher resolution in both the LCD display and the viewfinder display
The G9 camera layout and handling is new and includes an monochrome LCD info screen on top of the camera. This is a breakout camera that exceeds the G series moniker.
20mp MFT sensor
20 fps
225 autofocus points
Much larger viewfinder (EFV)
UHD/4K video up to 60 fps
6K photo mode
80MP image achieved by shifting the sensor 1/2 pixel and then combining the two images together.
Optional battery grip (for better handling in vertical orientation)
USB 3.0
Both Wi-fi and Bluetooth
More than 5 ounces heavier than the G85; a bit smaller and lighter than GH5
If you are a photographer or videographer and you are interested in the Mavic Pro drone primarily as a flying camera, then this article is for you. This is a run-down of camera controls and options, without discussing flight controls.
Documentation included with the Mavic Pro is minimal and help for the DJI Go app is non-existent.
First of all, let’s point out the obvious. The Mavic Pro has unmatched portability; it folds to a size that can fit in a large coat pocket. The gimbal that stabilizes the camera is probably the smallest in the world.
This drone can be flown using using the hand-held controller alone, or in conjunction wtih a smart-phone and the DJI Go app. You do need the Go app for access to numerous configurable options, but after configuring what you need, it is possible to fly with just the controller and no app. During flight, the Go app gives you a live video feed and camera exposure information, but you may not need to interact with the app except maybe to set the focus.
Not all available features shown here. These are just some features I wish to point out.
The Remote Controller
The hand-held controller includes quite a few camera controls, independent of any smartphone app.
Photo trigger (shutter button)
Start/stop video recording
Camera tilt
Exposure compensation
Custom button left (e.g. center focus)
Custom button right (e.g. AE lock)
5D button – up, down, left, right each has a different meaning that is configurable.
(For example, zoom in/out. It is a 2x digital zoom; there is no optical zoom.)
DJI GO app
The app shows real-time video and provides in-flight camera exposure information.
Real-time image view
Exposure histogram
Current exposure compensation setting (1/3 ev increments)
Over-exposure zebra stripes during video recording
Camera: ISO, shutter speed, white balance, remaining SD card number of photos
Video: resolution, FPS, remaining SD card recording time
The app provides extensive camera configuration options.
The app alerts you if a firmware update is available. The update can be applied with a simple touch; the download comes via your wi-fi, through the phone, down to the drone. The time to complete the upgrade was more than ten minutes and consumed about 18% of the drone battery charge.
Photo Quality
For photos, you can shoot RAW, JPEG, or RAW+JPEG. Of course, I recommend either RAW or RAW+JPEG.
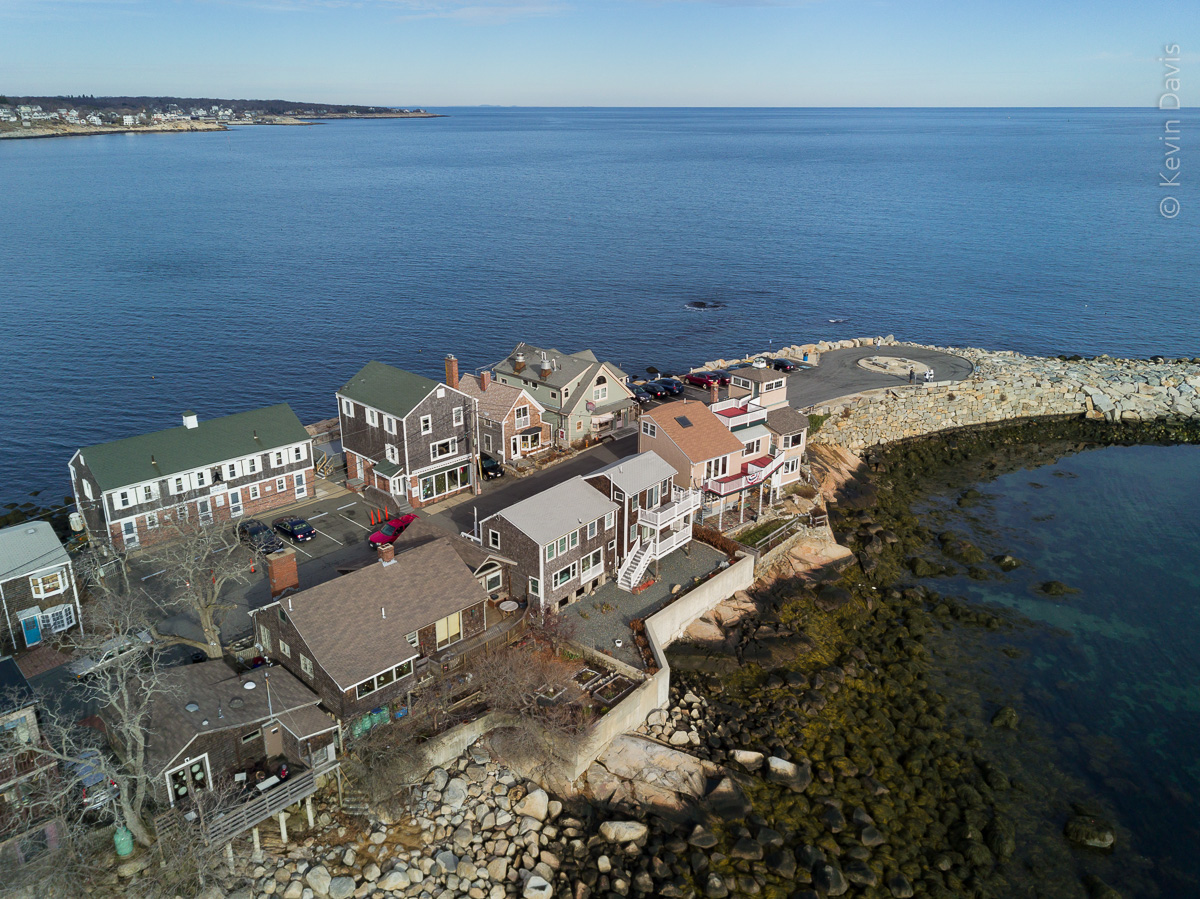
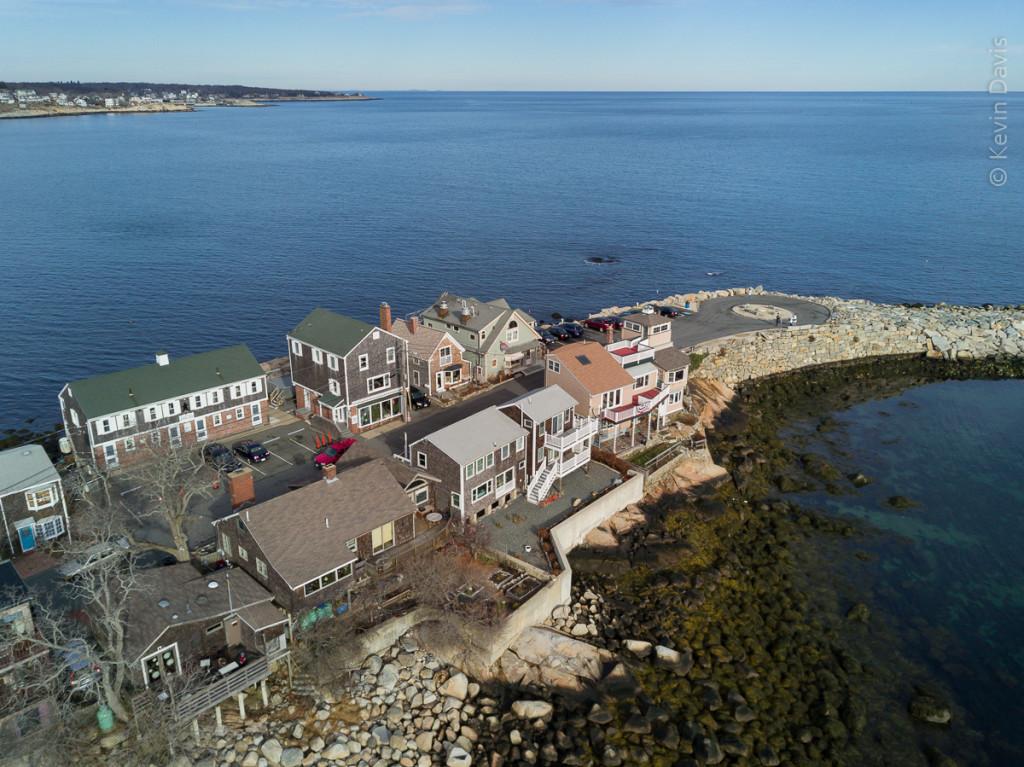
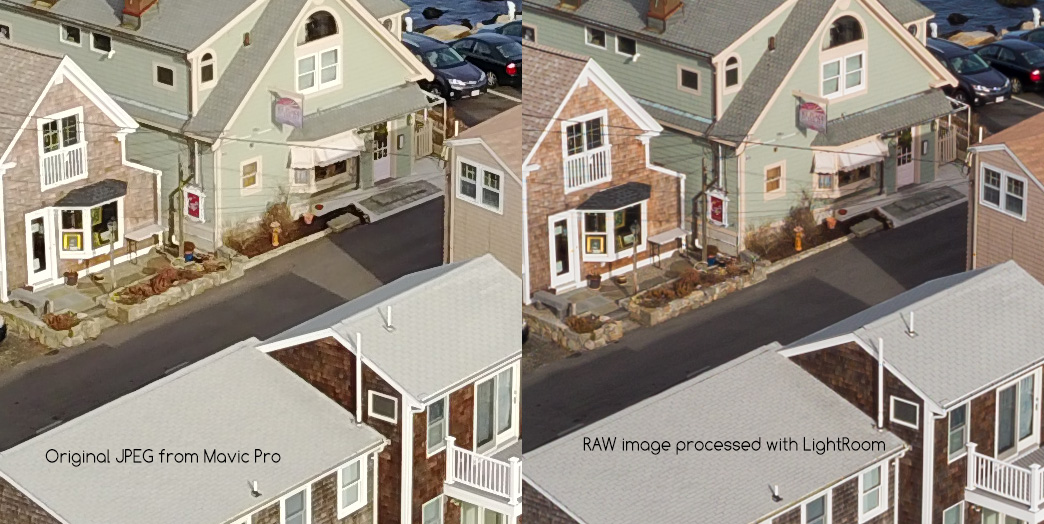
I shot the photo above (Bearskin Neck, Rockport MA) recently with the Mavic Pro set to record both JPEG and RAW. The second photo is a 200% crop from the center, comparing the original JPEG to the RAW file processed as I normally would in Adobe Lightroom. Overall, the JPEG is good. I think it is a bit green, looking at the short stone wall. Signs on the buildings are not legible in either case, but the JPEG is slightly worse than RAW.
With only a half dozen flights thus far, I have observed a couple specific image quality problems. For still photos, the very small image sensor is no match for a larger DSLR or MFT camera. I have read that the image sensor is Sony Exmore (wikipedia.org/wiki/Exmor), but I cannot confirm that. The maximum resolution is a respectable 12 megapixels, in 4×3 aspect ratio (4000×3000). You can choose to capture 16×9 ratio, but that is a crop down to 9 megapixels (I personally tested that just now; that’s real, not a guess.).
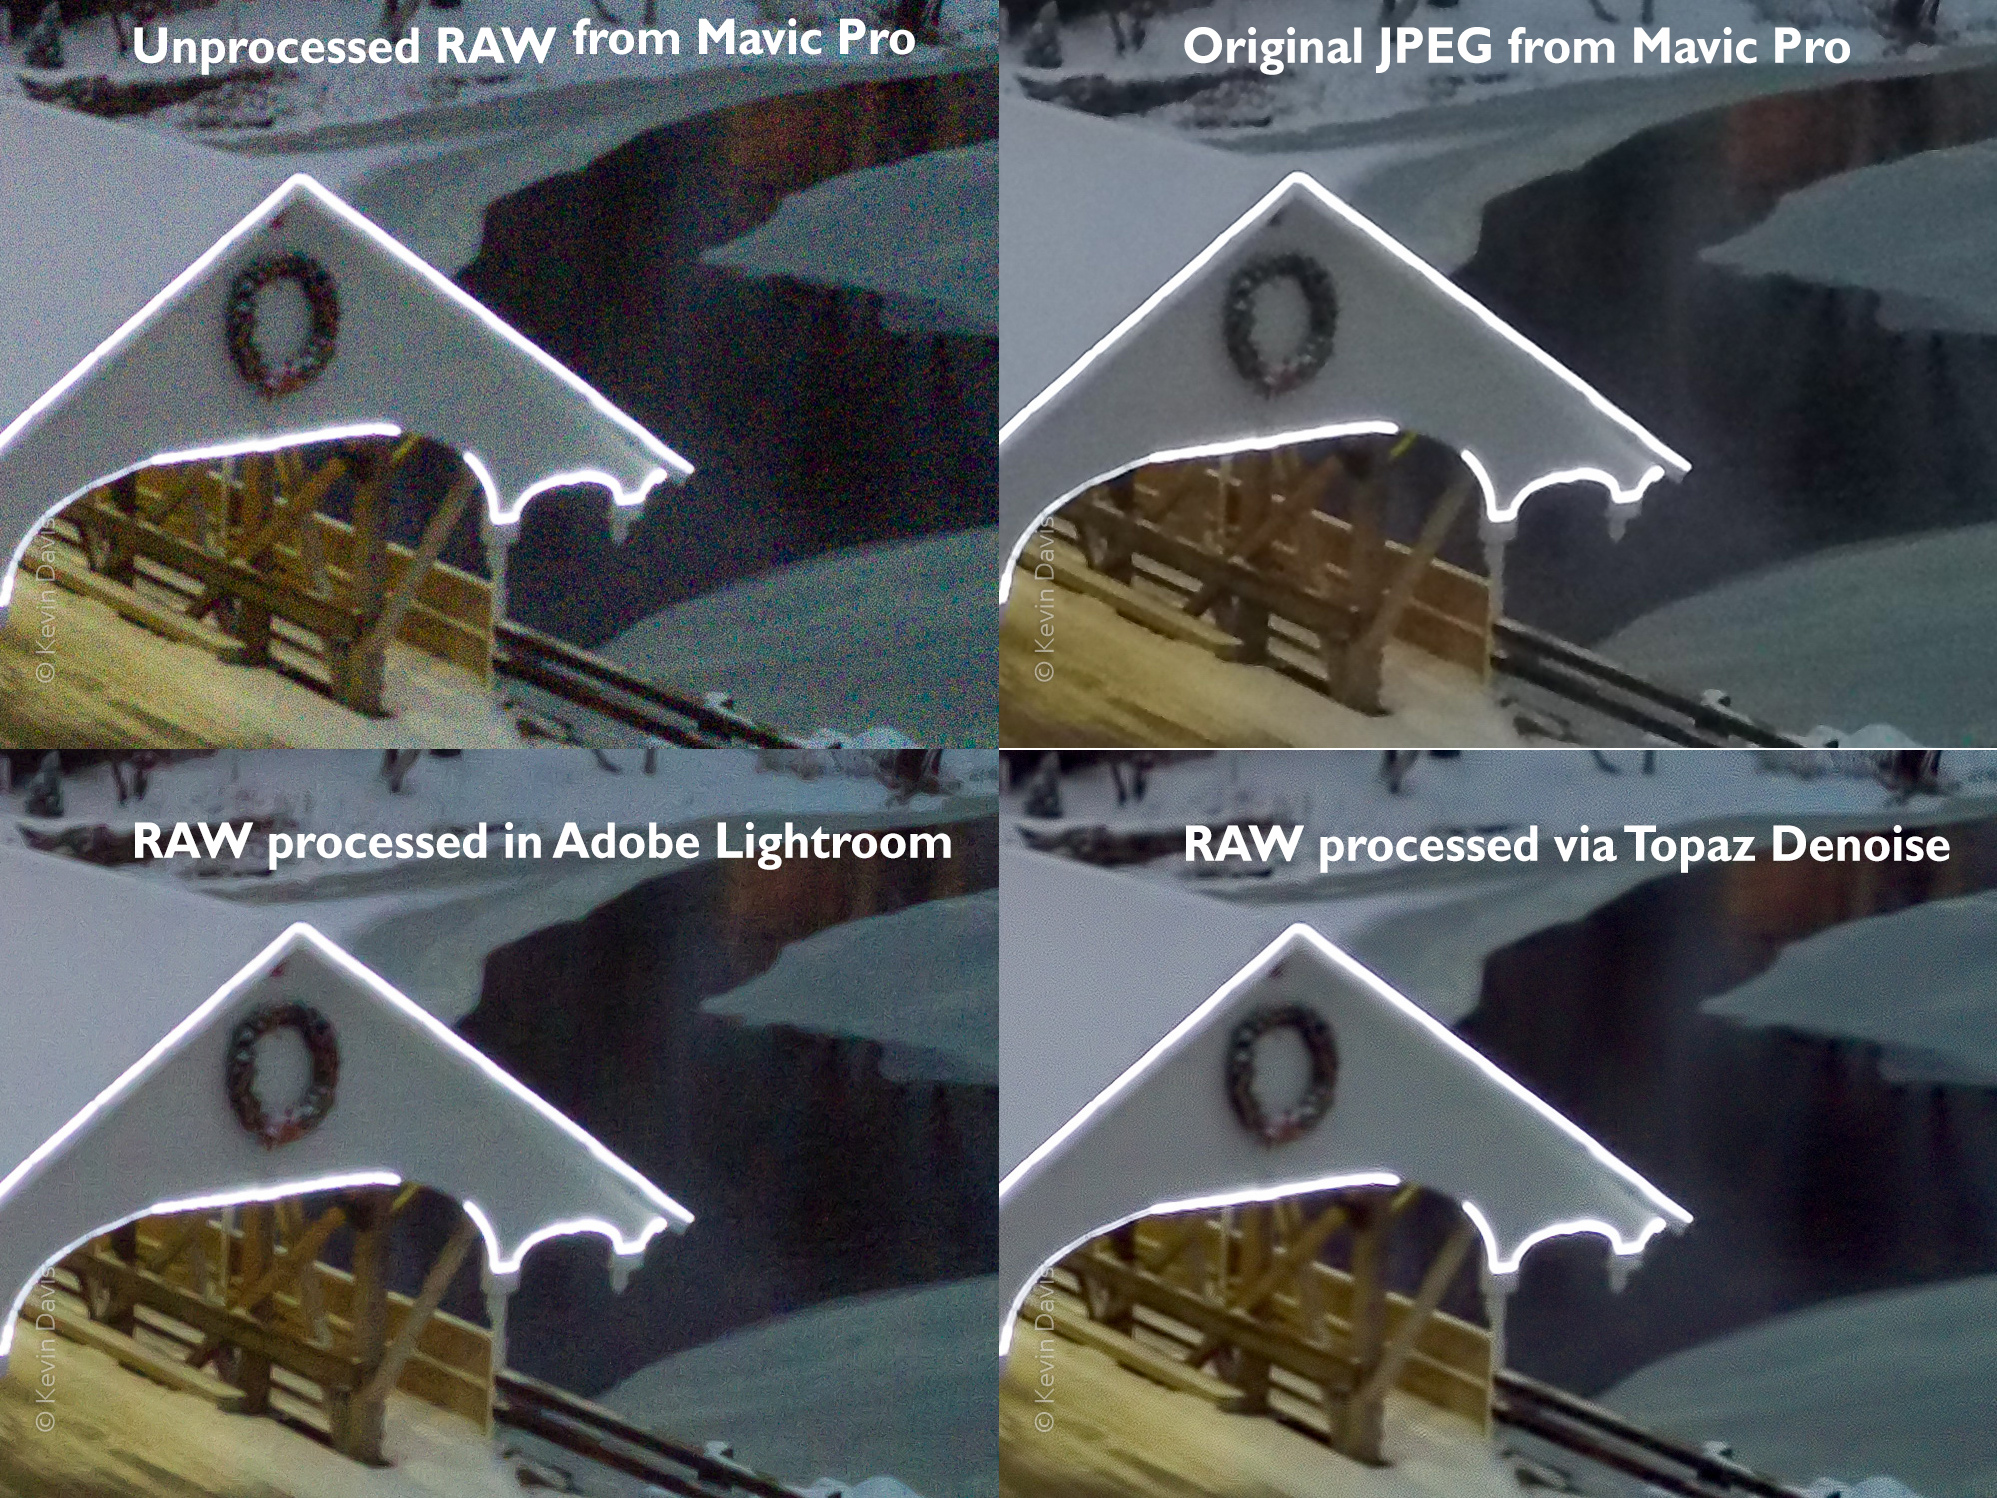
Photos can exhibit some amount of digital image noise at just about any ISO. Images shot during the low-light of dusk, around ISO 1600, exhibit a high amount of chroma noise. Samples are shown here below. For stills, Adobe Lightroom has the best noise reduction I know. While the JPEG processing in the Mavic does a reasonably good job of smoothing large areas, there is loss of detail inside the bridge. The Topaz Denoise plugin for Adobe is similar. Processing via Lighroom’s built-in noise reduction allows better control and retains better detail inside the bridge.
Video Quality
In good light, the video quality is probably on par with a GoPro Hero 3 or 4. Moire problems may occur when scenery includes detailed patterns, but I have not tested this with different capture resolutions. As with still photos, low light and high ISO exhibits a high amount of chroma noise. A product called Neat Video can do a good job of mitigating noise.
The video clip of the snowy mill (at the beginning of this article) was captured at 1080 without a problem. However, on a separate shoot, I did see a problem. Several people contributing to on-line forums have reported that 1080 does have problems, including a “pastel effect” which seems an apt description of the problem I saw. People experiencing problems at 1080 also report that the problem does not occur at higher 2.7K or 4K resolution. I have switched to shooting 2.7K and subsequently downsample to 1080 in post processing. However, the higher resolution does not support a frame rate faster than 30 fps; and downsampling does require additional compute time.
For video, I’ve been shooting the “None” color profile, modified with sharpness set to -1. Some pros are recommending two of the color profiles, DLOG (very flat) and ART (not as flat). Alternatively, some people have suggested color profile D-Cinelike and then customized to -2, -1, -1 (sharpness, contrast, saturation). All those suggestions create an intentionally flat result that necessitates some post-processing.
A clear plastic dome can optionally be used to protect the camera. Very first time I captured video with the Mavic Pro, I could see glare due to the plastic dome. Since then, I never fly with the dome attached. Potentially, I might use it if there some risk of water or dust in the air, for example, flying near a waterfall.
Pre-flight
Each time you fly, here’s the basic pre-flight steps:
1) Unfold the propeller arms and propellers
(Obviously, attach any propellers that you detached for transport/storage.)
2) Remove the camera gimbal clip
3) Optionally, connect your smart-phone to the hand-held controller
4) Turn on the controller and start the DJI Go app
5) Turn the antennae upwards, which is typically a 45-degree angle
6) Turn on the drone
7) To connect your phone with the drone, touch the “Camera” button on the DJI Go app
8) Check the aircraft status information, including available battery charge
9) If this is a different location than previous flight, calibrate the compass
10) Obviously, check your environment for obstacles or hazzards.
Make sure you are not in restricted airspace.
DJI includes a plastic clip to secure the camera gimbal when not in use. Always remove this clip BEFORE turning on the drone. If you fail to do so, the app warns of gimbal overload.
Initially, the Go app will display the “Aircraft Status”. Tap the “X” to close this display.
The DVD-R standard (pronounced: DVD dash R) pre-dates DVD+R (pronounced: DVD plus R). Today, most DVD players can read both. A DVD burner may be specific to one or the other. Use discs that are compatible with your burner.
DVD+R has a few technical advantages; notably, DVD+R supports both single layer discs and dual layer discs.
DVD-R discs are typically the least expensive.
What about DVD-RW, DVD+RW, and DVD-RAM ?
Rewritable discs (RW) can be erased and re-written. These discs contain a phase-change metal alloy. R formats utilize an organic dye (non metalic); once it has been written, it cannot be erased.
RW discs typically take more time to write/burn. DVD-RW or DVD+RW discs are commonly rated either 2x or 4x speed, while DVD-R discs are commonly 16x.
DVD-RAM discs are relatively uncommon or obsolete. DVD-RAM is typically not compatible with the DVD player attached to your television.
What is 2x, 4x, 8x, etc. ?
This indicates the speed at which the disc can be written.
Time to write an entire single-layer disc
2x = 30 min
4× = 15 min
8× = 8 min
16× = 5.75 min
What is dual layer ?
Dual layer discs have an embedded second layer, so have twice the storage capacity of single-layer. Some DVD burners can write both single-layer discs and dual-layer discs. A standard DVD player attached to your television likely does support dual-layer, unless it is a particularly old machine. Many Hollywood movie DVDs are actually on dual-layer discs.
Which should I use for compatibility with most DVD players ?
Most DVD players can read any R or RW disc. The following list begins with the highest compatibility.
(1) DVD-R should be compatible with 95% of all DVD players.
(2) DVD+R should be compatible with 85% of all DVD players.
(3) DVD+RW
(4) DVD-RW
Once again, DVD-R is typically the least expensive.
What about Blu-Ray ?
While Blu-Ray discs are the same physical size (as DVDs), Blu-Ray is higher density (more storage capacity), and capable of much higher data rates. For HD 720p or HD 1080 video, you need Blu-Ray.
DVD players cannot play Blu-Ray discs. Many Blu-Ray disc players can play both Blu-Ray and DVDs, but this is not universally true.
Which disc should I use to save computer files ?
For use on a single computer, you can use any disc that it can write. For sharing with other computers, single-sided single layer discs are the most compatible.
4.7GB – single sided, single layer DVD
9.4GB – double sided, single layer DVD
8.5GB – single sided, dual layer DVD
17.1GB – double sided, dual layer DVD
25GB – single layer Blu-Ray disc (BD)
50GB – dual layer Blu-Ray disc (BD)
I want a custom image on the top of the disc; How do I do that ?
There are three methods.
Inkjet printable disc label
Adhesive disc labels are generally frowned upon. Adding a label can cause problems for some DVD players. If you do apply a label, always use a donut-style round label and be very careful to insure the label is centered on the disc. An off-center label can cause a disc to wobble at high speed.
Inkjet printable disc
Most printable discs are plain white on the top surface. Some inkjet printers include the ability to print on discs. Alternatively, specialized disc printers are capable of printing many copies very quickly.
If the blank printable area extends almost to the center of the disc, this is referred to as “hub printable”. On a regular printable disk (not hub printable), the printable area stops about 3/4-inch from the center hole.
LightScribe disc
A LightScribe disc includes a reactive dye (in the top surface) that allows imprinting using a LiteScribe-capable DVD burner. In my experience, the print always fades, even to the point of disappearing.
Lightscribe has apparently been discontinued; both discs and burners are increasingly difficult to find.
When saving video for a disc, what video bitrate should I use ?
The ability of a DVD player to sustain playback at a given bitrate is highly variable from across different models.
You can choose variable bitrate (VBR) or constant bitrate (CBR). If you use VBR, then the average bitrate should be comparable to CBR. Here are very vague guidelines.
Many digital photography cameras have included the ability to record high-definition video, beginning with the Nikon D90 in 2008. The Canon 5D mk II (2009) was the first DSLR to be widely employed in film and television. Because video recording is usually accompanied by audio recording, these cameras necessarily include a microphone. But depending upon your own need for high-quality audio, the in-camera microphone can be a poor choice for professional quality.
(For a larger view, click on the photo here.)
Film and television production typically record audio on dedicated audio recording equipment, rather than relying upon the video camera to record audio. The separate video and audio recordings are brought together in post-processing. However, in-camera audio recording is practical for one-person or two-person teams recording video at events or for ENG (electronic news gathering).
Broadly speaking, you have two choices: a “video mic” or a general-purpose microphone with a pre-amp. “Video microphones” include some small amount of amplification such that they connect directly to your camera, for example a DSLR, with no additional equipment required. This is a simple compact solution. Video mics are available from Rode, Sennheiser, and Sure.
Alternatively, if you employ an audio pre-amp, then you can use any microphones you want and can use different microphones in different situations. However, this adds another piece of equipment, making the total solution more bulky.
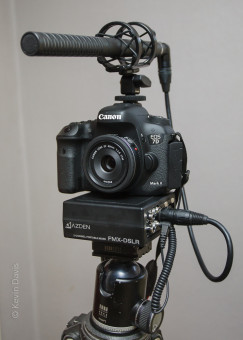
The photo here shows a general-purpose shotgun microphone, connected to a mixer/pre-amp, connected to a DSLR camera (Rode NTG2, Azden FMX-DSLR, Canon 7D mk II). The shotgun is mounted in a shock-absorbing mount that isolates the microphone from any camera noises, including operation of controls, auto-focus motor, or accidental knocking around.
Comparing this setup to the built-in camera microphone, there are four big differences. The external is directional, rejecting off-axis sounds, whereas the camera built-in mic is unidirectional, picking up sounds even from behind the camera operator. The external mic is cleaner, producing less unwanted background noise. And the external mic generally does not record camera noises, because it is mechanically isolated away from the camera. Lastly, as you can see in the photo, this is far more bulk than just the camera alone.
Power for the NTG-2 can be provided either by the FMX preamp or by an optional AA battery within the NTG-2. I have tested both setups and find no difference in audio quality. Either way is far better than the camera’s built-in microphone, particularly in situations where the audio source is quiet and requires significant gain.
You may be able to connect an external microphone directly into your camera without use of a pre-amp. Not all microphones require a pre-amp, but it is typically required for condenser microphones. Although I had partial success with this technique on a different camera, the combination of NTG-2 with Canon 7D mk II requires a pre-amp. In this specific case, I configure the camera internal gain setting to 25% and then use the adjustment knobs on the FMX. Alternatively, you can enable camera automatic gain; in this case, be sure to inform the pre-amp using the switch for this purpose.
Here is a short list of some popular audio pre-amps: Azden FMX-DSLR, Beachtek DXA, JuicedLink RM222, JuicedLink RA333, Sound Devices MixPre D.
Let’s clear the air. Is the DSLR dead? And what exactly is a DSLR anyway?
Ten years ago, most people assumed that DSLR meant “really good camera”. (Some folks still believe this.) Over the past three years, numerous commentators have pronounced that mirrorless cameras have killed the DSLR. Both these sentiments are a mix of truth and falsehood.
First of all, DSLR means Digital + SLR. It is the digital successor to SLR film cameras. If we all agree that we’re talking about digital cameras, then the “D” is superfluous.
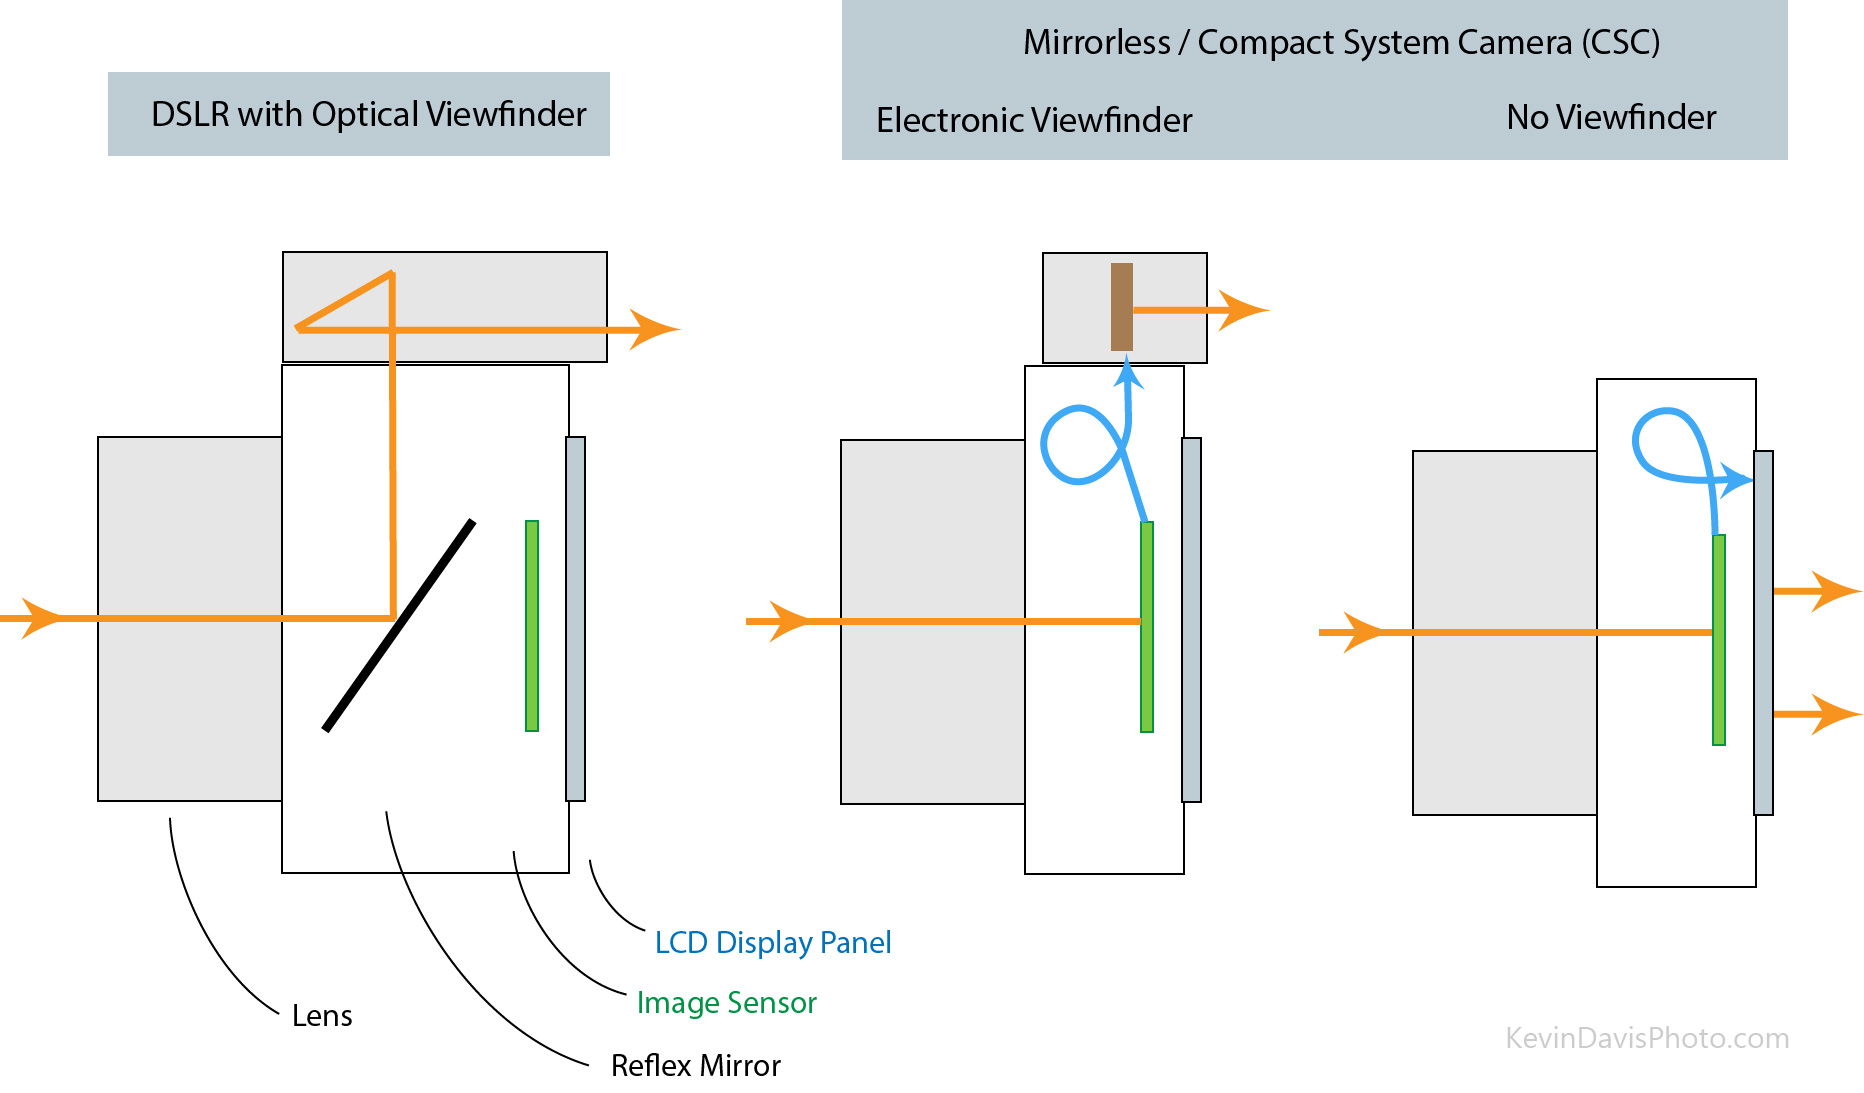
SLR (DSLR) = single lens + reflex mirror.
These cameras have two distinguishing characteristics. “SL” means single lens. “R” means reflex mirror. An SLR allows the photographer to optically see through the exact same lens that the camera uses to capture images; it does this using a mirror to redirect the light. In general, the mirror must be moved out of the light path when capturing an image; that’s why it is called reflex. (There are some exceptions; E.g. Canon EOS RT, circa.1990.)
System camera = camera with interchangeable components.
The most common system feature is choice of interchangeable lenses. Second most common system feature is a “hot shoe” for external strobes and other accessories. While interchangeable lenses implies “system”, the reverse is not entirely true; some camera systems do not include interchangeable lenses. Some camera systems offer lens accessories to make the built-in lens more telephoto or more wide-angle; for example: Olympus C5060 (2003), Fuji X100 (2015).
Compact system camera.
A system camera that is smaller than a typical DSLR. As mirrorless cameras are commonly half the size of a typical DSLR, mirrorless + system camera is often referred to as a Compact System Camera.
Mirrorless camera.
Mirrorless cameras eliminate the mirror found in SLR designs. There are two practical implications: the camera is smaller than comparable SLR and it lacks an optical viewfinder.
The term mirrorless camera generally implies a digital camera; however, I must point out that many older film-based cameras do not have a reflex mirror. View camera, twin lens, and rangefinder are all examples of mirrorless camera designs.
Eye-level viewfinder.
To see through the camera, you place the camera near your eye. There are three types of eye-level viewfinder. (1) Optical viewfinder, typical of a DSLR / SLR; (2) rangefinder (or possibly a twin-lens camera) which employs a second lens, separate from the lens used by the camera to capture the image; (3) electronic viewfinder which displays the image using a tiny digital display within the viewfinder. The first two are “optical” and require no electrical power, while an electronic viewfinder relies upon electronics.
Alternatively, a large display panel can substitute for an eye-level viewfinder. For example, a camera phone does not include an eye-level finder. But if you’ve ever struggled to use such a camera in bright sunlight, you may appreciate that an eye-level viewfinder can have advantages. Additionally, optical viewfinders do not eat your battery as digital display panels do.
Electronic viewfinder implies mirrorless. Typically, the combination of EV+IL implies a mirrorless camera system, which in turn implies compact system camera. However, as mentioned previously, a system camera may not have interchangable lenses. The term EVIL is more specific.
TTL = Through The Lens
This refers to an electronic exposure meter built in to the camera. A TTL meter measures the light coming through the lens used to capture the image. TTL is common for many different types of cameras, including SLR and mirrorless.
Let me give you one specific example where TTL is important. If you place a dark polarizing filter on the lens, the light entering the lens is diminished. TTL metering is immediately and precisely aware of this. If the meter is not measuring the light through the lens, then you have to manually adjust the camera controls to compensate.
Is the SLR “dead” ?
No, not yet.
As we said earlier, some people have equated SLR with “really good camera”. In that respect, the venerable SLR no longer stands alone.
Recognizing the technical meaning of the SLR acronym, mirrorless designs eliminate mechanical moving parts inside the camera. That is a compelling feature. And mirrorless designs tend to be much smaller, which is also compelling in many circumstances. However, the concept of an optical viewfinder + single lens … is still amazing, stunning, cool, and practical.
Honestly, I choose and use both SLR camera systems and mirrorless camera systems. They each have strengths and weaknesses. Did you know that “compact” isn’t always a good thing? But that is a subject for another day.
We need polarizing filters and I am not going to explain why. Many other photographer-authors have already done that and I see no need to put my own spin on it. But there may be differences between two polarizing filters, either from two different manufacturers, or from the same manufacturer. That is what we’re going to look at here.
Frankly, choosing a polarizing filter from a dozen or more options is a pain. If you have a limited budget, you might select the cheapest filter. If you have used filters before, you will likely stick with a brand that you know and trust.
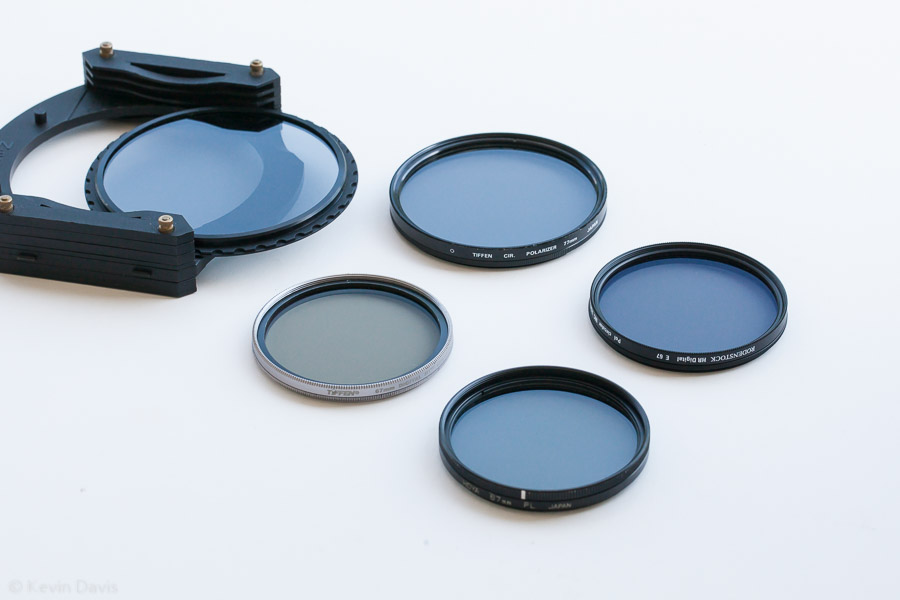
The photo above shows five polarizing filters. All attach to the front of a camera lens; four include a screw thread to attach directly to the lens and one is designed for a filter holder. Most are constructed from a glass element and a metal ring, but the most expensive filter is mostly plastic.
Clockwise from top left: (1) Singh-Ray LB Neutral Circular Polarizer for Z-Pro holder, (2) Tiffen circular polarizer 77mm, (3) Rodenstock Digital HR circular polarizer, (4) Hoya polarizer, (5) Tiffen HT Digital circular polarizer.
In true Sesame Street manner … which one of these does not belong with the others? While Singh-Ray does offer standard screw-in filters, this version shown here is designed specifically for a Cokin Z-Pro filter holder. Filter holders such as this allow the use of rectangular graduated filters. If you need both grad filters and polarization, you have two choices: attach a polarizing filter to the lens and then add the filter holder onto that, or use a special filter that fits directly in the holder. The Sing-Ray LB series (LB = lighter and brighter) isn’t quite as dark as most polarizing filters – you lose less light compared to others. And, while some polarizers have a color tint, the LB Neutral does not. This filter is ridiculously expensive.
Next, consider the silver-ring filter, which is a Tiffen Digital HT circular polarizer (HT = High Transmission). Like the Singh-Ray LB, this filter is not as dark as most polarizers, so you lose less light through the filter. Unlike the Sing-Ray LB Neutral, this filter has a color tint. This filter is low-profile; however, while “low profile” usually implies there is no female thread on the front, this filter does have a front thread.
In the specific case of the Digital HT, the front threading and the rear threading are both shallow, allowing the filter to be thinner. But after eight years of use, the rear thread has worn and this filter sometimes does not stay attached to the lens – that’s a problem. I recently replaced this filter with the Rodenstock HR Digital filter. The color is more neutral compared to the Tiffen Digital HT. However, it is not HT or LB, and I do miss that.
What is a low-profile filter? It is simply thinner than usual, in order to solve a particular problem. The problem with adding filters to the front of a lens is that they can cause vignetting, particularly if you stack multiple filters together. Low-profile filters often omit the female thread on the front, meaning you cannot attach another filter in front of it. The thinnest filters I have seen are from Vu Filters (http://www.vufilters.com). Frankly, unless you are experiencing a vignette problem, I suggest avoiding low-profile filters.
In addition to the Tiffen Digital HT, the photo here shows another Tiffen. This is a basic circular polarizing filter. It is good quality and I have relied upon frequently. However, I am replacing it with a B+W F-Pro circular polarizer (not shown), which I think is a bit better.
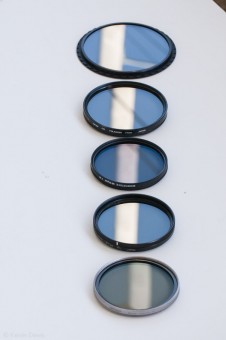
Just as lenses often have optical coatings on the glass, the same can be true for filters. The second photo (below) shows a telephone pole reflected on the filters. You can see that some filters are less reflective than others, which is achieved through coatings applied to the surface of the glass. From the top of the photo, first is the Singh-Ray, followed by the 77mm Tiffen, and then the 67mm Rodenstock Digital HR. See how the Rodenstock is a bit less reflective than the others? It has multiple coatings on the surface of the glass.
(Click on the image below to view it larger size.)
The one polarizing filter that I have not yet mentioned is an old Hoya filter, which is a linear polarizer, not a circular polarizer. Any linear polarizer can interfere with electronic auto-focus. Circular is generally preferable because you can always use a circular polarizer in place of a linear polarizer, but the reverse is not true. None-the-less, I did use this filter quite recently in a situation where I was relying upon manual focus. I have owned this filter for twenty years … since before I owned autofocus lenses.
Once upon a time, photographers needed an array of color-correction filters to compensate for peculiarities in the light. However, with the advent of digital cameras that include a color temperature adjustment, color correction can be done in-camera, largely eliminating the need for such filters. So, today, I carry only three types of filters, polarizing, neutral density, and graduated neutral density. While ND and grad ND are rather specialized devices that many folks do not need, the one filter every outdoor photographer needs is a polarizing filter.
Last October, I listed Drones for Under $2000. A week later, DJI announced a new quadcopter drone, Inspire 1, which was notable, but far above the $2000 price point. This week, DJI announced the third incarnation of it’s original Phantom, which now incorporates some features from Inspire but retains the more affordable price tag of the Phantom line. Here are the broad brush strokes.
Phantom 3
Improved camera system supports video and stills. Phantom 3 “pro” supports 4K video resolution.
3-axis gimbal, similar to Phanom 2 Vision
The new gimbal seems to pan, unlike its predecessor on the Phantom 2 Vision+
Digital video downlink sends live video feed to your mobile device on the ground (up to 720p)
Downward-facing visual and ultrasonic sensors allow position hold without GPS (indoors), like the Inspire 1
Improvements in motors and motor control provide better stability and longer battery life.
Phantom 3 vs Inspire 1
Inspire 1 is larger than Phantom and can fly faster
Inspire 1 allows unobstructed 360 degree camera rotation – retracting landing struts will not obstruct the view.
Inspire 1 supports dual pilot operation.
Phantom is theoretically much more durable than Inspire
Phantom costs far less than Inspire
Phantom provides a slightly longer flight time.
Not to be left behind, 3D Robotics will soon release their new quadcopter, currently known as SOLO.
The photo here shows some of the memory cards I have used in my digital cameras. The oldest is the SD card at center, rated at 20MB/sec. The newest and fastest is at the top (SanDisk, CF card), rated at a maximum speed of 120 MB/sec.
Historically, CF cards have supported faster data transfer (read and write) than SD cards. The reason is simple – a CF card can transfer 16 bits all at once, whereas a SD card can only transfer 4 bits at once. Count the electrical contacts on an SD card – there are 9 pins. Count the pin holes on a CF card – there are 50 pins.
Standard SD cards (SDHC, SDXC) are deemed UHS class I. A recent evolution of the SD card format has introduced SDXC UHS class 3. These cards have 7 additional electrical contacts and allow faster data transfer up to a theoretical limit of 300 MB/sec (equal to the limit for CF cards). These cards should be backward compatible with older cameras that support only the 9-pin UHS-I interface, but you will not see the speed advantage of the faster interface.
For historical reasons, the maximum speed of a memory card may be shown as a multiplier, such as 100x, 266x, etc. The baseline is 150 KB/sec. So 300x means 45 MB/sec (45,000 KB/sec).
Instead of an”x” rating, CF cards will typically be labelled with a simple speed rating in MB/sec. For SD cards, a speed class rating is newer than the old “x” rating . Class 6 means that the card can support at least 6 MB/sec. Class 10 means 10 MB/sec or more.
The speed class rating has been supplanted by the UHS speed class rating (Ultra High Speed). UHS Class 1 means the card will support a write speed of 10 MB/sec or better. UHS Class 3 (a.k.a. U3) means the card will support a write speed of 30 MB/sec or better.
How fast does a memory card need to be?
Writing to the card and reading from the card are really two different considerations. If you’re capturing 1080 HD compressed video, a momentary burst up to 30 MB/s is possible, but the sustained data rate is not that high. You need a Class 10 card. For 4K ultra-HD video recording, you need UHS Class 3. If your card can’t quite keep up, your camera will likely abort recording.
If you are a sports photographer, capturing ten images per second may amount to 300 MB/sec but this speed need not be maintained constantly. If your card cannot keep up, your camera will report “busy” for a second or two, during which new images cannot be captured.
At the end of the day, you need to upload the photos and video to a computer. That’s when you want to have the fastest speed reading from a card.
Card Readers
For years, photographers relied upon Rob Galbraith (http://robgalbraith.com) for his work measuring the read/write speeds of both memory cards and card readers. Then Rob moved to a full-time job and could no longer maintain the database. Recently there has been an update, seen here by PhotoShelter:
Three tables are presented. The first shows data transfer rate when reading from memory cards to a 2013 Mac Pro. The second is the same, but using a 2014 Macbook Pro. The third table regards XQD cards, which are new and relatively uncommon (notably, the Nikon D4 supports XQD cards). Higher number means faster data copy – the numbers are MB/sec.
The fastest card readers for (SD and CF cards) are:
The best speed requires that you connect the card reader to a USB 3.0 port on your computer. USB 2.0 is limited to 50 MB/sec, while USB 3.0 is limited to 145 MB/sec.
“You’re wasting time and not using your expensive gear to its full potential if you haven’t upgraded your cards and readers in the past two years or so.”
(Photoshelter, Allen Murabayashi)
I don’t entirely agree with Mr. Murabayashi. If you haven’t upgraded your cameras, then you probably don’t need to update your cards and readers. My general practice is to always buy new cards when I buy a new camera.
The term “drone” is commonly used in pop media, more common than alternative terminology UAS (unmanned aircraft system) or UAV (unmanned aerial vehicle). To my mind, a drone implies an automated military device – I prefer the term quadcopter.
As far as you or I are concerned, we serve as the remote pilots while standing on terra firma. We operate a radio transmitter while the copter is equipped with a matching radio receiver. Different radio systems are available and they are not all compatible. For example, some communicate via a 2.4 GHz radio frequency, while others utilize a 5.8 GHz. The differences are not limited to radio frequency alone.
Anything that is labeled as Ready-To-Fly (RTF) will include a radio transmitter that is compatible with the drone. If the product is not advertised as RTF, it may not include a transmitter, which is preferable for anyone who intends to re-use an existing transmitter they already have.
3D Robotics Iris+ … $750
3D Robotics RTF X8 … $1,350
Blade 350 QX – $470
DJI Phantom I … $400
DJI Phantom II Vison+ … $1,300
Gaui … 330X … $400
Gaui … 500X … $1,150
Gaui … 540H / hexcopter (6 rotors) … $600 does not include transmitter
Parrot AR drone … $300
Quantum Nova … $320
Quantum Venture … $400
TurboAce Matrix … $900
HUBSAN X4 H107C-HD
SteadiDrone QU4D … $1700
Walkera QR X350 … $400
Walkera QR 800 … $1,700
Walkera TALI h500 / hexcopter (6 rotors) … $1900
For aerial photography purposes, you need a stable device that is easy to control – consider electric copters only. Gas-powered machines are loud, extremely fast, and potentially very dangerous.
The rotational force of a single-rotor will tend to rotate the entire machine; this is why traditional helicopters have a small tail rotor, to counteract the rotational force. Coaxial dual-rotor designs solve the rotational force problem by spinning two rotors in opposite directions, but this reduces the total lifting force. Multi-rotor copters, with four or more independent rotors, solve the rotational problem by spinning half the rotors in a clockwise rotation and the other rotors in counter-clockwise rotation.
I expect (but have not verified) that all of the copters listed above are capable of lifting a small camera. In the cases of some smaller copters, I had doubts and so did not include those in this list.
Please note that most of these copters will rely upon rechargeable LiPo batteries, for which I offer two tips. A single battery might give you eight minutes of flight or twenty minutes of flight – so do have more than one battery. These batteries are relatively high power devices and there have been stories of such batteries causing fire, sometimes during the charging process. Do use protective LiPo storage bags such as LiPo Safe.
The most commonly used camera for these copters is a GoPro 3 or newer (e.g. Go Pro 3, Go Pro 3+, or GoPro 4). Personally, I have used the Hero 3+ Black Edition; while I find that it captures great video, I am not impressed by the still image JPEGs. Listed here are some of the available small “action cameras”, all of which I expect are primarily intended for video.
CamOne Infinity
Contour+2
ContourROAM3
Drift Ghost-S
Garmin VIRB Elite
Gear-Pro HD Sport Action Camera
GoPro HERO3+
GoPro HERO4
Ion Air Pro 3
JVC GC-XA2
Mobius Action Camera Pro
Polaroid XS100i
Polaroid Cube
Replay XD Prime X
Sony AS20
Sony HS100V
The last component for aerial photography is perhaps the first component to select when building a new system. A motorized/computerized gimbal is necessary for aerial video, to remove the unwanted effects of aircraft movement. The gimbal holds the camera, detects aircraft movement, and automatically moves the camera to counteract the aircraft movement. Without one of these devices, your level horizon will be ruined anytime the copter moves left or right. Gimbals are often designed to match the size and weight of specific cameras. So, if you are thinking of using a specific camera, you need to be sure that you can get a gimbal that accommodates that camera.