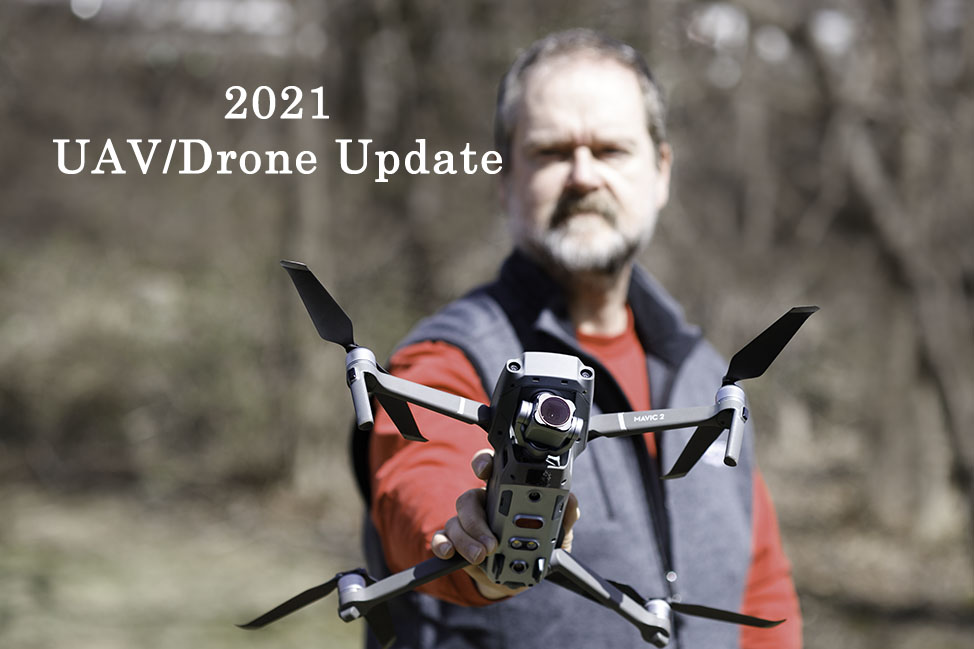
October 2024, while I was awaiting the next generation professional camera drone in the Mavic series, DJI instead released the Air 3S, which is considered a “travel drone” because of its size and excellent portability. The long-anticipated Mavic 4 pro is now expected to be released in April 2025. We know that the Mavic 4 is imminent because DJI submitted the product plan with the FCC. And currently, DJI has offered sale pricing for Mavic 3, which likely indicates DJI wants to reduce inventory of the old Mavic in advance of releasing the new Mavic 4.
Rumored features of DJI Mavic 4 pro
Three cameras (similar to Mavic 3 pro)
100-megapixel camera resolution
Video resolution up to 6K @ 60fps
Built-in ND filters
Obstacle avoidance includes LiDAR
6645 mAh battery
Up to 50-minutes of flight on a single battery
Approximate weight 2.3 lbs (a few ounces more than Mavic 3 pro)
Personally, any aerial drone is a flying camera; I’m always hoping for a better camera. However, I do not currently have a need for 6K video resolution. Beyond that, there are a few features here that would immediately render the Mavic 4 pro as “best in class” aerial camera drone ….
Longer flight time is generally welcomed by everyone. The battery capacity is always an important factor in flight time. Because a larger-capacity battery is commonly a heavier battery, achieving longer flight times is a balancing act and more than a small feat.
Built-in ND filters would be very significant. Today, without this feature, we have to land an aerial drone to physically change the ND filter.
LiDAR is important for obstacle avoidance in low light. I’ve seen one report that LiDAR maybe was planned but subsequently cancelled for Mavic 4; which means nobody knows for certain. The Air 3S is DJI’s first drone to employ LiDAR (for forward-sensing only).
Do not confuse DJI Mavic 4 with DJI Matrice 4. Matrice 4 (released earlier this month) is an enterprise class drone that supports thermal imaging, optional spotlight, and can carry payloads up to 200 g.
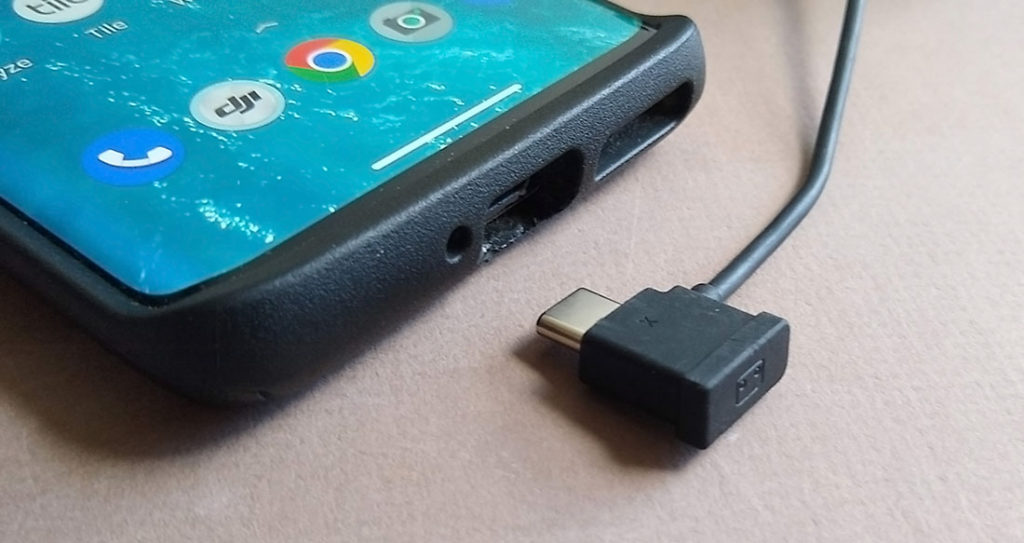
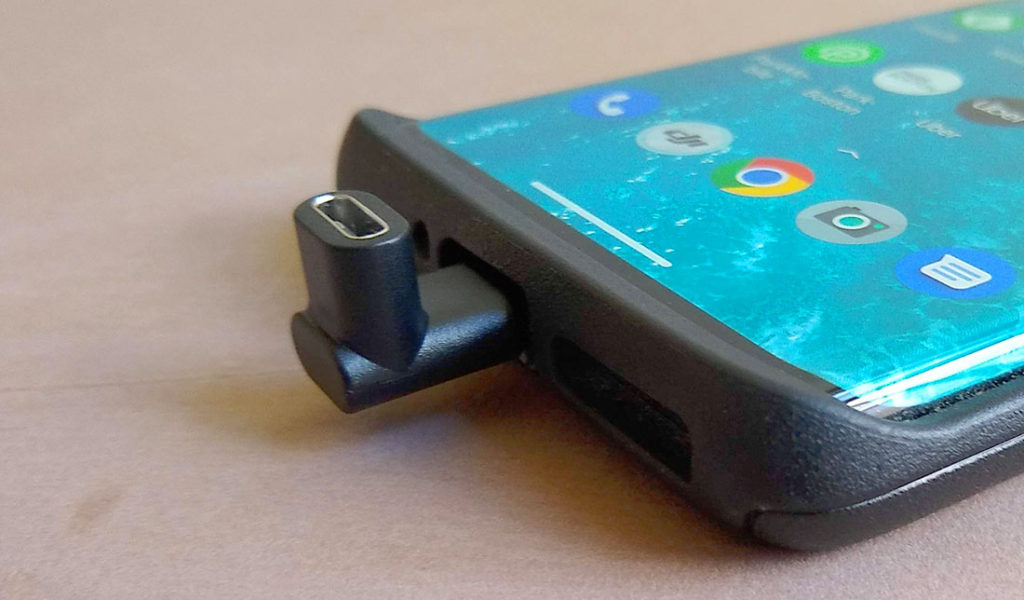
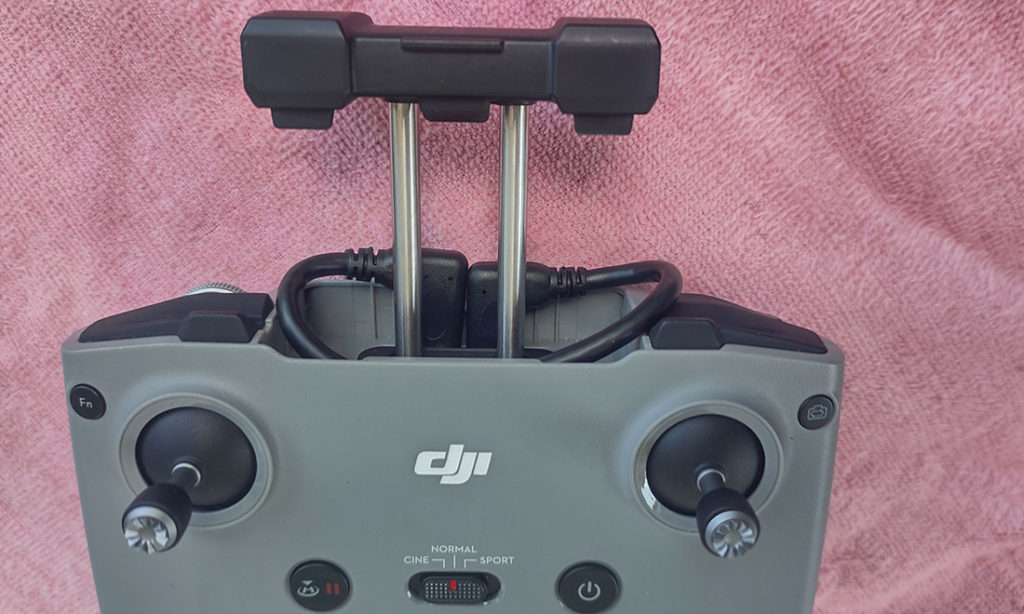
The standard hand-held remote controller for several DJI aerial camera drones is RC-N1. (These drones include DJI Mini 2, Mini 3, Mavic 3, Mavic Air 2 and 2S.) While this controller includes a small USB cable that hides when not in use, the cable commonly cannot be attached to a smartphone if that phone has a protective case. It fits any phone with a USB-C port but not if there is a protective case on the phone.
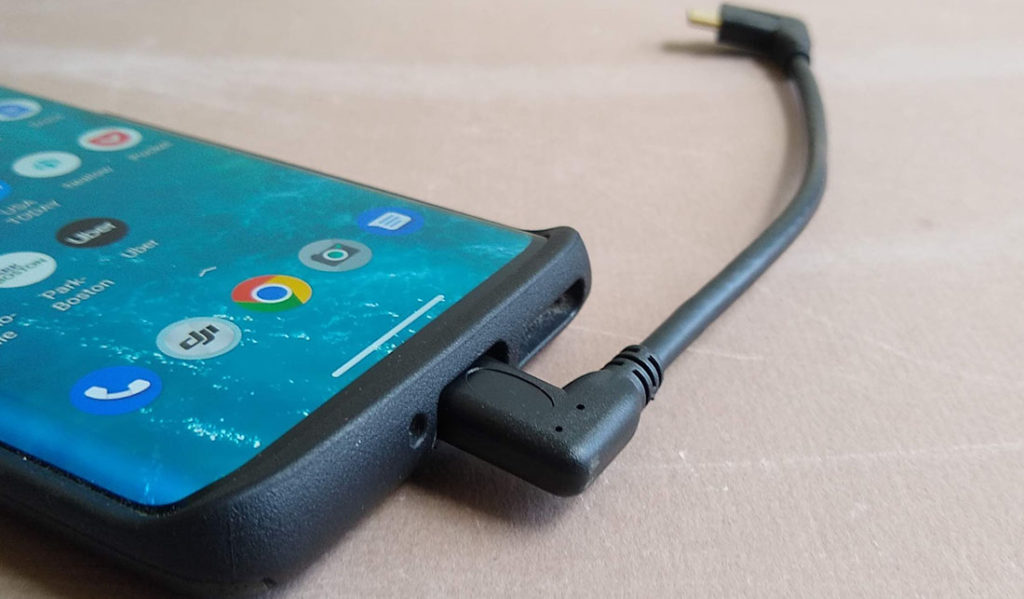
Here are two products that solve that problem. One is an adapter and the other is a replacement cable.
I keep the adapter in my drone carry bag for when I might need it. As it is quick and easy to attach, there is no need to leave it attached at all times.
The replacement cable is a bit thicker and bulkier than the standard DJI cable; it does not store nicely in the folded controller; see the photo here. You can decide for yourself if this is acceptable.
Although the Mavic 3 includes some groundbreaking new features, many reviewers will render their opinions about such things and I will not do so here. I am only analyzing the photo quality from Mavic 3 with comparison to the predecessor Mavic 2 Pro.
Mavic 3 includes two cameras. I am comparing the main camera to the camera of Mavic 2 Pro. The Mavic 3 main camera has a fixed-focal-length lens, 4/3 image sensor, and variable aperture.
The Mavic 3 supports capturing photos in either JPEG format or JPEG & RAW. While I almost always capture photos in RAW format and I do not need a JPEG, the initial release of MAVIC 3 will always save a JPEG. That could possibly change in a future firmware update.
See the end of this post for a link to my 2018 comparison of Mavic 2 Pro image quality, compared to original Mavic Pro.
Testing the Mavic 3 at sunset … f\3.2, ISO 100
The main camera of Mavic 3 uses a 4/3 image sensor; this has implications.
The image rectangle has an aspect ratio of 4:3, which is same as Mavic 2 Zoom but is different than Mavic 2 Pro and Mavic Air. For me personally, this implies that I must crop each image and discard some pixels to obtain a final image of 3:2 aspect ratio.
Four-thirds and Micro Four Thirds (MFT) are established standards. The diagonal measure of a 4/3 sensor can vary but is typically around 22mm. Compare this to Mavic 2 Pro and Mavic Air 2S, which each have image sensors with diagonal measure around 16 mm.
A larger sensor can allow for either more pixels or larger pixels. The Mavic 3 pixel resolution is not significantly different than Mavic 2 Pro. Likely the individual dot elements (pixels) are larger. Potentially that might translate to better ability to gather light, potentially reducing the signal-to-noise ratio. But that is theoretical. As the old saying goes, the proof is in the pudding.
Some online articles suggest that the larger image sensor “gives Mavic 3 higher resolution and dynamic range” but …. higher resolution is a dubious claim and higher dynamic range is theoretical.
DJI drones have historically employed Sony Exmore image sensors; DJI/Hasselblad cameras are no exception. I must guess that the Mavic 3 is using the Sony IMX472-AAJK, but I have not confirmed this. That sensor can capture all 20 megapixels at 120 frames-per-second. Notably, this sensor uses “stacked CMOS” technology and is the first ever stacked CMOS sensor in the 4/3 size. This sensor diagonally measures 21.77 mm.
The Mavic 3 user guide (available online) includes this disturbing note: “Before shooting important photos or videos, shoot a few images to test the camera is operating correctly.” I shudder to imagine what might have happened during initial product testing to warrant such a warning.
Pixel Resolution
If you want a final image to have3:2 aspect ratio, then any 3:4 image must be cropped and that includes Mavic 3. Technically, you end up with fewer pixels than Mavic 2 Pro and Mavic Air 2S.
Mavic Air 2S @ 3:2 aspect ……………… 5472×3648 = 19.9 million pixels Mavic 2 @ 3:2 aspect ……………………… 5464×3640 = 19.88 million pixels Mavic 2 @ 4:3 aspect (crop from 3:2)… 4852×3640 Mavic 2 @ 16:9 aspect (crop)…………… 5464×3070 Mavic 3 @ 4:3 aspect …………………….. 5280×3956 = 20.88 million pixels Mavic 3 @ 3:2 aspect (crop from 4:3)… 5280×3520 = 18.58 million pixels Mavic 3 @ 16:9 aspect (crop)…………….. 5280×2970
Color
Opening RAW images in Adobe lightroom, the color is a bit green. That’s correctable but really annoying; I’m guessing this problem is because Lightroom/Photoshop/CameraRAW do not yet include a camera profile for Mavic 3 (Hasselblad L2D-20c).
Looking at the JPEGs, the color looks good – not vibrant, but good.
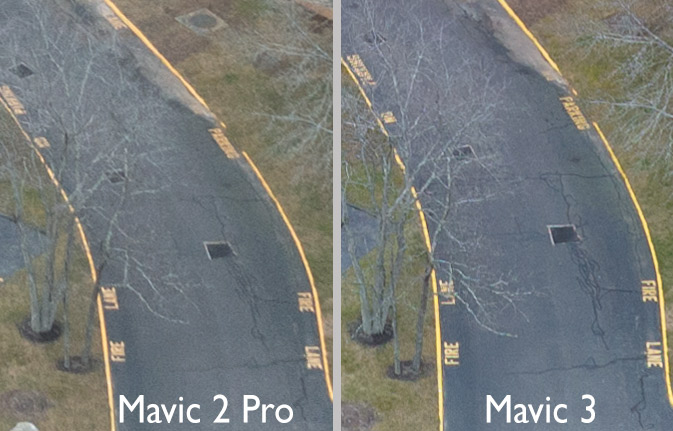
Sharpness
Comparing images from Mavic 3 and Mavic 2 Pro, at aperture f\3.5 and f\4.0, the two are equally sharp at center of the lens. However, away from center, toward the edges of the image, Mavic 3 exhibits improved sharpness over Mavic 2 Pro.
High-magnification crop from the original RAW image
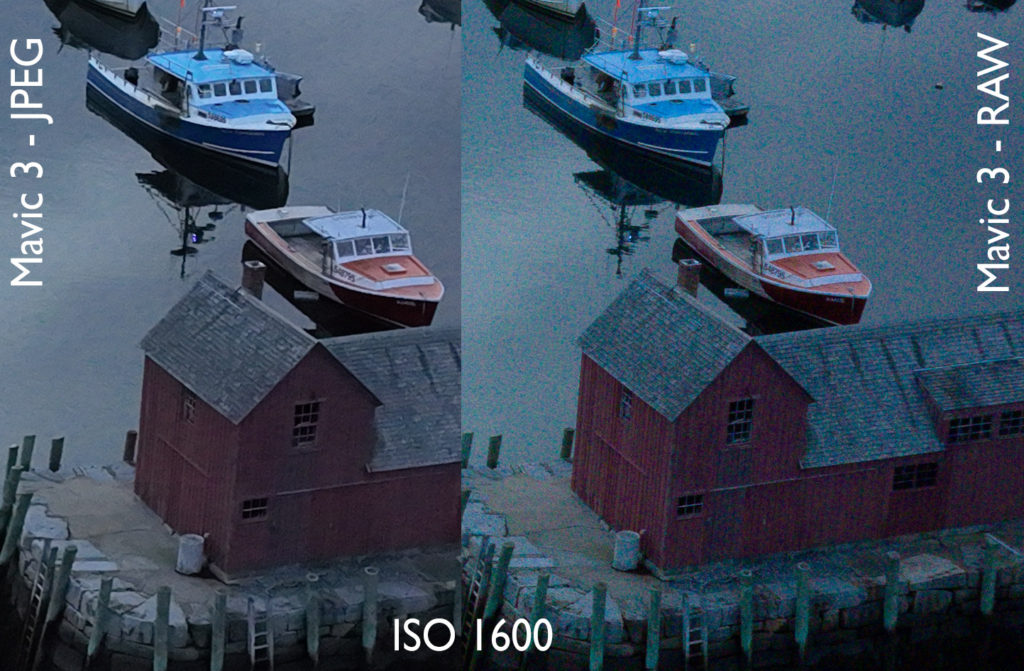
Image noise
Considering all ISO 100 through 3200, Mavic 3 shows less luminance noise than Mavic 2 Pro. However, at any ISO, low light situations can result in considerable chroma noise in both shadows and midtones. It is worst at IS0 800, 1600, 3200. While it can usually be mitigated using noise-reduction in post-processing, the 4/3 image sensor should not exhibit this problem.
As the camera saves both RAW and JPEG, I looked at the JPEGs. Luminance noise is reasonably mitigated through ISO 1600; mitigation can be dicey at 3200. Chroma noise is essentially eliminated. However, not surprising, this noise reduction comes at a price – loss of sharpness.
Luminance noise in shadows … ISO 400, daylight with ND4 filter … N0te: ambient light and altitude are not identicalMavic 3 … chroma noise in low light … ISO 1600
Chromatic aberration
In some situations with high-contrast fine detail, Mavic 3 can suffer from chromatic aberration similar to the first-generation Mavic Pro. Although Mavic 2 Pro significantly reduced chromatic aberration, Mavic 3 is a step backward. This is observed with the clear DJI lens cover; I haven’t tried it yet with the naked lens.
Mavic 3 (RAW image) shows improved sharpness, but also shows chromatic aberration in railing balusters
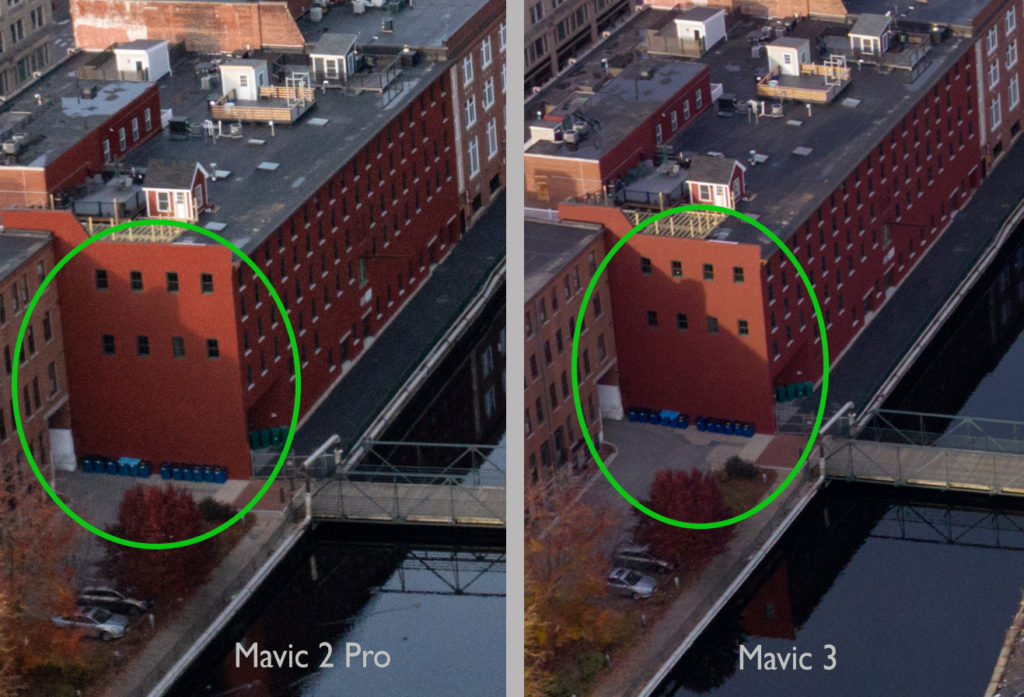
Shadow detail
Considering detail in the darkest shadow areas, Mavic 3 has a slight advantage to reveal details that Mavic 2 Pro cannot. The difference is quite small.
DJI has stated that the Mavic 3 main camera has 12.8 stops of dynamic range, which is not significantly greater than Mavic Air 2S or Mavic 2 Pro.
Highlight detail
Both the original Mavic Pro and the successor Mavic 2 Pro often failed to resolve subtle detail in highlights. This commonly manifests in architectural details that are white,such as clapboard siding and trim mouldings. Mavic 3 does shows a slight improvement.
Images captured with Mavic 2 Pro – particularly images that include architecture – have commonly required a great deal of effort to safeguard highlight details. At the time of capture, exposure bracketing saves an additional exposure wherein the highlights are rendered with reduced brightness. In post-processing, that exposure is developed carefully and specifically for hightlight details. Then those highlights are manually blended into the other exposure. Only time will tell if Mavic 3 eliminates the need for that extra work.
Remote control
Apart from the camera itself, I must mention the remote control. With the Mavic 2 Pro, I have very commonly used the camera control dial under the right index finger. With Mavic 3, the RC-N1 remote controller has no such control dial; exposure settings can only be controlled via touch-screen. The expensive RC Pro controller includes a dial for right index finger, which I vaguely believe controls camera zoom and I do not know if it can be used for exposure purposes. I did not spend the extra $1000 to get an RC Pro.
Mavic 3 … , daylight with ND4 filter, f\4.0, ISO 400
Here is my investigation of the Mavic 2 Pro, back when that was released in 2018:
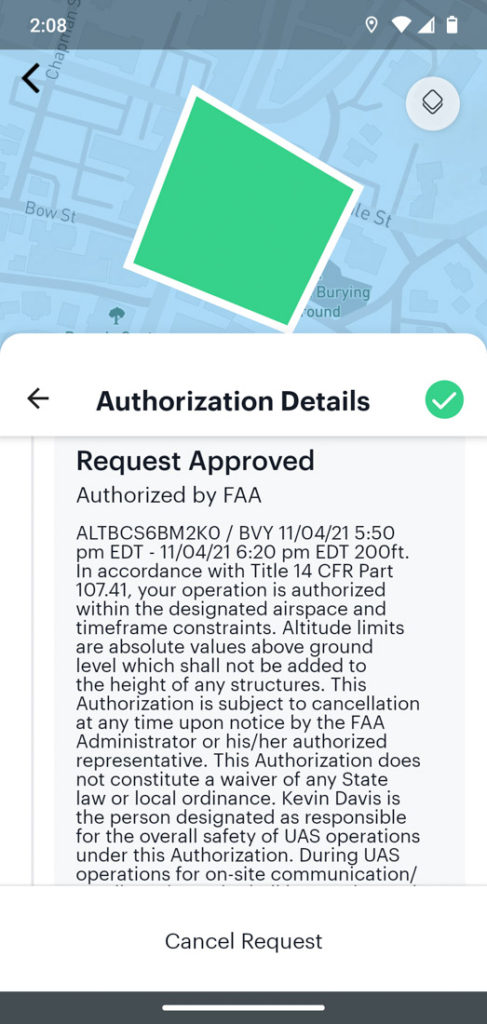
On multiple occasions, my intended drone flight was defeated because my DJI drone refused to spin-up the propellers. Although the flight is authorized by the FAA, the drone refuses to launch. With proper planning, this problem is avoidable.
DJI drones include a safety feature known as Geofencing, which is intended to prevent flying in areas that are could be unsafe, particularly near airports. There are different systems of understanding the airspace and the DJI system is entirely different that the system employed by the FAA.
Local airport facility grid
Anywhere around controlled airspace, maximum flight altitude is determined a grid layered across a map; each grid-square indicates maximum altitude. As this is local to the facility/airport, it is commonly referred to as the facility grid.
A flight plan that does not exceed the stated maximum altitude can often be approved in seconds by a computer, without need for review by a person. This is made possible by a computerize system called LAANC (low altitude authorization). Submit your flight plan via a mobile app that supports LAANC. If you succeed in receiving authorization, you may need to export that information and then submit it to DJI to unlock your drone.
For years, I used a LAANC-enabled app called AirMap. Recently, that failed (and I found some rumors online why that might be true). Ultimately, I was forced to switch to a different LAANC-enabled app and I now use Aloft (https://www.aloft.ai/), formerly known as Kittyhawk.
If your drone is locked and will not launch, flight authorization from the FAA – by itself – does not unlock a DJI drone.
DJI Geofencing
Based upon the current GPS location, the drone automatically is aware of local flight restrictions. Potentially, it can refuse to take off. In some cases you may be able to unlock it from your flight controller; this is called self-unlocking. In other cases, self-unlocking is not allowed and you must request unlocking DJI Fly Safe (https://www.dji.com/flysafe). FAA flight authorization is a prerequisite.
In advance of your flight, always check the DJI Fly-Safe geofencing map. If you’re flight is either fully or partly in a blue zone or red zone, you will need to manually unlock the drone. DJI GEO system shows approach paths to airport runways and it is these areas that are likely to be considered no-fly zones. DJI did not invent this system; it is based upon LATAS (Low Altitude Traffic and Airspace Safety), which I have read was pioneered by PrecisionHawk.
Do not wait until you arrive at your launch location before checking that your drone will be able to launch. Research in advance: weather, FAA controlled-airspace restrictions, NOTAMs, and DJI GEO restrictions.
In specific geographic locations, your drone controller may display “NFZ”, which means “No-fly Zone”. When locked due to a NFZ, the drone can only be unlocked via the DJI Flysafe website; it cannot be unlocked via self-unlocking.
(I remember a conversation with a police officer in Boston when he asked to check my flight authorization. When I told him the drone would not launch in a specific location, he suggested that the pilot can simply unlock it and I told him that is not always true. Clearly this guy does not have personal experience flying DJI drones within the class-B airspace of Boston Logan airport.)
On mobile devices (e.g. smartphone), the Fly-Safe website reports that unlocking is not supported on the mobile website. The solution is to use a full-screen computer. Do this at home before you drive off to your launch site.
For custom unlocking via the DJI Flysafe web page, you probably need a computer.
Upon submitting your request, two things happen. You will receive an email that states “Unlock application is created.” The web site shows you that the request is “Pending review.”
If all goes well, two things will happen. You will receive a subsequent email within less than 10 minutes stating “Unlock application is accepted.” The website shows you that the request is “Accepted.”
Your login username must match: Flysafe web site & the mobile app.
Import the unlock certificate to the aircraft
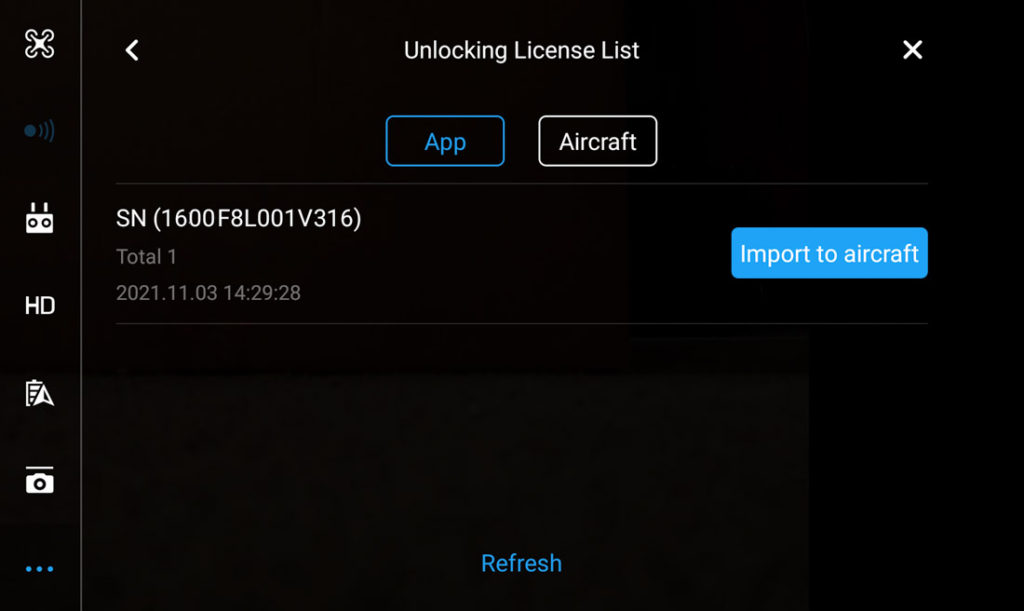
What happens next is not entirely obvious and requires a bit of care. You launch the app for piloting (e.g. DJI Go 4 or DJI Fly) and find the menu item “Unlocking License” (DJI Go 4 app) or “Unlock GEO Zone” (DJI Fly app). The app retrieves any unlocking authorizations via the Internet. This requires two things. You must be connected to Internet data (e.g. Wi-Fi or cellular data network). Whenever you launch the app, you must be logged-in and the username must match the username that you used when requesting the unlock. (I have once stumbled because I had inadvertently used a different login, the unlocking license could not be found, and my intended flight did not happen until after I solved the mystery.)
If all goes well, your unlocking authorization will be listed. You’re not quite done yet; there are two more steps to unlock the drone. Though the license is recognized by the remote controls, the license must be copied to the drone. Look for “Import to Aircraft”. Do that and the app will then show that the drone has the license and it appears with a on-screen enable/disable switch. As the default is “disabled”, you must slide it to “enable” before the drone will finally unlock the NFZ. The display on remote controller will change from “NFZ” to “Ready”.
NOTAMs (Notice to AirMen)
Mobile apps that support LAANC will show you both the boundaries of controlled airspace (class-B, class-C, class-D, class-E ground level) and all local facility grids. However, most of these apps do not show active NOTAMs. To see active NOTAMs, simply look at Skyvector.com. Active NOTAMs appear as red circles.
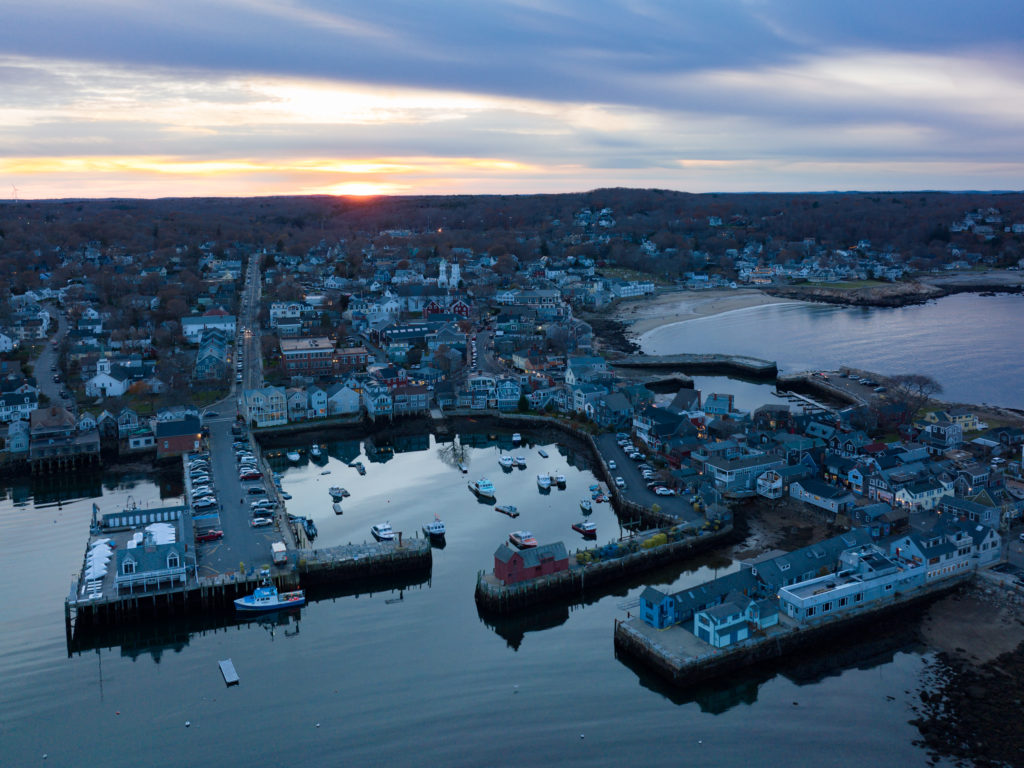
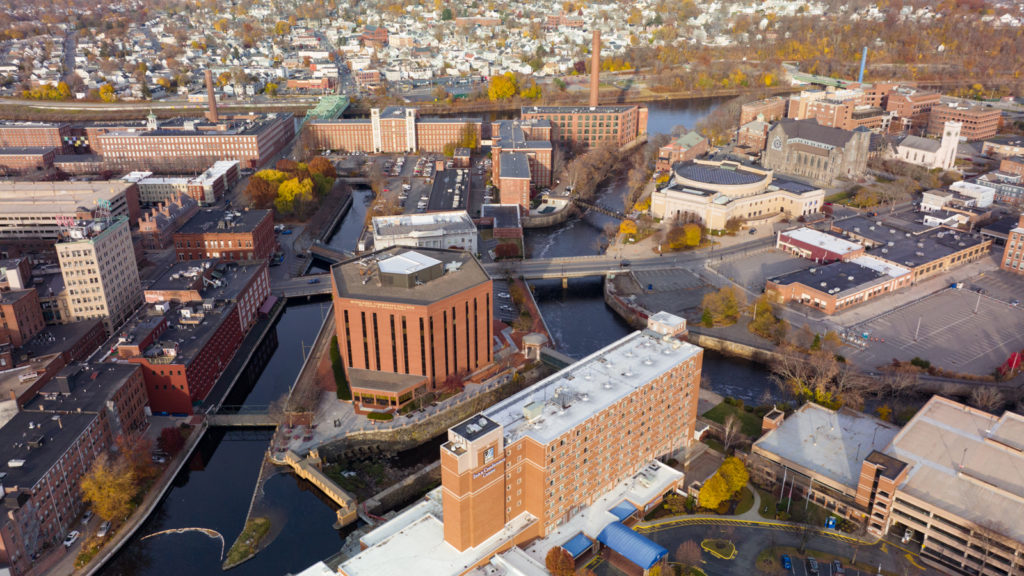
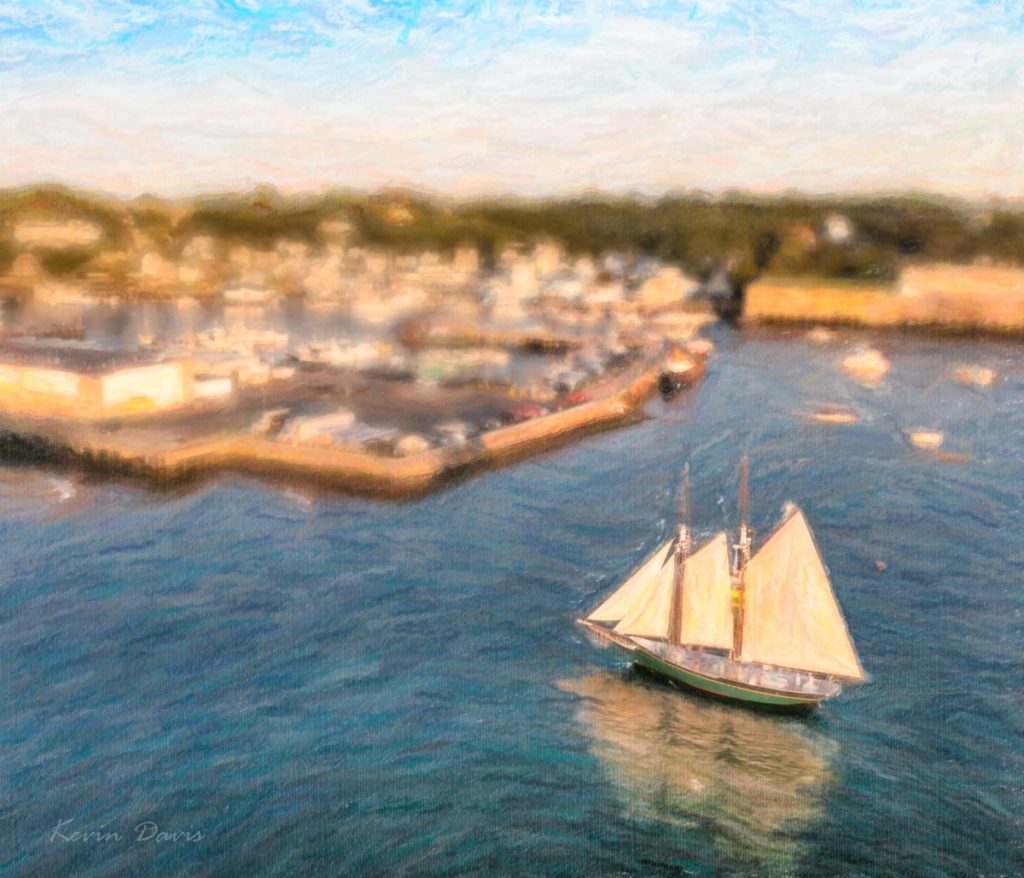
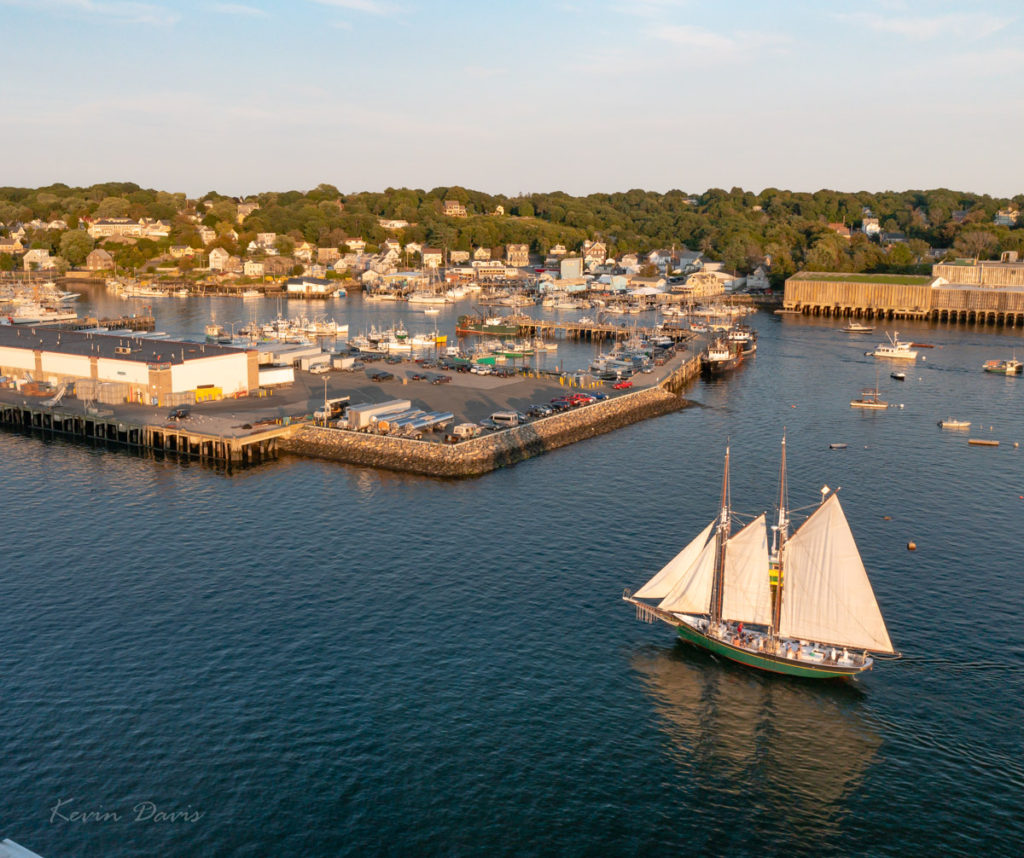
In addition to visiting Gloucester this weekend, I also ported all my photography and tools to a new computer. As I imported new images from a camera drone, I took the new computer on a test drive to verify that my tools were all in good order.
This scene had both very bright highlights and very dark shadows; I doubted that a single exposure could contain both the highlights and shadows. As you likely know, such situations are known as high dynamic range (HDR). I captured a bracket of three exposures. In retrospect, it was a wise choice. The middle exposure was spot on, however the foreground was nearly black and some background highlights were blown out – white boats and white buildings. The darker exposure provided correction for the blown-out highlights. The lightest exposure was used to replace the black foreground water with dark-blue water.
Initially, I processed each of the three in Lightroom and then combined them together using Photoshop. From Lightroom, open the three images using “Edit In” -> “Open As Layers In Photoshop”. Once opened in Photoshop, select all three layers and choose “Edit” -> “Auto-Align layers”. Here, there are six Projection options; I chose “Reposition” because the three images were identical composition that varied only by exposure.
A selection of the highlights was applied as a layer mask on the darkest layer, such that only the highlights are used from that layer. A selection of the foreground dark water was applied as a layer mask to the brightest layer such that the foreground is lightened. The resulting image is shown here on the right.
From there, I applied three image filters by Alien Skin. First was Bokeh, to blur the image – except for the schooner. Then I used two different variations of Snap-Art. All this was done through Photoshop. Upon saving all of this (TIFF file), I was back in Lightroom. Judicious use of brightness, clarity, and color saturation enhanced the simulated brush strokes. The end result is shown here on the left.
If you’re using an aerial drone for photo or video (or anything else), the FAA has released new rules for drone pilots. These changes do not take effect immediately but are very significant.
Flying over people
FAA part 107.39 has prohibited flying a drone over people (beyond flight operations staff participating with the pilot in charge) unless the pilot obtains a formal waiver from the FAA. As a pre-requisite, the applicant must be a certified remote drone pilot in accord with FAA part 107.
Beginning in 2023, certified Part-107 pilots will be allowed to fly a drone over people and a waiver will not be required. However, there is no change for recreational pilots (not certified); recreational pilots are not allowed to fly over people and no waiver can be obtained.
This also applies to flying over moving motor-vehicle traffic.
Specific restrictions require some form of protective guard around spinning propeller blades that might lacerate or otherwise injure a person on contact.
Currently, FAA part 107.26 prohibits flying a drone at night unless the pilot in charge obtains a formal waiver. As a pre-requisite, the applicant must be a certified remote drone pilot in accord with FAA part 107 and the drone must be equipped with particular lighting.
Beginning April 21st, 2021, certified pilots will no longer be required to obtain a waiver … if knowledge of night operations has been demonstrated via FAA drone pilot exam. The certification exam (to become a Part 107 Certified drone pilot) will be modified to include questions about night operations.
Remote ID
“Remote ID” is sometimes referred to as digital license plates for drones. Beginning April 2022, all new drones will be required to include Remote ID. And beginning in 2023, all drone flights (using any drone, old or new) must broadcast Remote ID. Small drones that weigh less than 0.55 drones are exempt from these new requirements.
Remote ID is not entirely analogous to automobile license plates. Remote ID broadcasts (via either Wi-Fi or Bluetooth) the drone’s unique ID, the current location of the drone, the location of the remote control (location of the pilot), and an emergency indicator (e.g. low battery). Many people are concerned that broadcasting the location of the pilot could provide an open door to thieves (a drone may be considered an item of value) and to people who simply hate drones and wish to harass the pilot.
If you already own a drone – or you purchase a new drone in 2021 – and it does not include Remote ID, you will be able to purchase an add-on device that fulfills Remote ID requirements. This add-on device is sometimes referred to as a beacon. The cost should be $50 or less. There is a slight difference regarding the specific information that is broadcast. Because a beacon cannot track the location of the pilot, it will broadcast the location from which the drone was launched. If the pilot then walks away from the launch point, the beacon does not have information about the pilot’s location.
If a drone has built-in Remote ID, possibly it may refuse to launch if Remote ID is not operational. I don’t think we know that yet.
Remote ID for drones is similar to ADS-B for manned aircraft. In general, drones will not be allowed to broadcast ADS-B nor ATC; this is apparently what airplane and helicopter pilots want.
To maintain certification, the FAA has required remote pilots to pass a recurrent exam every two years. That exam has been conducted in-person under watch of an authorized proctor. However, this is being replaced by an on-line recurrent exam and a fee will no longer be charged to take the recurrent exam.
The official timeline called for online testing to be available March 16, 2021 but that did not happen. The revised timeline says it should be available today, April 6, 2021.
The new online exam will include questions about Remote ID and night operations. This presumably includes such topics as diminished depth perception, lighting requirements, etc.
Mid-October 2018, I photographed Wakefield Massachusetts using an aerial drone. As the autumn colors were not well developed yet, I returned a week later to make the same photo again. That’s the first photo here, October 23, 2018.
Some renovation work was in progress that day. You can see scaffolding against the steeple and one of the tall windows is laying on the grass.
In the evening later that day, a lightning storm passed through the area and this presumably sparked the fire that destroyed the First Baptist Church. The next day, I again put the drone in the air to photograph the aftermath of the fire.
Today is the one-year anniversary of that fire, so I returned to again make the same photograph, but without the church.
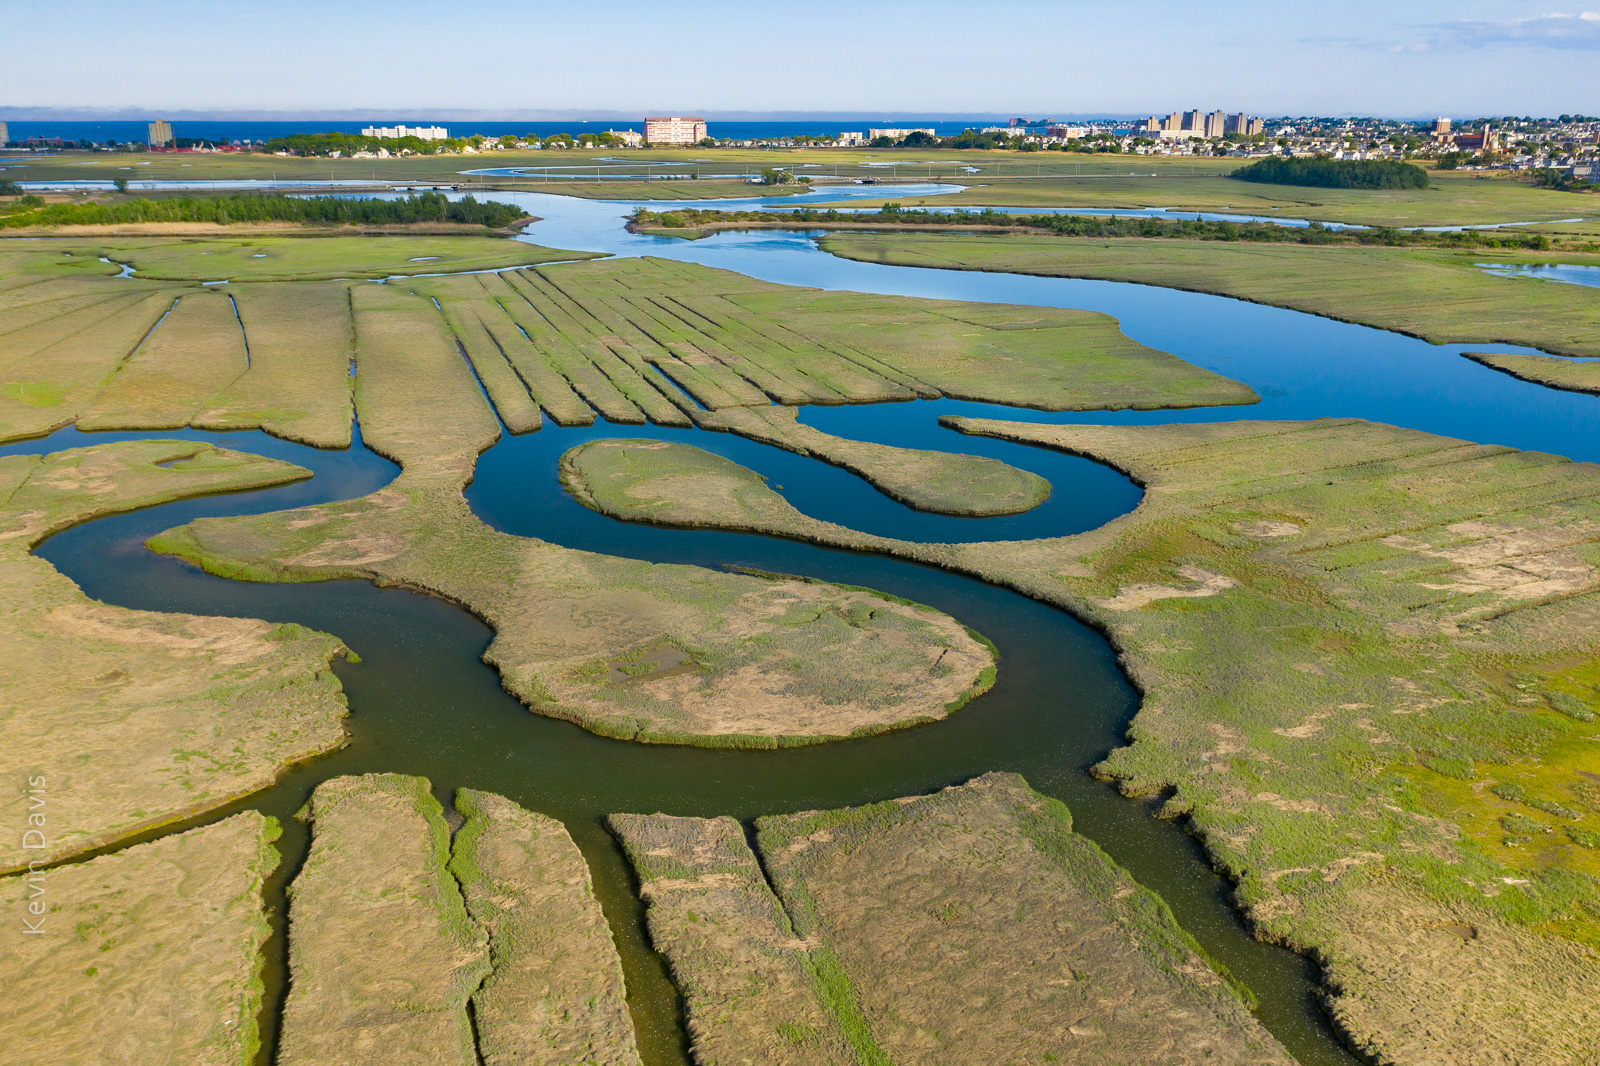
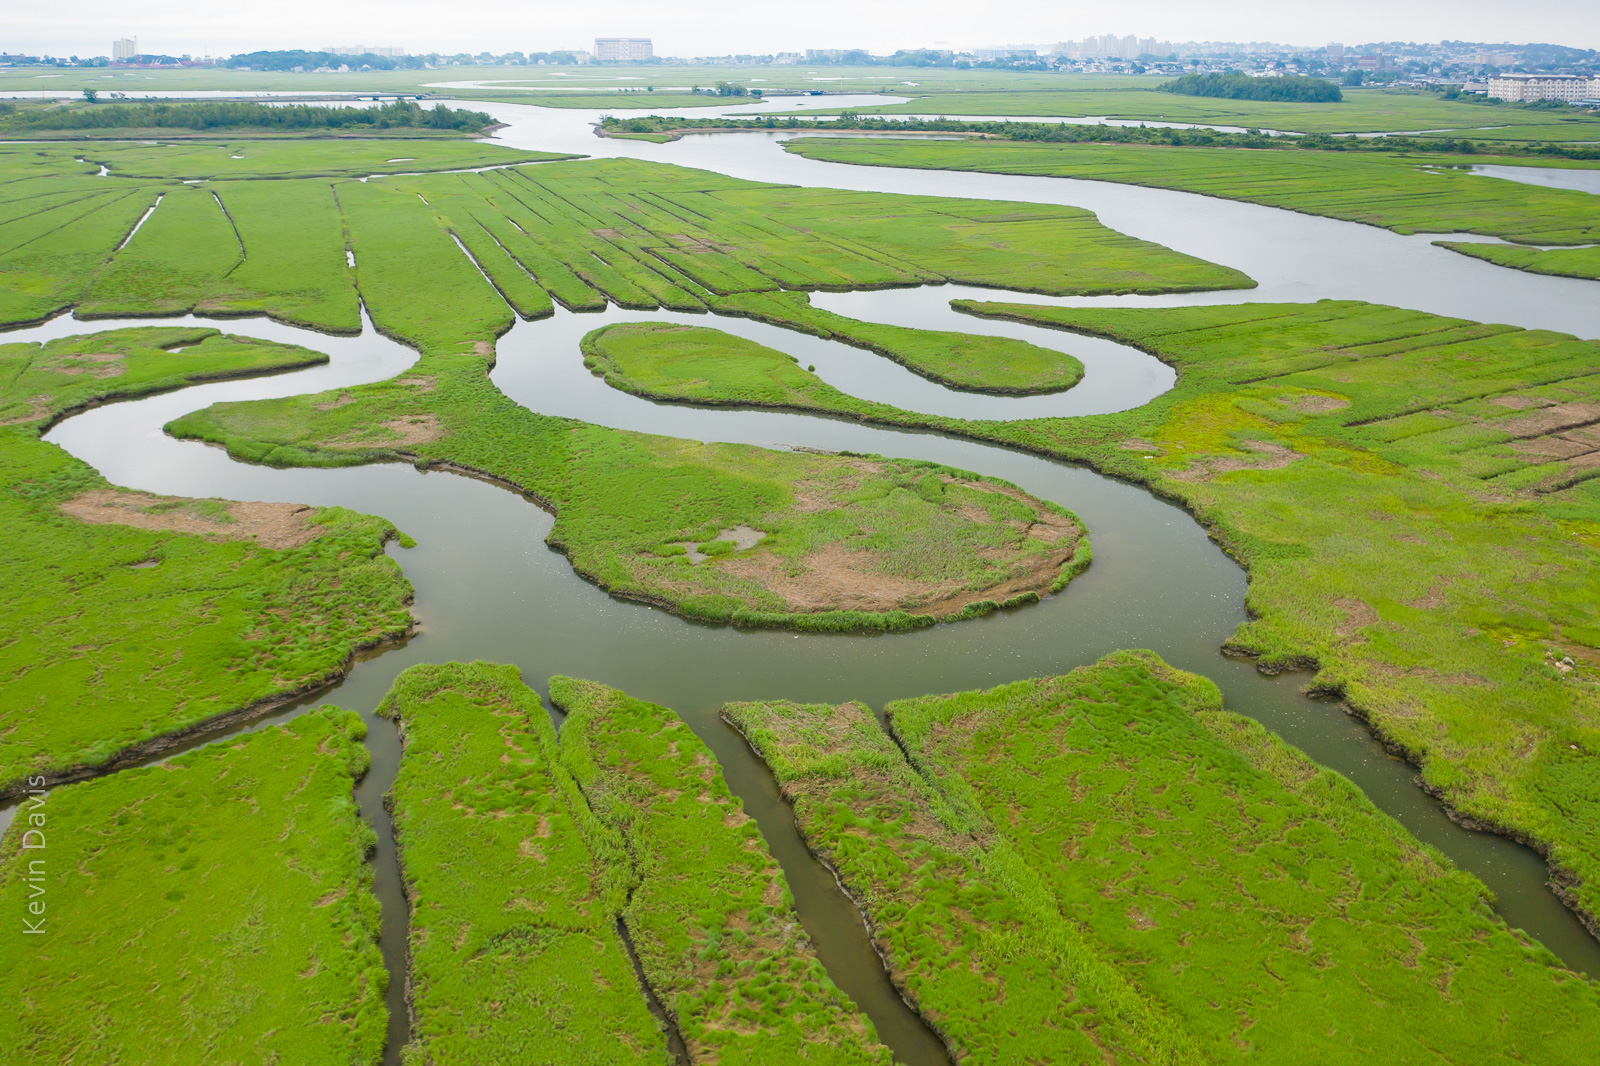
Rumney Marsh photographed with an aerial drone (sUAS)
I first visited Rumney Marsh in the month of May. Although I discovered some great photo compositions, the marsh was mostly brown. Presuming that the grasses would fully transform the landscape into a greener palate, I vaguely planned to return some weeks later. Shown here below is my first image from the May visit:
Rumney Marsh in the month of May
.
This year, spring in New England has featured more rain than normal. Dry days are a bit like currency – have to spend them judiciously. Five or six weeks later I returned to the marsh on a dry day and found the green grasses covered the land, as expected. Unexpectedly, coastal clouds were lingering and the water reflected white sky (not blue sky).
Rumney Marsh (June) under cloudy skies
While that is a nice image, … I had imagined the water reflecting a blue sky. So, I returned later that same day after the clouds cleared away. That final image is shown at the top of this article.
In all three instances, the image required post-processing for HDR, particularly because the buildings on the horizon were too bright. So each of these three instances is a combination of multiple exposures, simply to control the dynamic range of light.
The day of the new Mavic 2 release one week ago, numerous sites and YouTube channels already had reviews prepared. DJI had judiciously provided new Mavic 2 drones to people who would do these reviews. I have no intention of rehashing that stuff. I am interested specifically in the camera performance. Because I am largely interested in image quality, we’re talking about the Mavic 2 Pro, not the Mavic 2 Zoom. As for video quality, we’ll have to leave that for another day.
For high-quality images, DJI now provides this choice: Phantom 4 Pro, Mavic 2 Pro, Inspire 2 with Zenmuse X5s, Inspire 2 with Zenmuse X7. The unique value proposition of any Mavic is that it folds down to a size that can fit in a camera bag. A Mavic drone and remote controller requires physical space similar to a DSLR camera body and a zoom lens.
For photographers, is the upgrade worth it, from Mavic Pro to Mavic 2 Pro?
Yes, after brief testing this morning, there is no doubt in my mind.
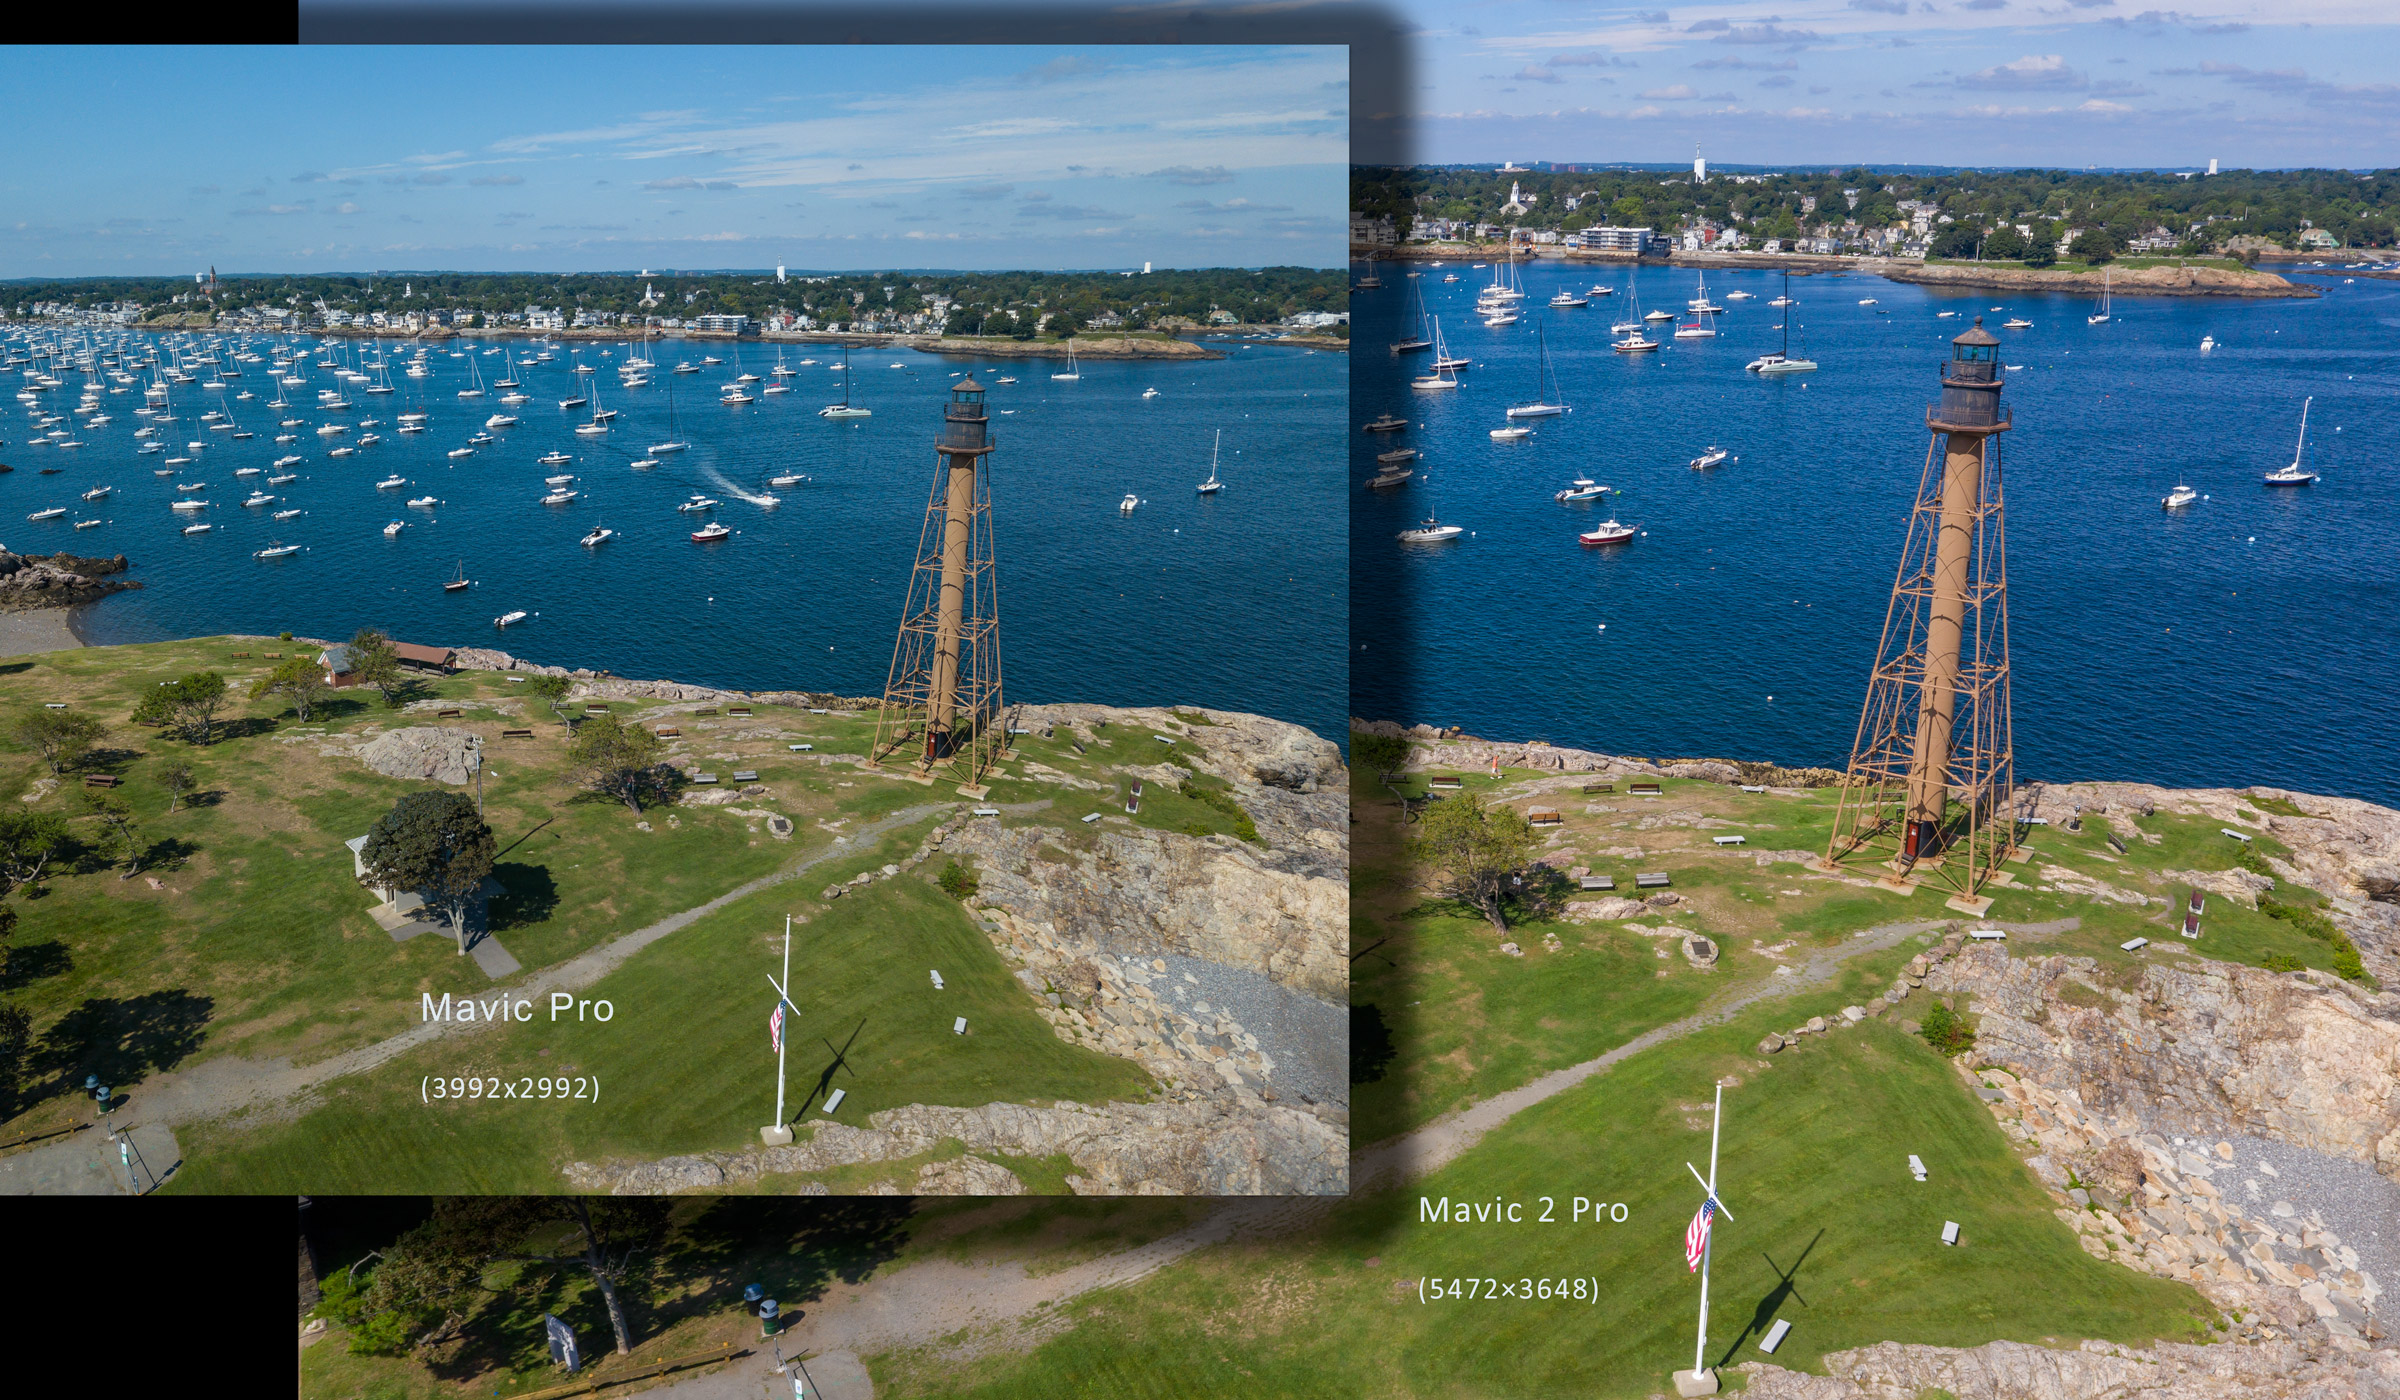
With the advent of Mavic 2 Pro, the camera difference between Mavic and Phantom has been erased. Both the variable aperture (f/2.8 to f/11) and the sensor resolution (5472×3648) are on par with the pre-existing Phantom 4 Pro and superior to the original Mavic Pro. Note that this is a 2:3 aspect ratio compared to a 3:4 aspect ratio of Mavic Pro, Mavic 2 Zoom, and Zenmuse X5s.
Note that camera is new and not exactly the same as P4P. DJI bought a majority stake in Hasselblad a couple years ago and this apparently is the first fruits of that partnership. (Yes, DJI essentially owns the legendary Hasselblad company.)
According to the numbers, the angle of view is a bit different, though I did not notice during actual use. Mavic 2 Pro provides a FOV equivalent to 28mm lens on a full-frame camera. This is narrower than the original Mavic Pro’s equivalent 26mm and narrower than the Phantom 4 Pro’s equivalent 24mm. Despite being less wide angle, vertical lines can still keystone strongly and you may choose to correct for that in post processing.
Here are the problems with Mavic Pro that I hope are improved with Mavic 2 Pro.
Dynamic range in the Mavic Pro was not very good. In high-contrast scenes, highlights can easily blow out and/or the shadows block up. To mitigate this, I have sometimes captured multiple RAW exposures and then post-processed for HDR.
Using RAW capture, if the highlights do not blow out entirely, the camera still fails to resolve details in the highlights. For example, houses with clapboard siding in full sun – the separation of the clapboards may be entirely absent in the image. This seems surprising to me … if the story is true that the RGB color space has finer granularity in the highlight range compared to the shadow range.
Image noise, particularly in shadows. To mitigate this, I have relied upon heavy-handed post-processing. While noise reduction in Adobe Lightroom is very good, there is a price to pay – higher levels of noise reduction can deteriorate details throughout the brightness range.
With high magnification, images lack sharpness. In post-processing, I have found it necessary to apply twice as much sharpening compared to my hand-held cameras.
Color from RAW images is typically worse than any other camera I have used (except perhaps GoPro Hero3) and the images require heavy-handed post-processing. Of course, RAW images from any camera will always require some degree of post-processing.
Blue/red chromatic aberrations. I commonly see this around white baluster railings. Lightroom’s ability to mitigate chromatic aberration typically fails to resolve the problem.
In summary, the Mavic 2 Pro does achieve small improvements in all of these problem areas. So let’s look at some actual images from the new Mavic 2 Pro compared to the original Mavic Pro.
Harbor photographed with both drones
In high-contrast situations such as this scene with white boats and white houses, Mavic 2 Pro still has difficulty retaining detail in the highlights, but is not so bad that it requires HDR techniques to overcome it. It is still necessary to reduce the exposure by 1/3 stop to protect the highlights (this does not jeopardize shadow details) and also apply highlight reduction in post-processing.
[Click on an image to see the full resolution.]
[Images shown here are all RAW and individually post-processed to the very best of my ability using Adobe Lightroom.]
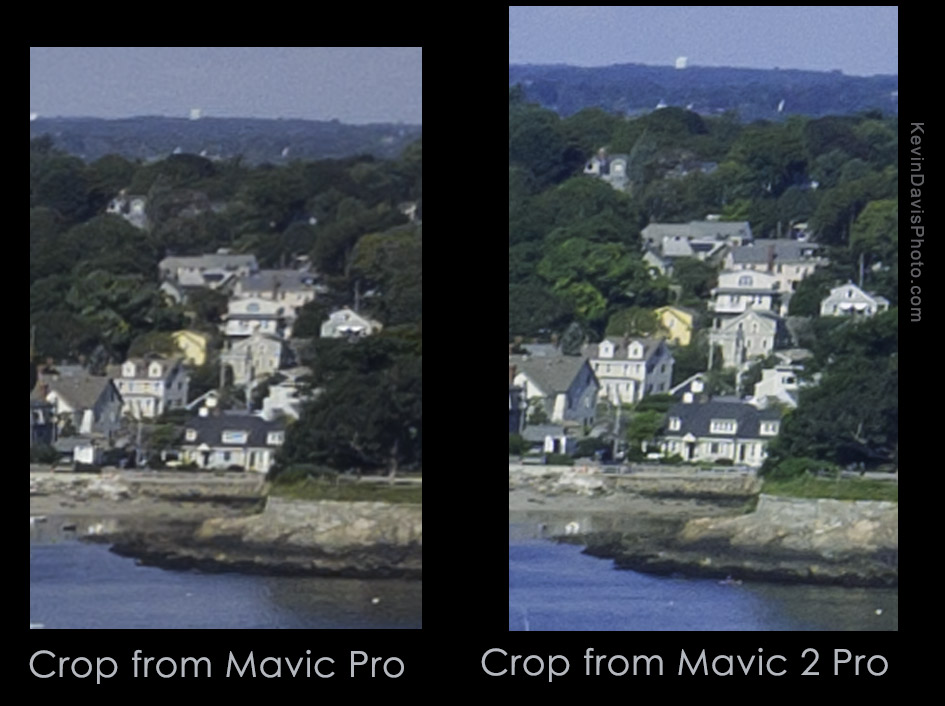
Detail in highlight areas
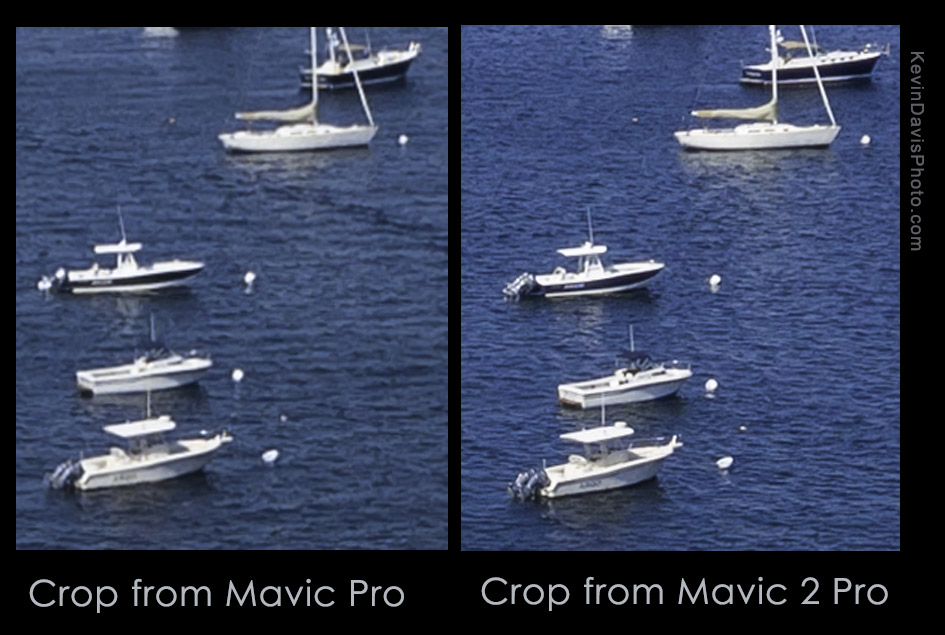
Image sharpness
Noise reduction is still necessary but far less than with the original Mavic Pro.
Color of RAW images is much better, requires less correction.
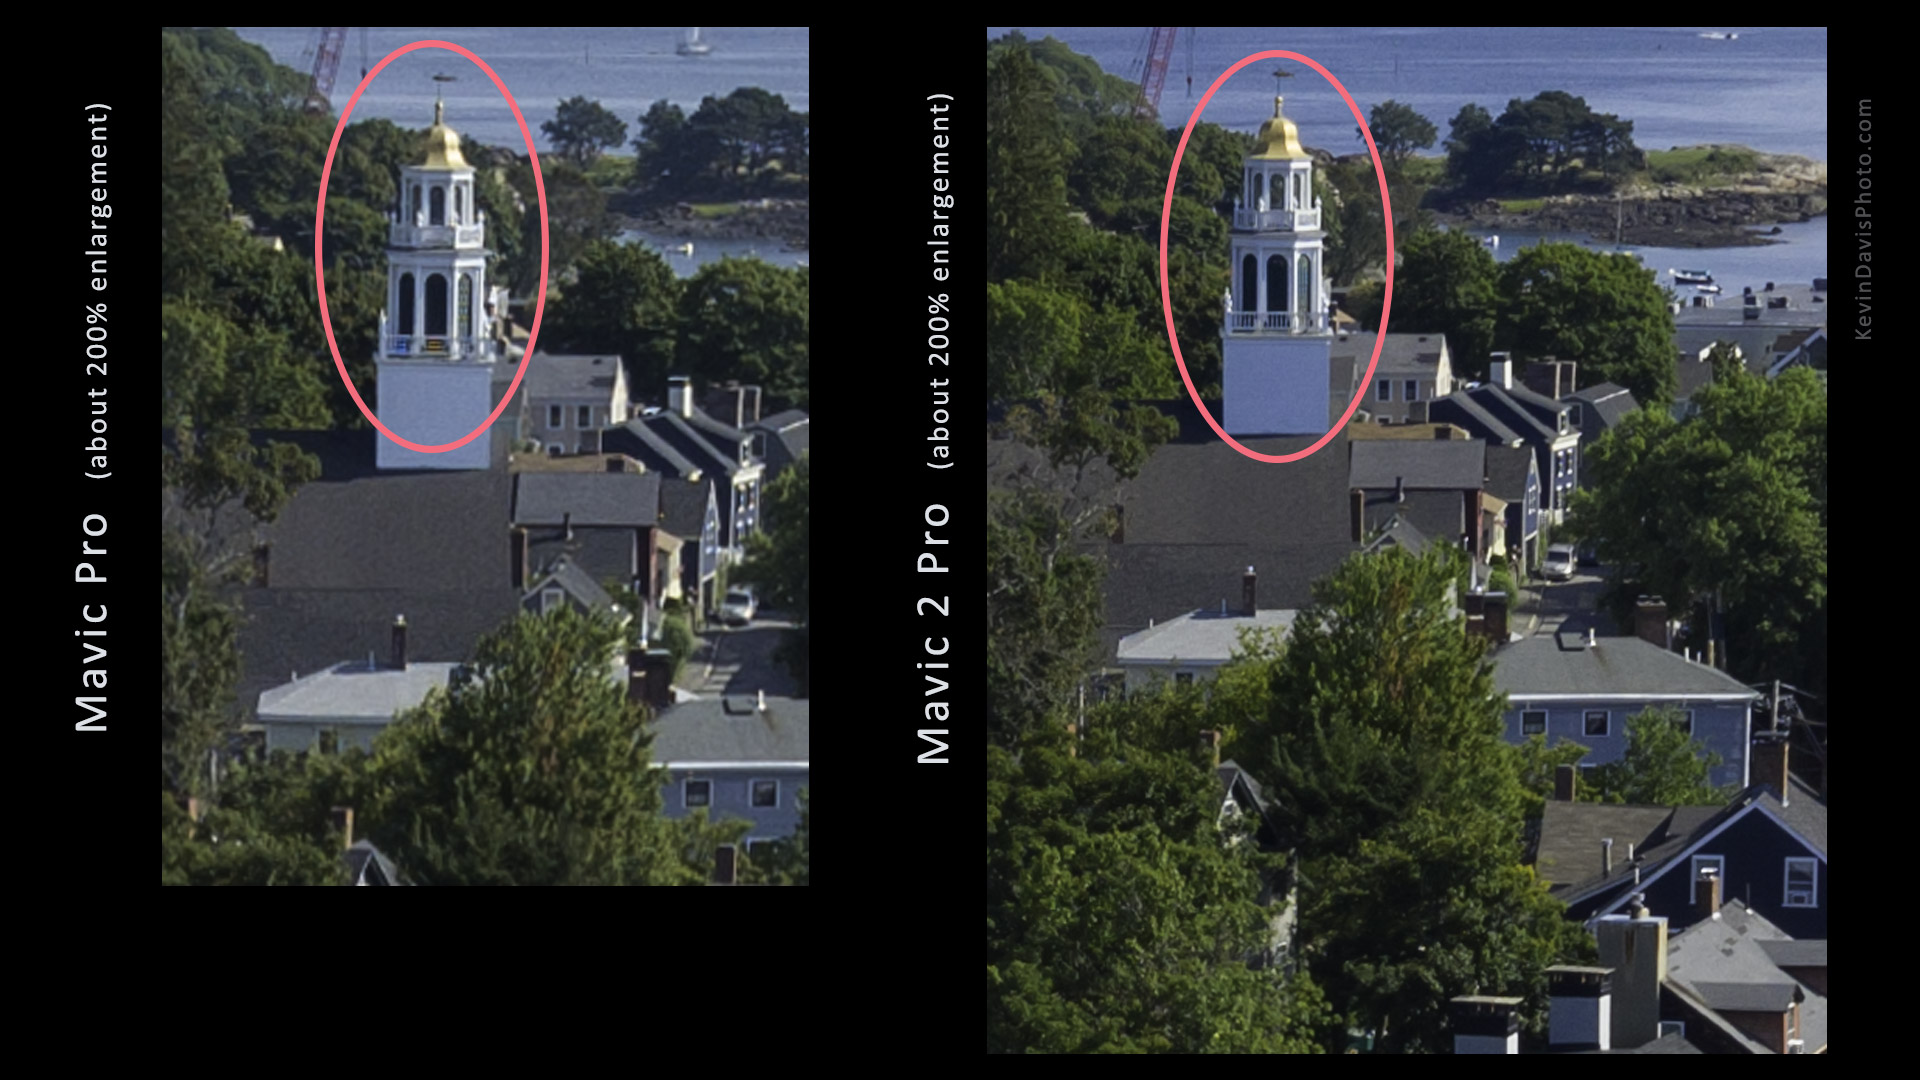
Here’s an example (not a particularly good one) that shows Mavic Pro was unable to resolve the balusters and suffered chromatic aberration. Mavic 2 Pro did not exhibit either of these problems.
Click on the image to see larger version
Finally, a few notes that do not regard image capture.
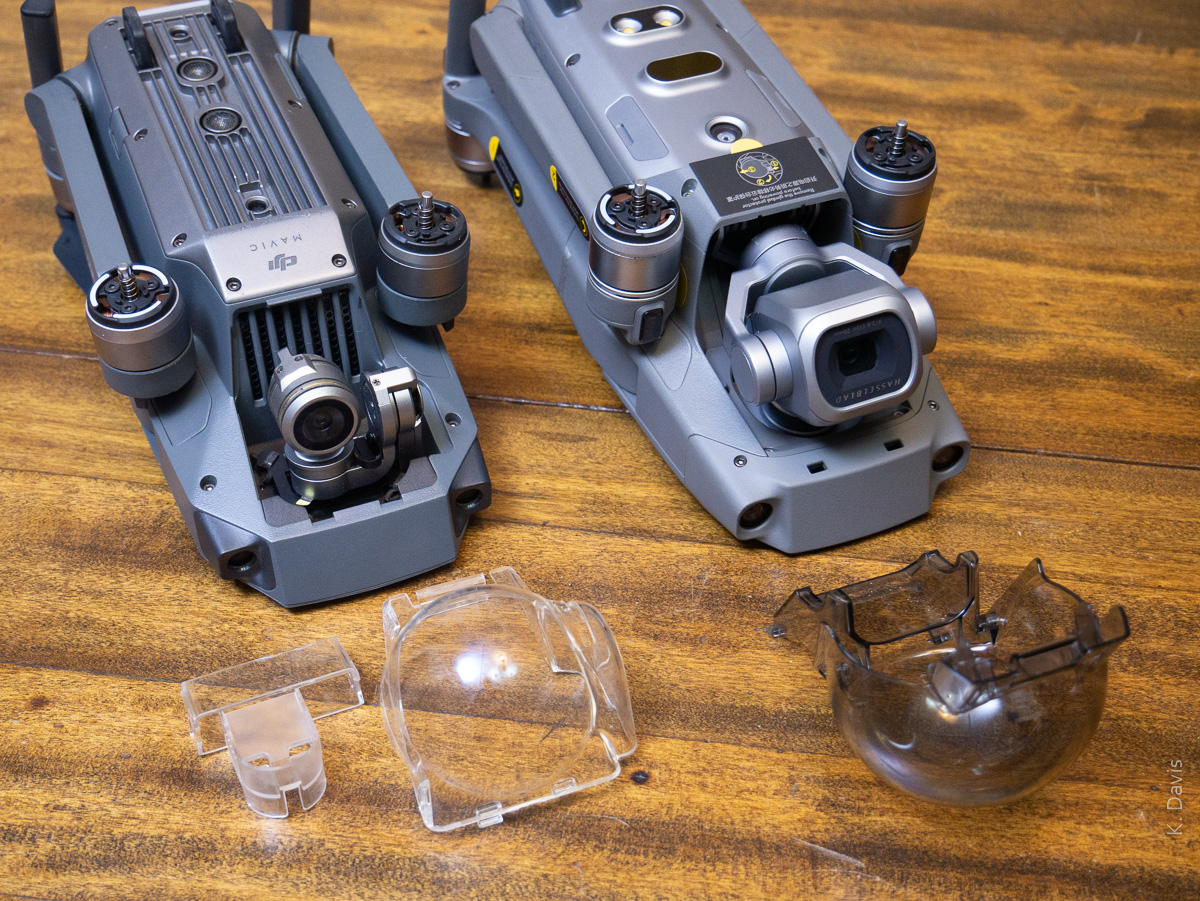
If you’ve ever fumbled with the gimbal clamp on the original Mavic Pro, or worse yet have forgotten to remove the clamp before powering on the drone, rest assured that the new Mavic 2 Pro does provide an improvement. The gimbal clamp is integrated into the protective dome cover – remove the dome necessarily removes the gimbal clamp. See the photo below showing both the Mavic Pro and the Mavic 2 Pro.
Gimbal clamp
Unlike the original Mavic Pro, the Mavic 2 includes 8GB on-board memory in addition to a micro SD slot. To access this memory from another device, connect a USB cable (included) to the Mavic 2 USB-C port and turn on power to the Mavic 2. (Remember to remove the gimbal clamp before turning on the Mavic.) After having inserted a micro SD card, the DJI GO app prompted whether to use that instead of the on-board memory. I am assuming that we must select one or the other and automatic switch-over is not supported, but I don’t know that for certain.
The transmission system between the drone and the controller is theoretically the most robust of any DJI product to date. Mavic 2 utilized second generation Occusync 2.0, while the Phantom line has yet to adopt the Occusync transmission system. Although Occusync 2.0 reportedly can operate at distances up to five miles, I personally have no need of that. Increased robustness of the signal is welcome, as I have seen unexplainable video signal loss when using the original Mavic Pro.
January 23, 2018 – DJI officially announced the new Mavic Air, which again raises the bar for ease of use and safety for aerial drones. Having watched the announcement live this morning, here are the essential details I have noted (somewhat filtered according to what I find most interesting). So, for those interested in aerial drones or aerial photo/video with drones, here is what you need to know in 60 seconds.
Physical
Half the size of Mavic Pro and 41% lighter
Antennas concealed within the landing legs (away from the body)
8GB internal storage + SD card slot
USB type C port
Controller is pocketable, removable control sticks
Available in black, white, or red
Camera
1/2.3″ image sensor (same size as Mavic Pro and Phantom 3 Pro)
4K video
12MP still photos
HDR capture mode
360-degree panorama, auto stitching up to 25 images
New 3-axis gimbal, improved vibration dampening, better image stabilization
Flight control
Intelligent flight modes, including improved auto-tracking moving subject and two new quick-shot modes
Controllable with hand gestures (up to 19 feet)
Advanced pilot assist can automatically go around obstacles
More stable, can withstand wind speeds up to 22 mph
Fly Safe geo system – information about airspace restrictions
Pricing
$799 complete
$999 with accessories (extra battery, extra propellers, carrying case, etc)
Availability
Shipping Jan.29, 2018.
(I am guessing that demand will be high for this product and it will take some time for DJI to fulfill all the orders.)


 Mavic Pro")