Camera ISO

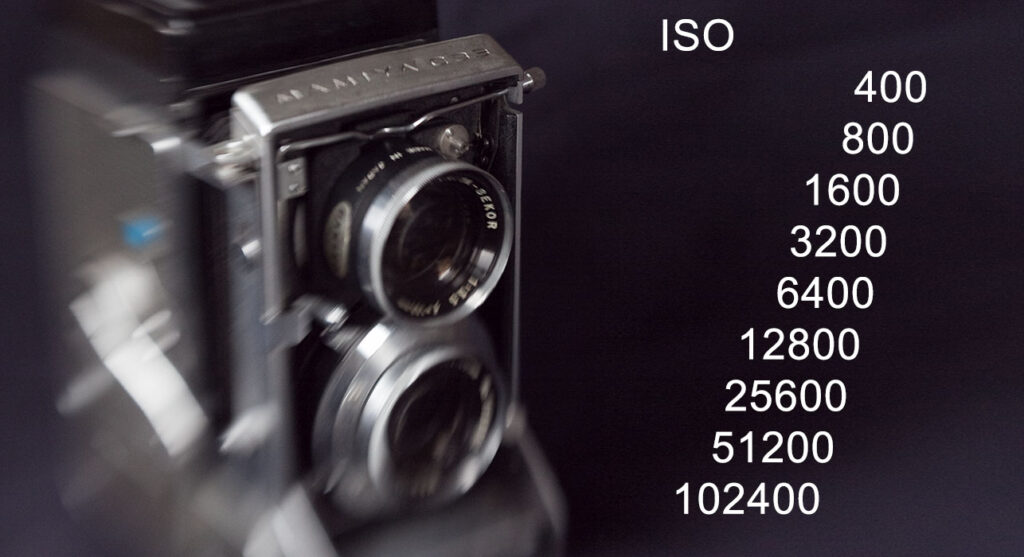
ISO is a property of recording photography; it represents sensitivity to capture light. Before the days of digital cameras, all photographic film was categorized with an ISO rating. Digital cameras have an adjustable ISO. Increasing digital ISO is primarily a matter of increasing the gain of the electronics signal. As with most electronics, gain increases not just the signal but also signal noise (stuff you don’t want). However, many digital cameras today have excellent signal-to-noise ratio.

In the days of film cameras, photographers might “push process” film to achieve higher ISO. ISO 400 was commonly pushed to ISO 800; that’s a difference of 1 f-stop.

Today, using digital cameras, 1-stop is child’s play. Digital cameras can provide 6 f-stops or more …. ISO 51,200 or better. The results can be cleaner (less noise) than the old ISO 400 film pushed to 800.

I shot the image here at ISO 5000 … that was ten years ago.

(Intonition Band, at night under a tent at Fraklin County Fair)

Canon Rumor: EOS R1 and EOS R5 mark II

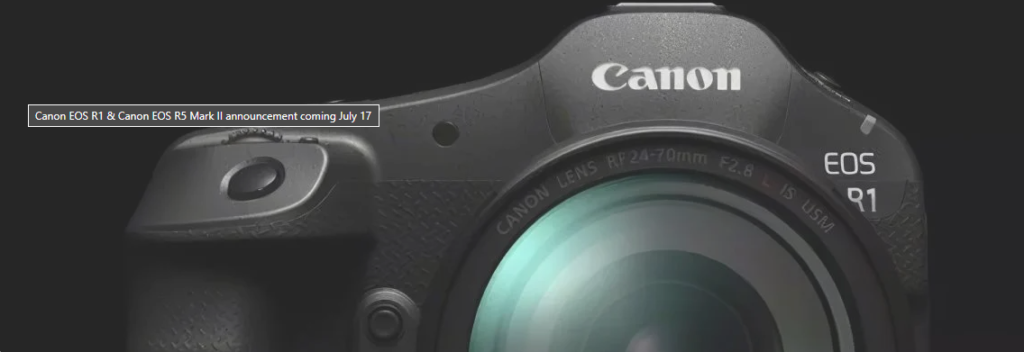
Two new Canon camera bodies have been long rumored to be released soon. For several months, rumors have further suggested the release announcement will coincide with the Summer Olympics 2024. I can only guess this is because some photographers will be shooting the new camera – or cameras – at the Olympics.

Latest rumor suggests Canon will announce one or both cameras on July 17.

The name designation “1” indicates a flagship camera, the best Canon has to offer. That’s the EOS R1.

The EOS R5 mark II is an expected refresh of the very popular EOS R5 that was released four years ago.

Photo Editing: Remove a Telephone Pole

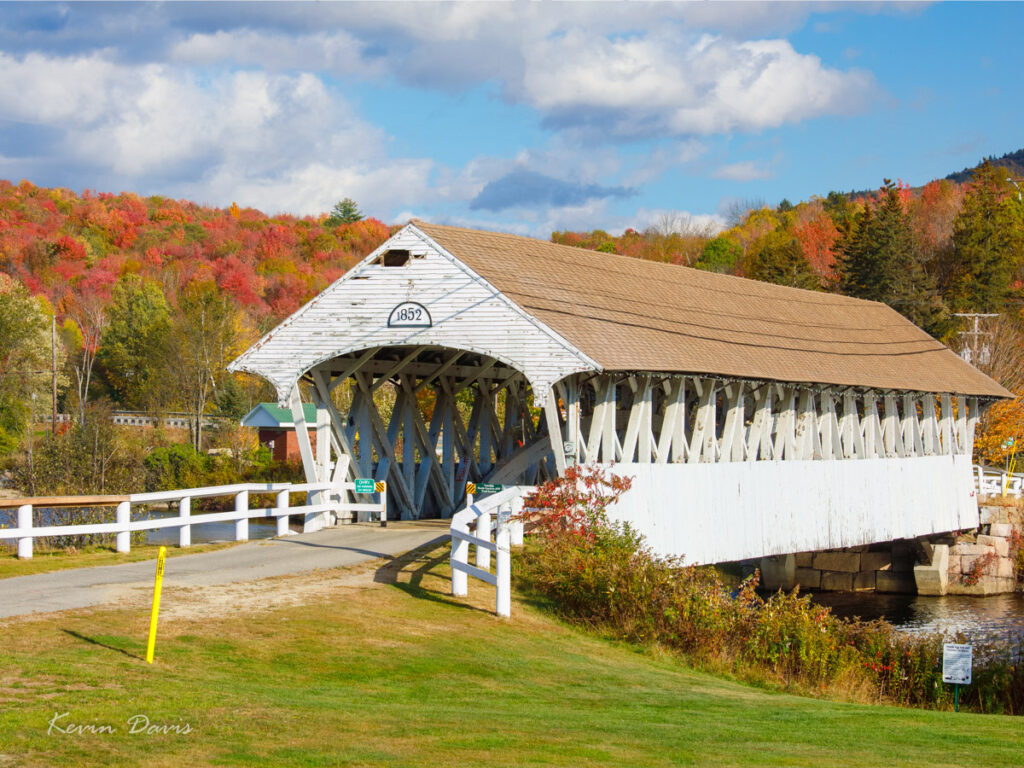
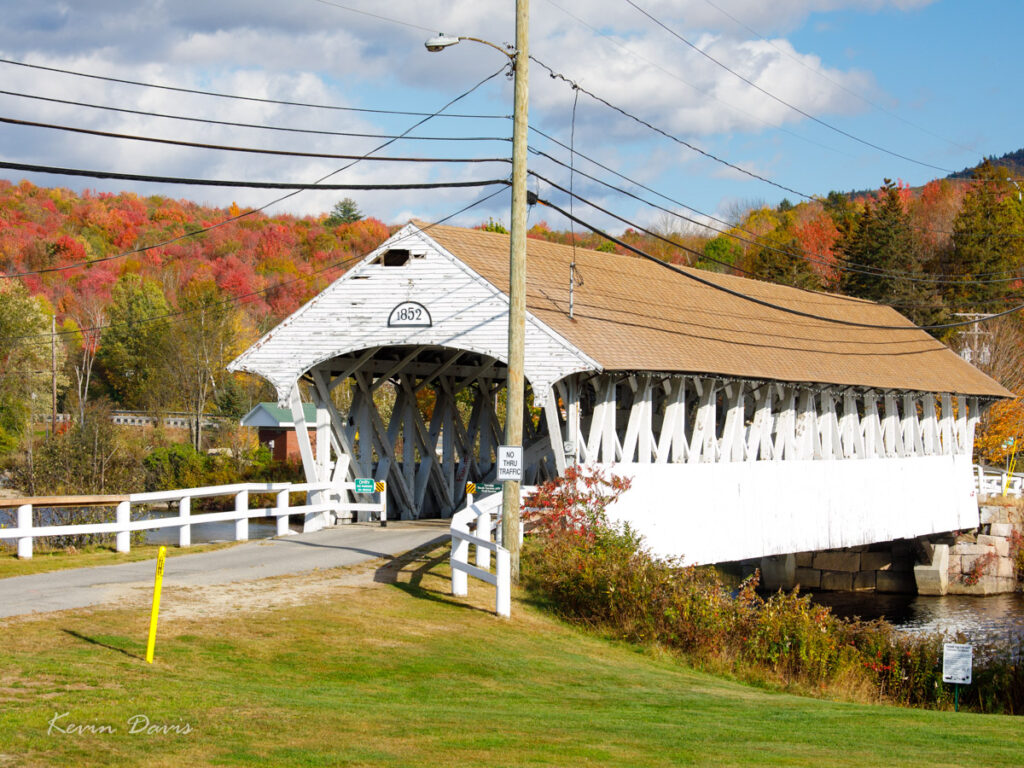
After editing in Photoshop

A common problem in outdoor photography : unwanted obstacles. Digitally removing the object can be easy or very difficult.

If the object obscures a plain background such as blue sky or beach sand, then computer software can easily fill-in any space that is vacant when deleting the unwanted object. If the object obscures something more complex such as a person’s face, there is no way to recreate what the camera never captured. While this is surely changing with today’s advances in generative AI, there will always be limitations.

In this image of the Groveton covered bridge, removing the yellow marker post would not be difficlut. The real problem is a telephone/utility pole that stands near the front of the bridge; see the unmodified photo below.

The technique that solves this problem is to capture two images. After taking the first photo, take a few steps to one side and make the second photo. That second capture reveals what was hidden behind the pole in the first capture. In post-processing, I removed the pole and then used pieces of the second image to fill in the blank.

Original photo – Before editing

Of course there are still many wires and shadows of wires across the image. Removing those can be easy against a clear blue sky but becomes more difficult across varying clouds, trees, and the shingle roof. I expect generative AI can make this task much easier … and better. If you look closely at the edited image, you may find a few breaks in cable shadows that I have not yet remedied. AI could potentially figure out the pattern of the roof shingles and extend the pattern, completely fixing the shadow breaks.

HDR photography (High Dynamic Range)

A camera’s image sensor has one job – to record light. However, sensors generally can only capture a limited range of light from shadows to highlights. When the actual range exceeds the sensor’s ability, that’s “high dynamic range” or HDR.

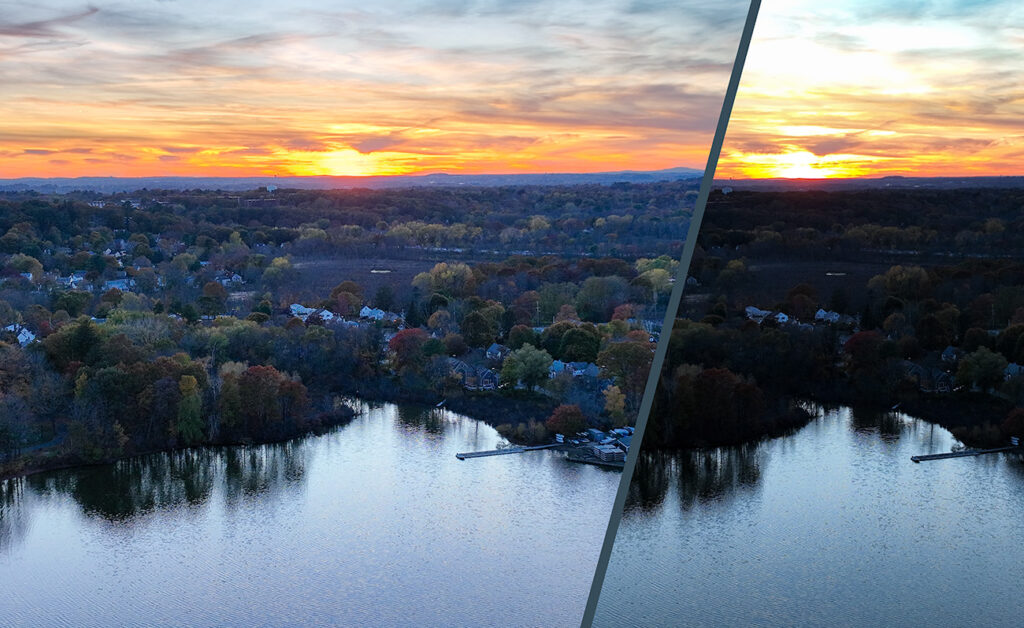
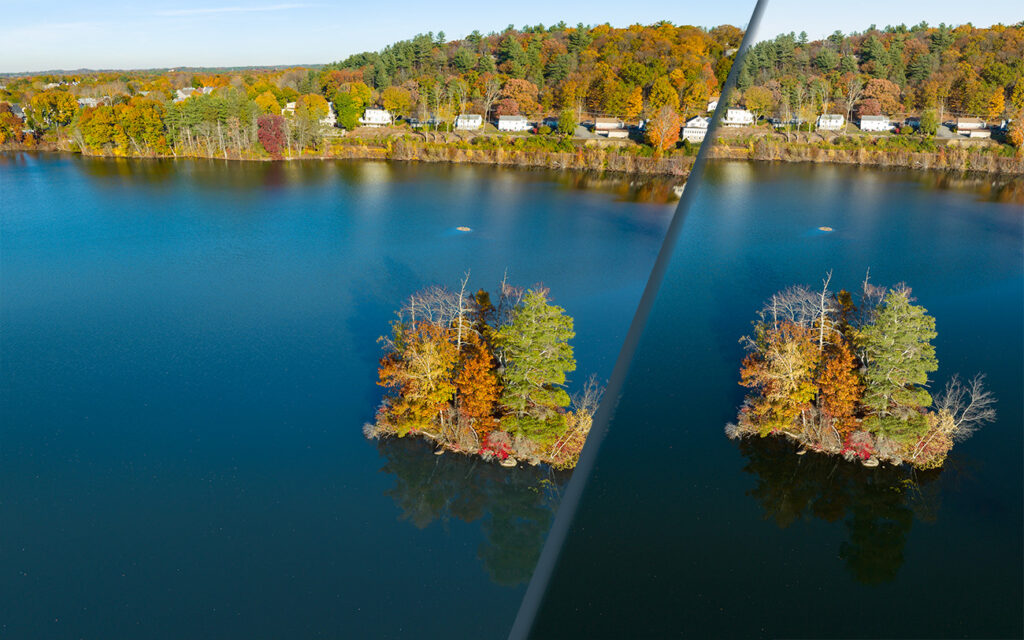
Here are two recent examples where the range of light exceeded my camera sensor’s ability. The first is a sunset. No surprise – the highlights are super bright. The second example is less obvious – the surface of a lake reflects blue sky in some areas and elsewhere the light simply falls off to black.

The solution is the same. Capture multiple exposures and then combine them together as a matter of post-processing. Many cameras have this post-processing and a built-in option. Even my smartphone camera includes that feature. The results may be disappointing. My own experience with camera built-in HDR processing is 50/50 at best. The end result is so commonly disappointing that I routinely don’t trust the camera to do it. Instead, I do HDR post-processing using software in a desktop computer.

This technique generally requires that the camera doesn’t move when capturing the separate exposures. The composition of the two captures is exactly the same. If the camera moves slightly, that is commonly not a problem because the two can be aligned during post.

This technique doesn’t work with video. When shooting video, the camera angle usually changes during the shoot; to shoot the scene a second time will result in a different video composition. Two captures will never align. For video, the solution to HDR is different – capture the shot just once but use a special camera mode that is very low-contrast, often referred to as DLog. Straight out of the camera, that shot looks truly awful. It must be post-processed, expanding the contrast range to something that appears correct.

Mavic Drone Photography – Post-Processing

With all digital cameras, my general practice is to capture RAW images instead of JPEG. Particularly when photographing with DJI Mavic 3 aerial drone, I not only capture RAW but additionally I frequently utilize exposure bracketing and HDR post-processing.

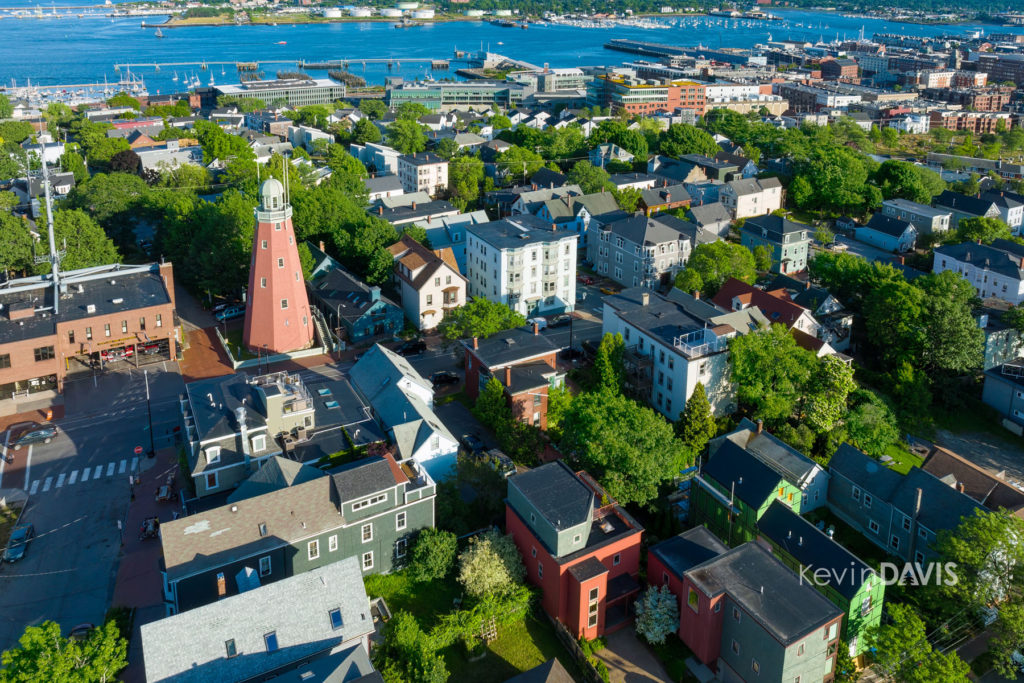
Portland Maine

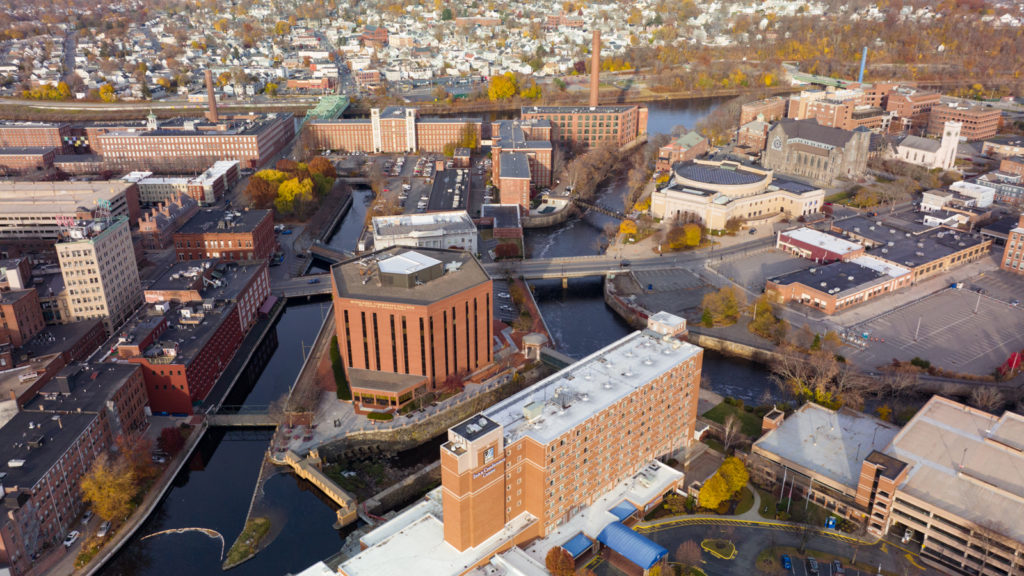
The image shown here is the result of post-processing with Adobe Photoshop.

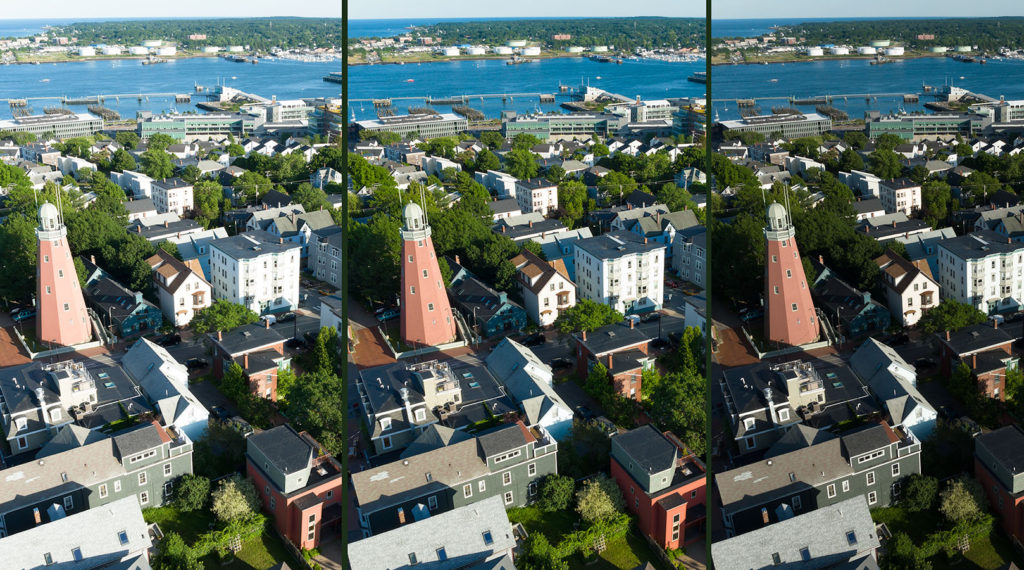
Having used the original DJI Mavic Pro, Mavic 2 pro, and Mavic 3, all have exhibited similar difficulty holding fine details in the highlights. This commonly occurs with architectural details under full sun; highlight details are easily lost. My solution is to use exposure bracketing and HDR post-processing; this means the original capture includes the best exposure, then two other exposures, one that is a bit brighter and one that is a bit darker. For the example, the photo here. I expected in advance that the highlights were at risk of getting lost; in retrospect, yes it was true.

The original three exposures are shown below. The best exposure is in the middle. As has been typical of Mavic 1,2, and 3, architectural details in white buildings have not been fully captured. The second problem is that the green trees are too dark. That second problem can be remedied in post-processing without much difficulty. However, if details in the highlights are blown out, recovering this can be difficult or impossible.

Initially, I perform basic adjustments in Adobe Lightroom and then open all three using “Open as layers in Photoshop”. That opens the three separate files as ProPhoto RGB (16-bit color depth) and with the adjustments made in Lightroom. Once opened in Photoshop, select all three layers and choose “Auto-align layers” in case the drone may have moved slightly between exposures. The best exposure I move to the bottom layer. From the other two exposures, I select specific parts of the image and these are overlayed over the bottom layer, effectively replacing problem areas.

Because the darkest exposure has retained all details in the highlights, I select the brightest areas from this exposure. Typically, this can be accomplished with either Photoshop’s built-in “Color range” selection. Once that selection is made, I often need to tweak it a bit, manually deselecting some areas that were selected but I don’t want those areas selected. Then feather the selection and convert it to a layer mask.

Using the brightest exposure, I similarly selected the green trees. That proved to be more difficult and I spent much time tweaking that selection. This selection is also converted to a layer mask. This replaces the overly dark trees in the base layer with a brighter version. Of course, you might use tools such as brightness or tone curve to lighten the trees in the base image, but the underexposed trees are more prone to luminance noise. Leveraging the brighter exposed trees does not suffer from noise, but is a bit more work to achieve.

There are alternative methods. I sometimes use Raya Pro by Jimmy McIntyre.

The final image is a composite assembled from three separate exposures of the same scene. I save this layered file as TIFF, but you can also save it as PSD (Photoshop format). I may merge all layers and export a JPEG file, but I keep the layered file. Commonly, I do return to this file and make further adjustments. For example, I may decide later that one or more of the exposures has noticeable noise or is not sufficiently sharp. The layered file allows me to make adjustments to the individual exposures.

Mavic 3 Photo Quality vs. Mavic 2 Pro

Mavic 3 Photo Quality vs. Mavic 2 Pro

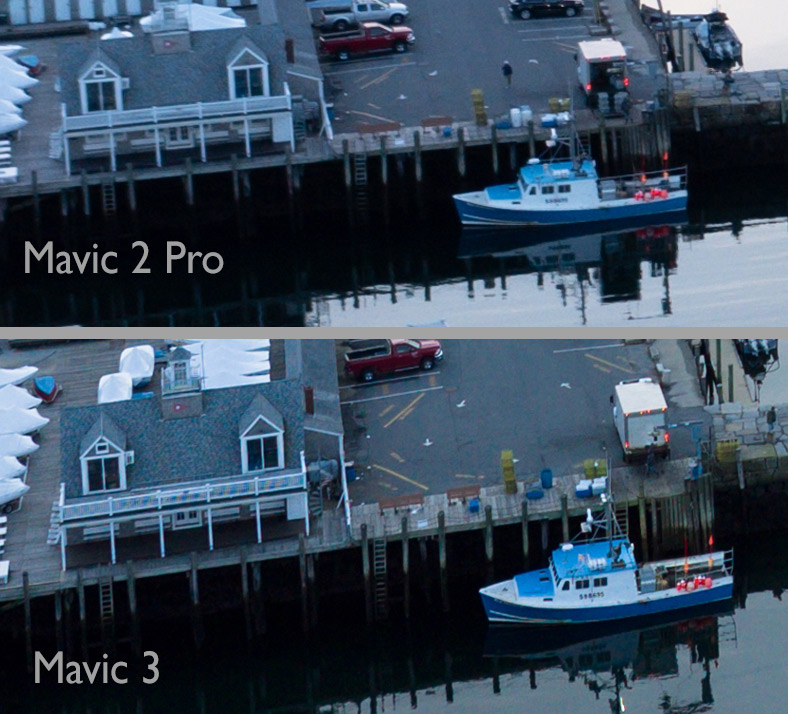
Although the Mavic 3 includes some groundbreaking new features, many reviewers will render their opinions about such things and I will not do so here.  I am only analyzing the photo quality from Mavic 3 with comparison to the predecessor Mavic 2 Pro.

Mavic 3 includes two cameras.  I am comparing the main camera to the camera of Mavic 2 Pro. The Mavic 3 main camera has a fixed-focal-length lens, 4/3 image sensor, and variable aperture.

The Mavic 3 supports capturing photos in either JPEG format or JPEG & RAW. While I almost always capture photos in RAW format and I do not need a JPEG, the initial release of MAVIC 3 will always save a JPEG.  That could possibly change in a future firmware update.

See the end of this post for a link to my 2018 comparison of Mavic 2 Pro image quality, compared to original Mavic Pro.

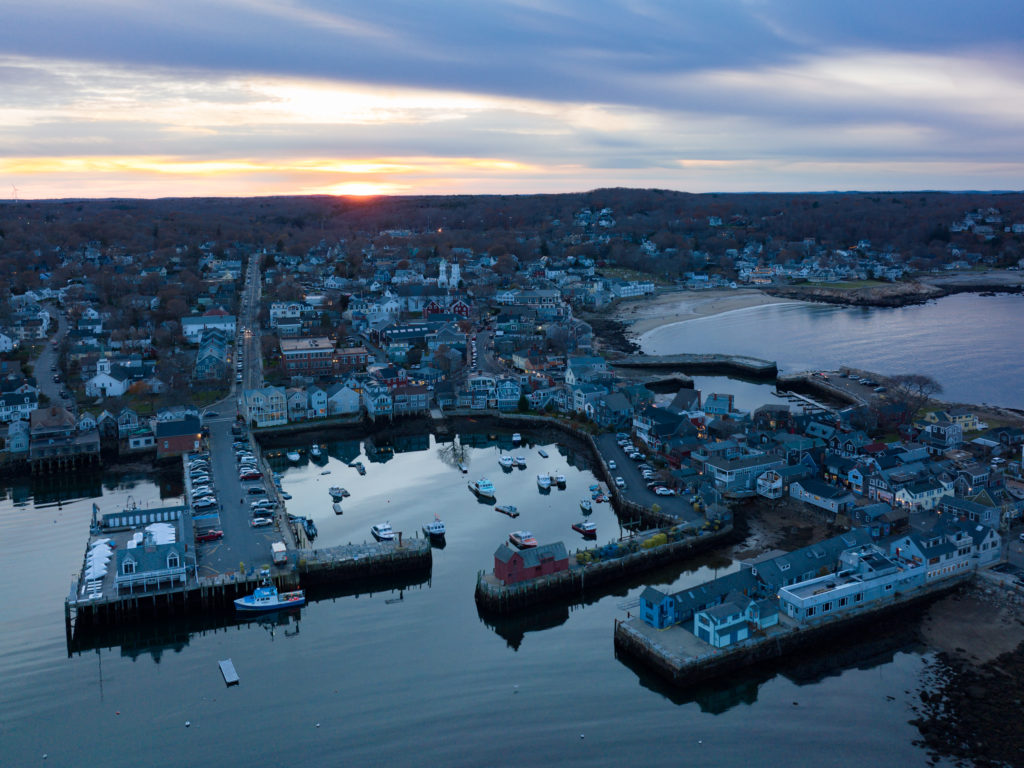
Testing the Mavic 3 at sunset … f\3.2, ISO 100

The main camera of Mavic 3 uses a 4/3 image sensor; this has implications.

  • The image rectangle has an aspect ratio of 4:3, which is same as Mavic 2 Zoom but is different than Mavic 2 Pro and Mavic Air.  For me personally, this implies that I must crop each image and discard some pixels to obtain a final image of 3:2 aspect ratio.
  • Four-thirds and Micro Four Thirds (MFT) are established standards. The diagonal measure of a 4/3 sensor can vary but is typically around 22mm.  Compare this to Mavic 2 Pro and Mavic Air 2S, which each have image sensors with diagonal measure around 16 mm.
  • A larger sensor can allow for either more pixels or larger pixels.  The Mavic 3 pixel resolution is not significantly different than Mavic 2 Pro.  Likely the individual dot elements (pixels) are larger.  Potentially that might translate to better ability to gather light, potentially reducing the signal-to-noise ratio.  But that is theoretical.  As the old saying goes, the proof is in the pudding. 

Some online articles suggest that the larger image sensor “gives Mavic 3 higher resolution and dynamic range” but …. higher resolution is a dubious claim and higher dynamic range is theoretical.

DJI drones have historically employed Sony Exmore image sensors; DJI/Hasselblad cameras are no exception. I must guess that the Mavic 3 is using the Sony IMX472-AAJK, but I have not confirmed this.  That sensor can capture all 20 megapixels at 120 frames-per-second.  Notably, this sensor uses “stacked CMOS” technology and is the first ever stacked CMOS sensor in the 4/3 size.  This sensor diagonally measures 21.77 mm.

The Mavic 3 user guide (available online) includes this disturbing note: “Before shooting important photos or videos, shoot a few images to test the camera is operating correctly.”   I shudder to imagine what might have happened during initial product testing to warrant such a warning.

Pixel Resolution

If you want a final image to have3:2 aspect ratio, then any 3:4 image must be cropped and that includes Mavic 3. Technically, you end up with fewer pixels than Mavic 2 Pro and Mavic Air 2S.

Mavic Air 2S @ 3:2 aspect  ………………  5472×3648  = 19.9 million pixels
Mavic 2 @ 3:2 aspect  ……………………… 5464×3640 = 19.88 million pixels
Mavic 2 @ 4:3 aspect (crop from 3:2)… 4852×3640
Mavic 2 @ 16:9 aspect (crop)…………… 5464×3070
Mavic 3 @ 4:3 aspect  …………………….. 5280×3956 = 20.88 million pixels
Mavic 3 @ 3:2 aspect (crop from 4:3)… 5280×3520 = 18.58 million pixels
Mavic 3 @ 16:9 aspect (crop)…………….. 5280×2970

Color

Opening RAW images in Adobe lightroom, the color is a bit green. That’s correctable but really annoying; I’m guessing this problem is because Lightroom/Photoshop/CameraRAW do not yet include a camera profile for Mavic 3 (Hasselblad L2D-20c).

Looking at the JPEGs, the color looks good – not vibrant, but good.

Sharpness

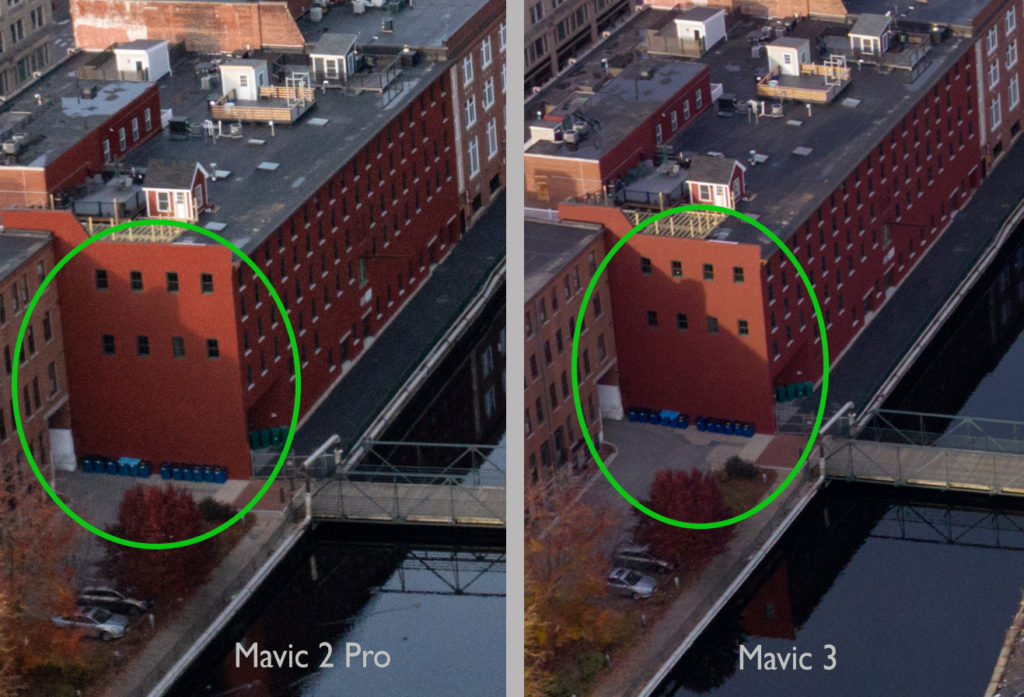
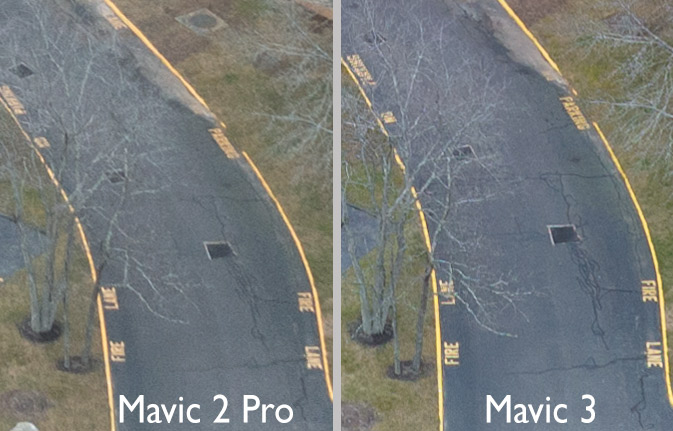
Comparing images from Mavic 3 and Mavic 2 Pro, at aperture f\3.5 and f\4.0, the two are equally sharp at center of the lens.  However, away from center, toward the edges of the image, Mavic 3 exhibits improved sharpness over Mavic 2 Pro.

High-magnification crop from the original RAW image

Image noise

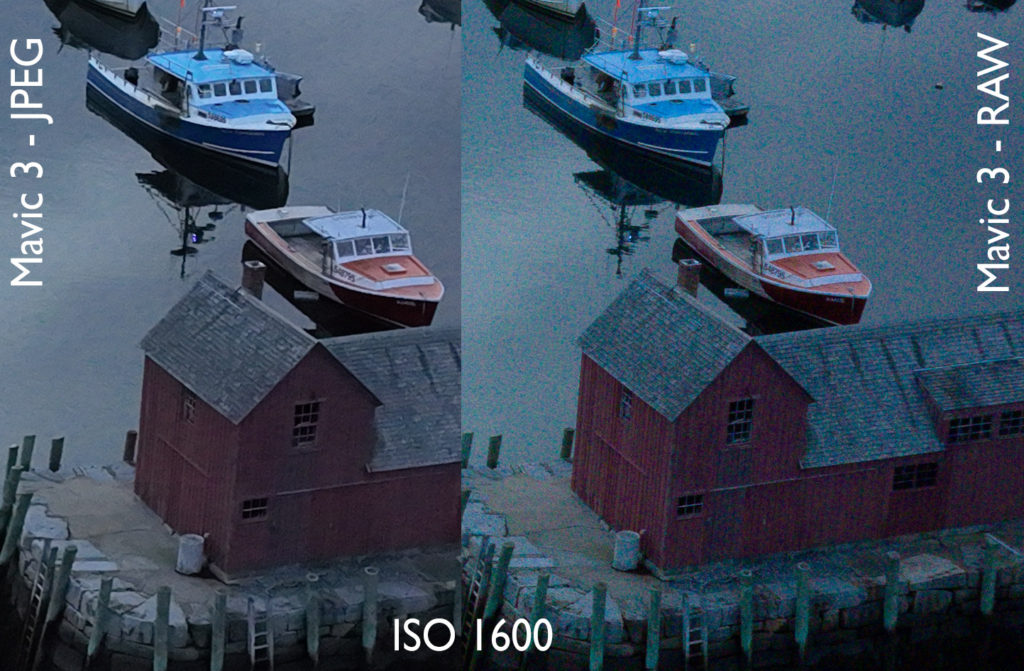
Considering all ISO 100 through 3200, Mavic 3 shows less luminance noise than Mavic 2 Pro. However, at any ISO, low light situations can result in considerable chroma noise in both shadows and midtones.  It is worst at IS0 800, 1600, 3200.  While it can usually be mitigated using noise-reduction in post-processing, the 4/3 image sensor should not exhibit this problem.  

As the camera saves both RAW and JPEG, I looked at the JPEGs.  Luminance noise is reasonably mitigated through ISO 1600; mitigation can be dicey at 3200.  Chroma noise is essentially eliminated. However, not surprising, this noise reduction comes at a price –  loss of sharpness.

Luminance noise in shadows … ISO 400, daylight with ND4 filter … N0te: ambient light and altitude are not identical

Mavic 3 … chroma noise in low light … ISO 1600

Chromatic aberration

In some situations with high-contrast fine detail, Mavic 3 can suffer from chromatic aberration similar to the first-generation Mavic Pro.  Although Mavic 2 Pro significantly reduced chromatic aberration, Mavic 3 is a step backward. This is observed with the clear DJI lens cover; I haven’t tried it yet with the naked lens.

Mavic 3 (RAW image) shows improved sharpness, but also shows chromatic aberration in railing balusters

Shadow detail

Considering detail in the darkest shadow areas, Mavic 3 has a slight advantage to reveal details that Mavic 2 Pro cannot. The difference is quite small.

DJI has stated that the Mavic 3 main camera has 12.8 stops of dynamic range, which is not significantly greater than Mavic Air 2S or Mavic 2 Pro.

Highlight detail

Both the original Mavic Pro and the successor Mavic 2 Pro often failed to resolve subtle detail in highlights. This commonly manifests in architectural details that are white,such as clapboard siding and trim mouldings.   Mavic 3 does shows a slight improvement.

Images captured with Mavic 2 Pro – particularly images that include architecture – have commonly required a great deal of effort to safeguard highlight details. At the time of capture, exposure bracketing saves an additional exposure wherein the highlights are rendered with reduced brightness.  In post-processing, that exposure is developed carefully and specifically for hightlight details.  Then those highlights are manually blended into the other exposure.  Only time will tell if Mavic 3 eliminates the need for that extra work.

Remote control

Apart from the camera itself, I must mention the remote control.  With the Mavic 2 Pro, I have very commonly used the camera control dial under the right index finger.  With Mavic 3, the RC-N1 remote controller has no such control dial; exposure settings can only be controlled via touch-screen. The expensive RC Pro controller includes a dial for right index finger, which I vaguely believe controls camera zoom and I do not know if it can be used for exposure purposes.  I did not spend the extra $1000 to get an RC Pro.

Mavic 3 … , daylight with ND4 filter, f\4.0, ISO 400


Here is my investigation of the Mavic 2 Pro, back when that was released in 2018:

Is the Old-Fashion Photo Album Dead?

Is the Old-Fashion Photo Album Dead?

Photo Album

Statistics tell us that 80% of all Americans use a smart phone. That number rises to 83% in some European countries. As we carry not only digital camera-phones but also digital photo storage in our pockets, are photo prints dead? Are old-fashion photo albums a thing of the past?

Framed photo prints are still valued, either for wall display or atop a desk. However, the once ubiquitous notion of a family photo album seems to have faded. From 2007 to 2017, people relied more upon photos stored in their smart-phones. This led to a common problem of filling up that storage to maximum capacity, requiring the time-consuming and painful task of choosing which photos to delete, to make room for new photos.

Since 2015, the available options for cloud-based storage have increased and largely eliminated the problem of insufficient storage for too many photos. This facilitates another problem – failure to delete useless photos and keep only the good ones. Yet another problem has arisen. While some amount of storage is free, larger amounts of storage incurs a fee and and if you cease to pay that fee for any reason (accidental or temporary financial stress), all of your photos may be forfeited. It is similar to renting a storage closet; if you do not pay the monthly fee for any reason, the storage company will get rid of all your stored items regardless how valuable they might be.

What about the old-fashioned album of photo prints? While albums are clearly still valued in the context of wedding photographs, what about the iconic album of family photos? Once upon a time, every family had such an album.

Albums do still have value but not as much as twenty years ago. The physical size limitations require us to curate our photos; that’s a good thing. From a total of 2000 photographs of varying quality, we might cull 100 photos of high quality or highest emotional value. That result is both more meaningful and more practical to share with other people.

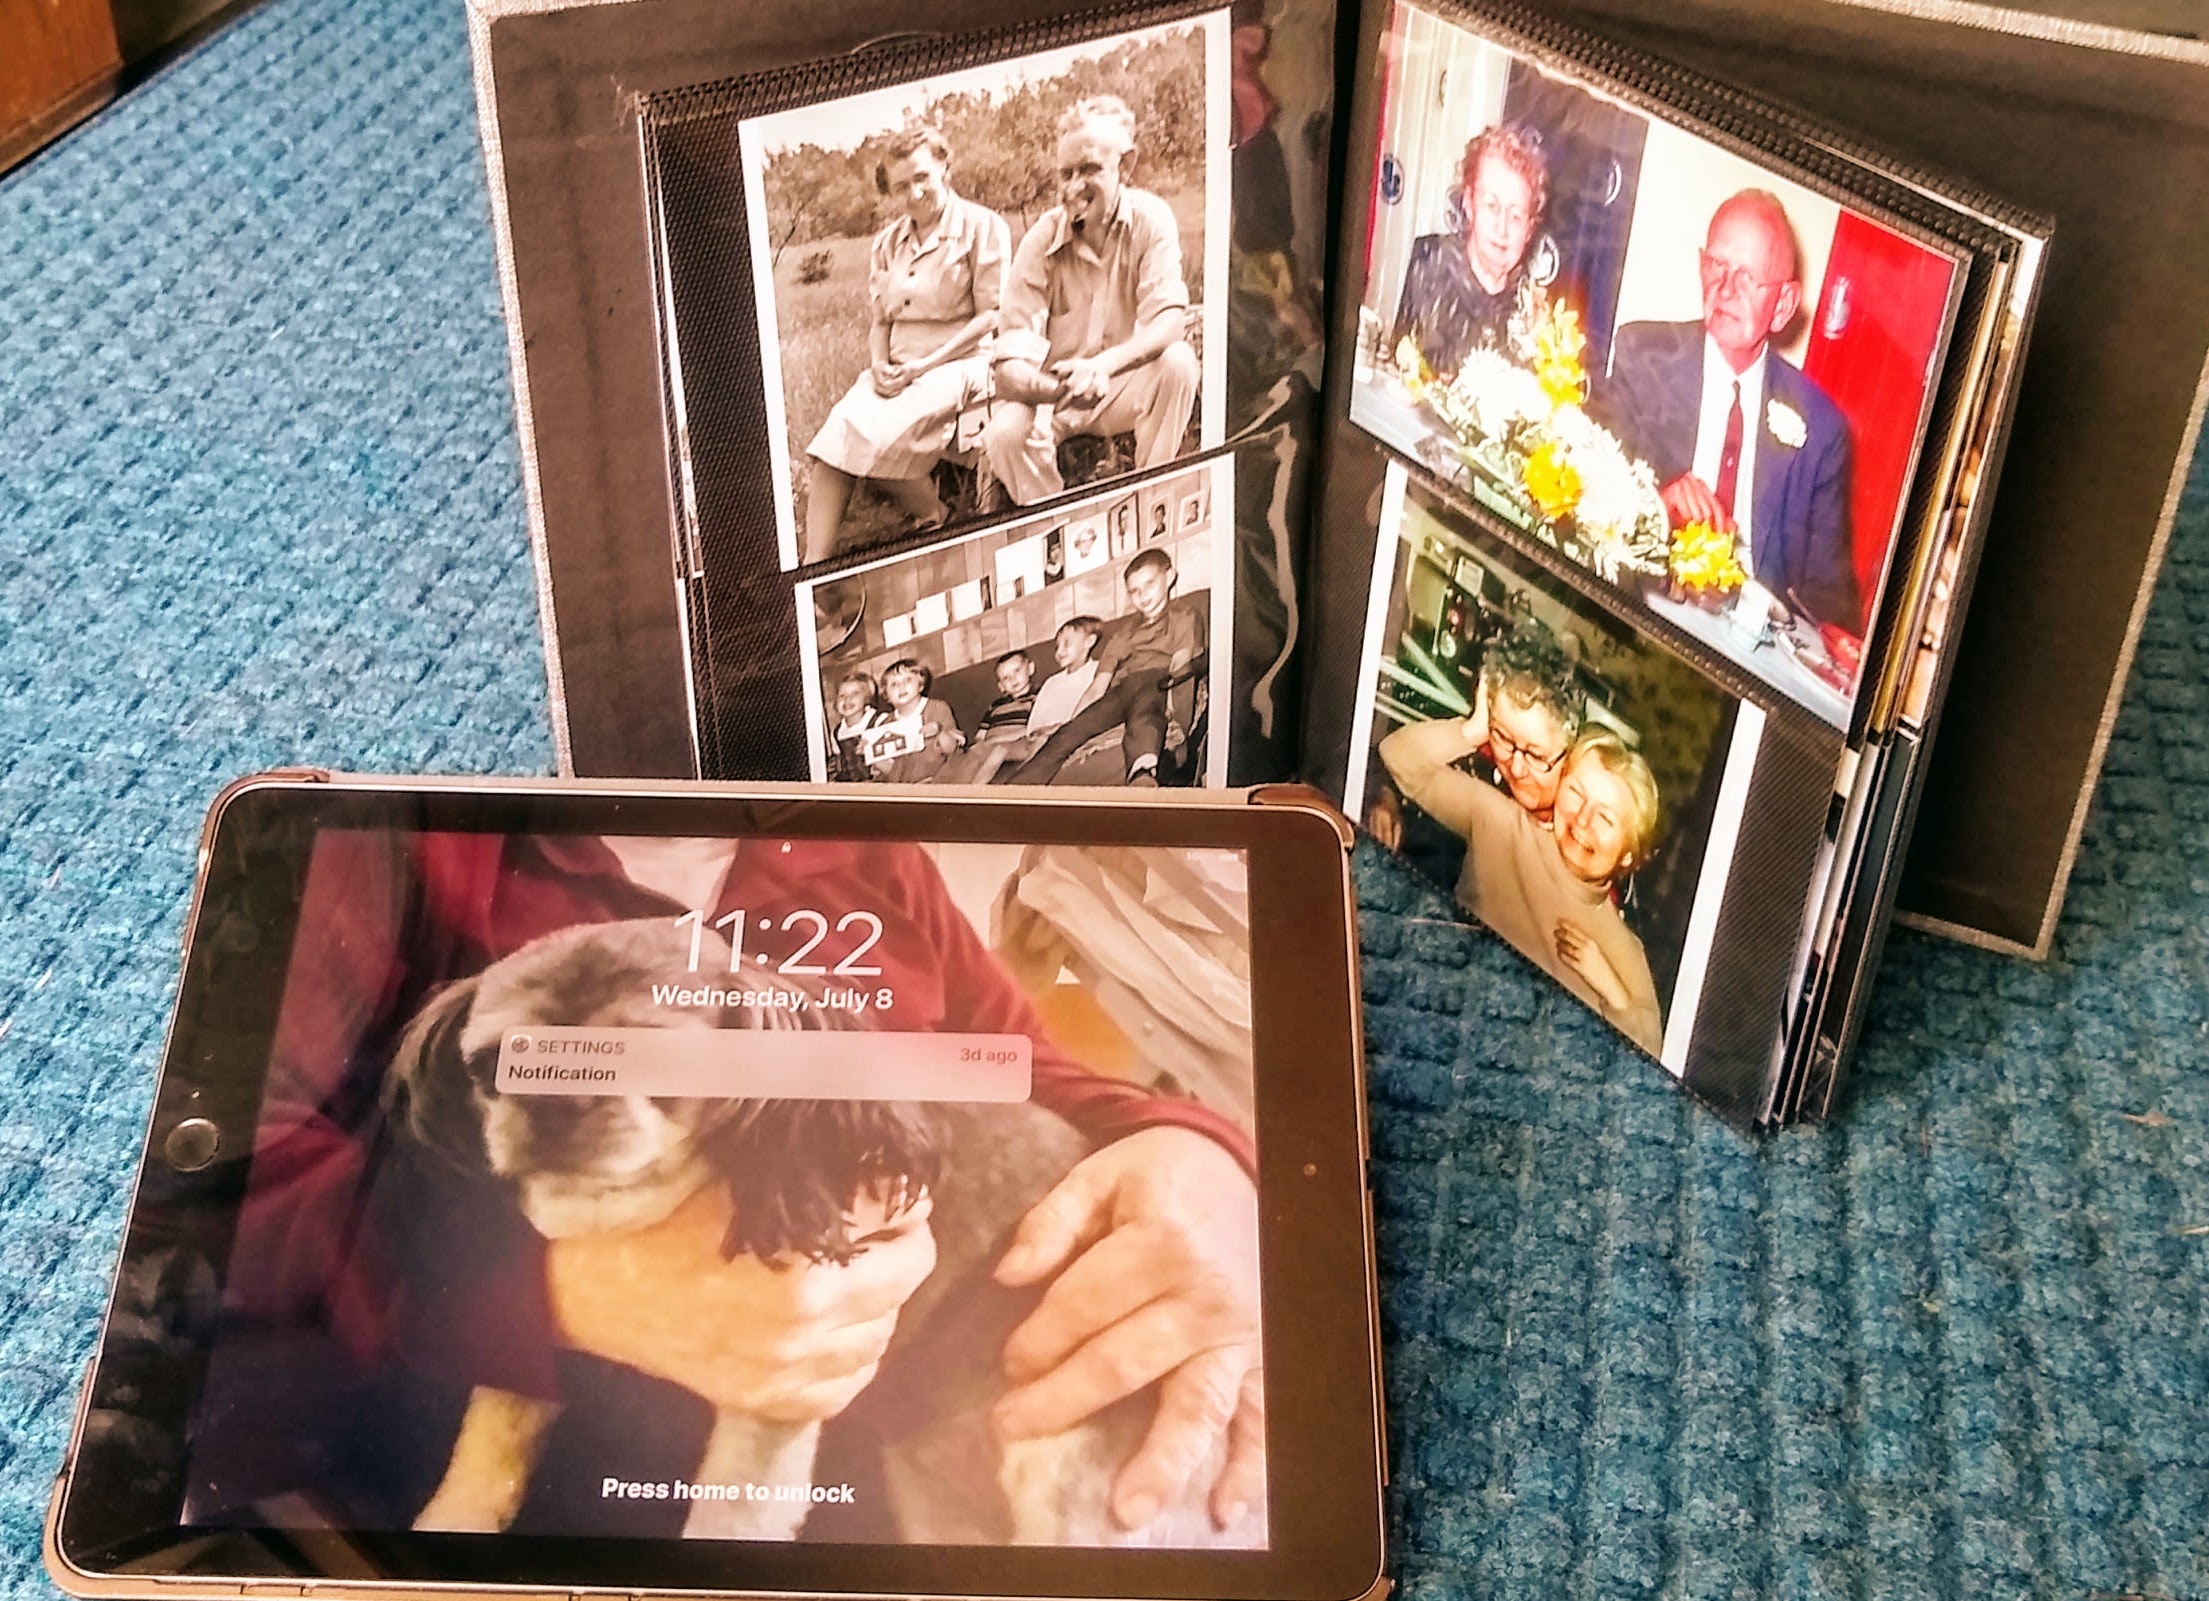
Gathering my parents’ old photo albums, I recently selected the most meaninful and scanned these to digital form. (Some of these images are older than me.) I asked my sister for any additional digital photos from her family collection (images very different from my mom’s collection). Then printing these photos at 4×6“, I gathered them into an album and gave it to my dad on Father’s Day. This album is both meaninful and practical, as it gathers significant images from multiple sources and presents them in an obvious form that requires neither electrical power nor any technology to view them.

A blank photo album, awaiting your photo prints, is difficult to find in local retail stores. I tried three local stores and found that two of the stores each offered only one album product for purchase. So, if you are looking to purchase and empty album, your best bet is to shop online. Alternatively, the best local retail option is probably a photo/camera store.

Obviously, accessing photos from a mobile device is great because you can access your photos without carrying around extra baggage. (And, if your photos are stored in the cloud, you may be able to access your photos from any device at all.) A physical print album is not going to replace your digital photo viewing; it is merely complimentary – an alternative way of seeing and sharing photos.  Sometimes a physical print album feels better.  Furthermore, we know that many people prefer to read print books instead of eBooks.

A digital photo frame is another option. These electronic gadgets ( which have been available for at least 15 years) can have advantages over low-tech albums and high-tech smart devices. For viewing, the user interface is as simple as : turn it on and watch the slide show. For photographs, some devices include wi-fi capability and can pull images from online sources. This may allow distant family members to upload new images remotely – for example, family members can upload photos of grandchildren which then display on grandparents’ digital photo display. While you can certainly do this with computers and mobile smart devices, the digital photo frame may me an easier, more friendly mechanism, particularly for people who don’t like the complexity of computer interfaces.

In the final tally, viewing family photographs on computers and mobile smart devices has certainly taken center stage. The appeal of printed photo albums has declined dramatically. The venerable photo album is not entirely dead and likely it never will be.

Recovering Family Photos from Film

Recovering Family Photos from Film

Film Scanner

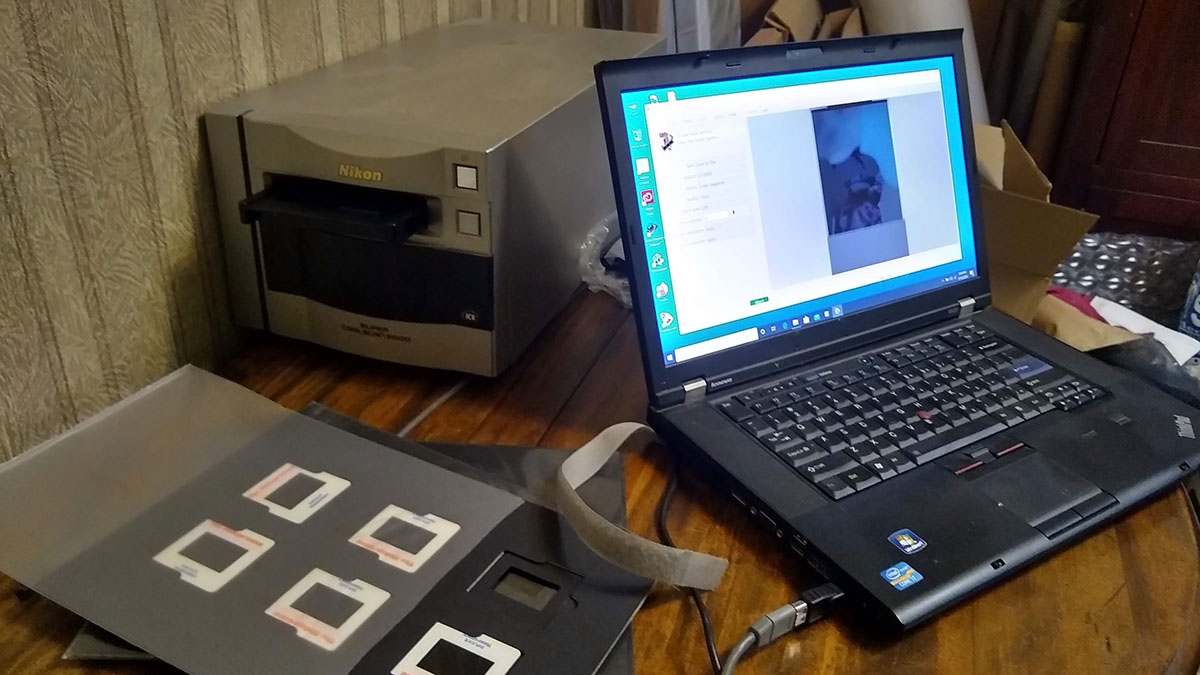
Recently, I borrowed some old photo albums from my mom. These photos were captured either on negative film or Polaroid instant film.  For posterity sake, I am converting these old photos to digital.

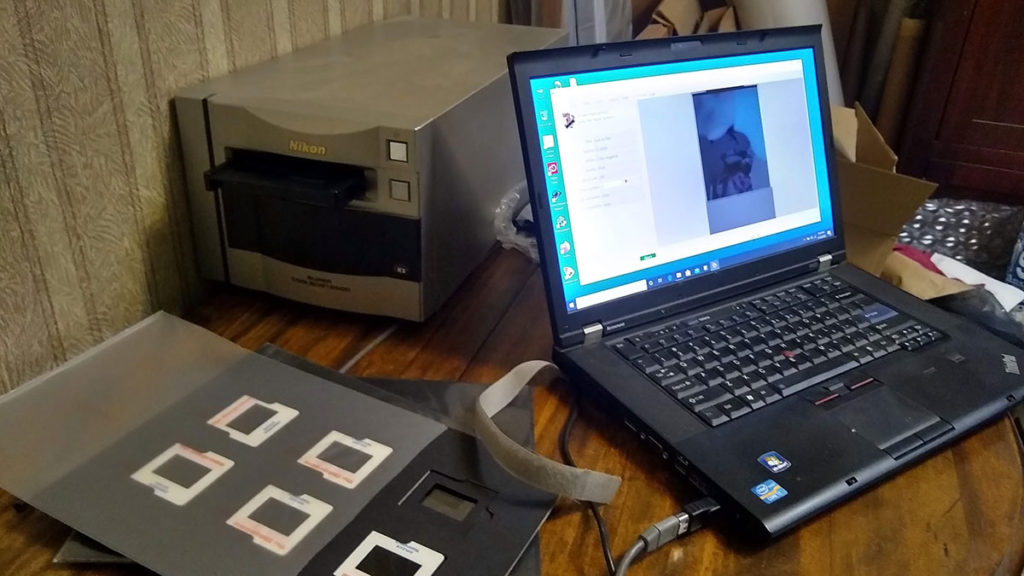
For either negative film or slide film, a computer accessory to scan film can still be purchased today, but I had an old Nikon scanner collecting dust. This scanner is more than a decade old and the interface to a computer is Firewire, not USB. As Firewire has fallen out of favor, most computers do not have a Firewire port. However, my aging laptop does have a Firewire port. Yet I had to overcome two problems. First, having upgraded the laptop to Windows 10 last year, Win10 does not include a driver for Firewire. Second, the port on the laptop is a different size than the cable from the scanner.

With some difficulty, I eventually did install a legacy Firewire driver. And a bit of research online told me that Firewire connectors can be 4-pin, 6-pin, or 8-pin.  Purchasing a 4-pin to -6pin adapter (which can be seen in the photo here) allowed connecting the scanner to the computer.

Nikon no longer supports this scanner and the last software release was intended for Windows Vista (a short-lived version of the OS in between Windows XP and Windows 7).  After considerable research and effort, I could not get this software to function on Windows 10. However, in the past, I had also used a third-party application called VueScan and I found that I still had that 10-yr-old software installer.  After installing that and configuring it to run in Windows-7 Compatibility Mode, I was able to successfully operate the scanner.

If you don’t have a film scanner, you can buy a new or used scanner … or send your film to a lab that provides scanning services.  While I was still struggling to get my old scanner operational, I looked online and saw a used Epson V600 for less than $100.  This was my backup plan, which I now do not need.  The important feature here is that the V600 can scan both 35mm and medium-format films, which is important to me but may not be important to you.

Many labs provide scanning services; just search online.  I have done this in the past with good results. The resulting digital photos may be provided to you via internet download or on a CD-ROM.  (Be aware that labs may charge you a fee for each physical disk, perhaps $5.)

Two services can convert still-photo film, motion-picture movie film, and VHS videotape:  LegacyBox and Kodak Digitizing Box (yes, Kodak, an old trusted name in photography). But I have not personally tried either of these services. If you only need to digitize 35mm negatives or 35mm color transparency film, other service providers may be less expensive.

Personally, I don’t want to digitize ALL the old film photos because most of them are discardable snapshots that do not show important memories. It makes sense to extract the few negatives or slides, scan them, and then return the original to where I found it. For this reason, I chose to do the scans myself rather than send it out to a scanning service.

A smaller number of photos were shot on Polaroid instant film. This is outside the capability of a film scanner.  However, these can be scanned using a flatbed scanner or an all-in-one computer printer (printer, fax machine, scanner all in one). It just so happens that I acquired a new all-in-one last year and I have found that this is adequate to scan the Polaroid photos.

Hypothetically, let’s say you’ve just scanned a photo of somebody’s 18th birthday. (My mom was very careful to annotate each photo with the date and subject, usually written on the backside of the photo.)  You’ll want to save that descriptive information with the photo.  The final step in scanning an image is to rescue the “metadata” – the descriptive information.  The digital photo will be either a JPEG or TIFF file. Both these formats include metadata and you will need some sort of software application that allows you to write that information, notably a particular item called “Description”.  I personally used Adobe Bridge but there are numerous other alternatives.

How to share your mobile device (smartphone, tablet) video/audio to a TV screen

How to share your mobile device (smartphone, tablet) video/audio to a TV screen

Many devices today support sharing video and audio to a separate device. Getting it to function can sometimes be simple and sometimes be difficult, depending upon the specific devices.  Sharing from an Apple iPhone (or iPad) to Apple TV should be easy to setup.  Sharing from a Samsung smartphone/tablet to a Samsung smart TV should also be easy to setup.  But the word “should” doesn’t always mean much.

Wired connection using an HDMI cable

Regardless of whether the TV is a “smart TV” or not, you may be able to connect the mobile device to the TV via an HDMI cable, set your TV to use the HDMI input rather than television. However not every smartphone or tablet supports this. For example, Motorola smartphones apparently do not support it.

Current iPhone models have a Lightning port and you will need a Lightning-to-Digital-AV-Adapter.  (Rumor suggests that upcoming new iPhone models will instead have a USB-C port.)

An Android phone probably has a USB port. (Specifically, newer models within the past 18 months will have USB-C.) You will need a USB-to-HDMI adapter … or possibly an MHL cable, but most devices do not support MHL.

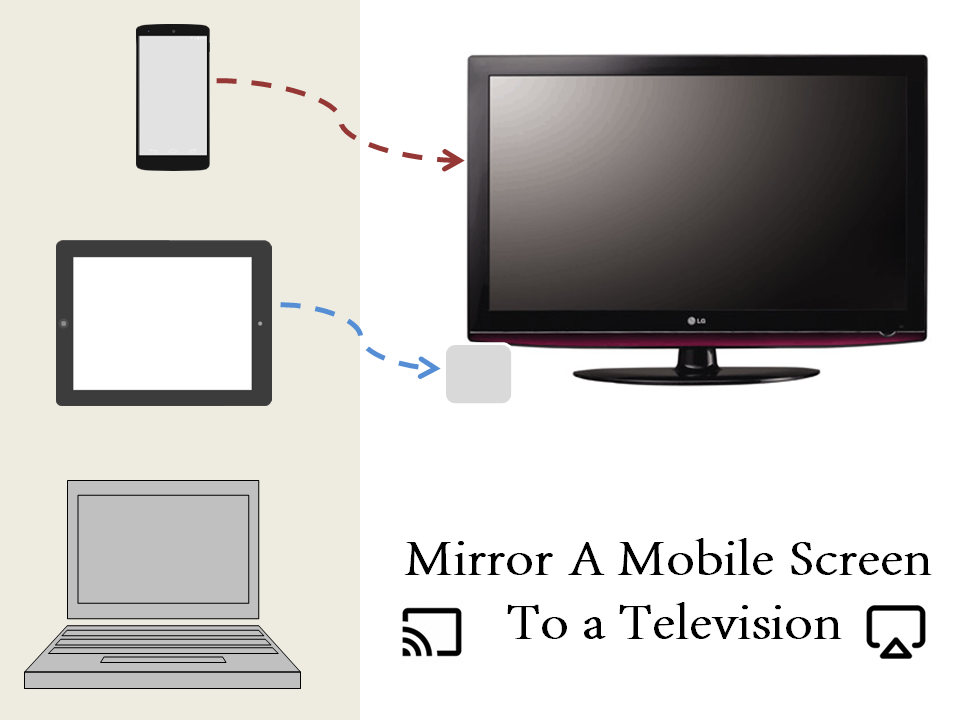
Wirelessly connect a smartphone/tablet/computer to a television

If a TV is not a smart TV but does have HDMI input ports, you can attach an external device to the TV which effectively adds “smart” to your dumb TV. Common external devices that support wireless sharing include:
Google Chromecast, EZCast, Apple TV, Samsung AllShare, Amazon Firestick, and Roku.

Using your smartphone/tablet/computer as the sending device and your smart TV as the receiving device, there are two basic requirements:

  • The two devices must be on the same local network (e.g. your home wi-fi).
  • The two must utilize the same stream-casting protocol.

The three dominant protocols today are:  Miracast, Airplay 2, and Google Cast (a.k.a. Chromecast built-in) .  Samsung’s Smart View is based upon Miracast.

Chromecast will not function without an internet connection; this is not true for Miracast and Airplay 2. Miracast is built upon a standard called “Wi-Fi Direct”, allowing two devices to communicate directly rather than over a network. (AirPlay is proprietary, specific to Apple.)

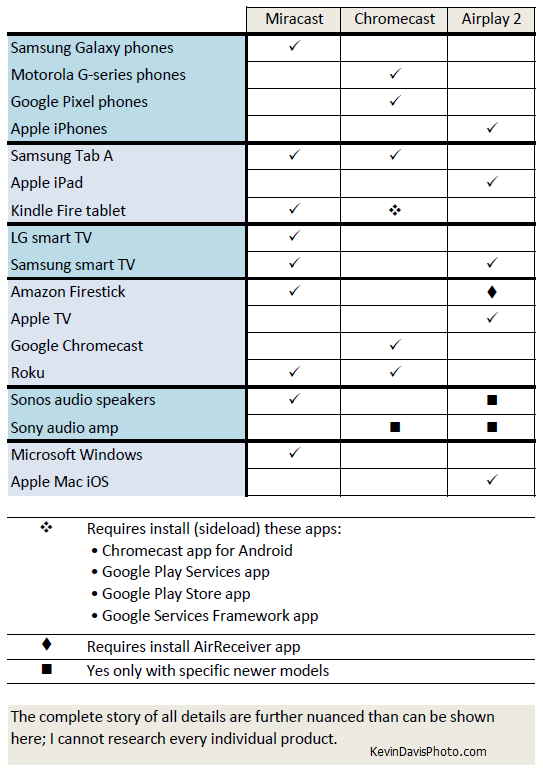
I have an Android tablet that has successfully connected with two different smart TVs, Amazon Firestick, and an audio amplifier; but my smartphone can only connect to one of those four.  The phone supports only Chromecast while three of the other devices support only Miracast. The following table attempts to show such compatibilities and incompatibilities.
Casting

Stream “casting” and “screen mirroring” are two forms of wirelessly sending media (video and/or audio) from one device to another. Although they are different, the term casting may sometimes be loosely misused.

Technically, casting (a.k.a. stream casting) is a feature of a specific application, with support from the mobile device. YouTube, Netflix, Hulu, and iHeartRadio are a few of the apps that support casting.  [Note to some friends using the Zoom videoconferencing app: this does Not support casting but you can certainly use screen mirroring; keep reading.]

Example: On an Android device supporting Chromecast, go to the settings (swipe down from the top of the screen).  Enable: Cast.  That should present a list of available destinations (e.g. a TV). The mobile device will send an invitation to the destination and may display the animated icon (illustrated above).  Then launching the mobile YouTube app, it shows the connected icon (illustrated above) in the title bar at the top of the app.  Upon launching any video within the app, the video and audio are wirelessly cast to the TV.

In the case of a video&audio app such as YouTube, casting to an audio-only device, the video plays on the mobile device as normal while the audio plays from the audio device. I don’t recommend this, as the audio is delayed and no longer synchronized with the video.

Display Mirroring

Display mirroring (a.k.a. screen mirroring) is a feature of your mobile device that wirelessly replicates your local device display on a remote screen (e.g. television).  As this mirrors your entire screen, you can use ANY applications and those apps need not include any special features. (Possibly, you may also be able to use your TV as the source and mirror that to another device, but I cannot think of a scenario where that would be useful.)

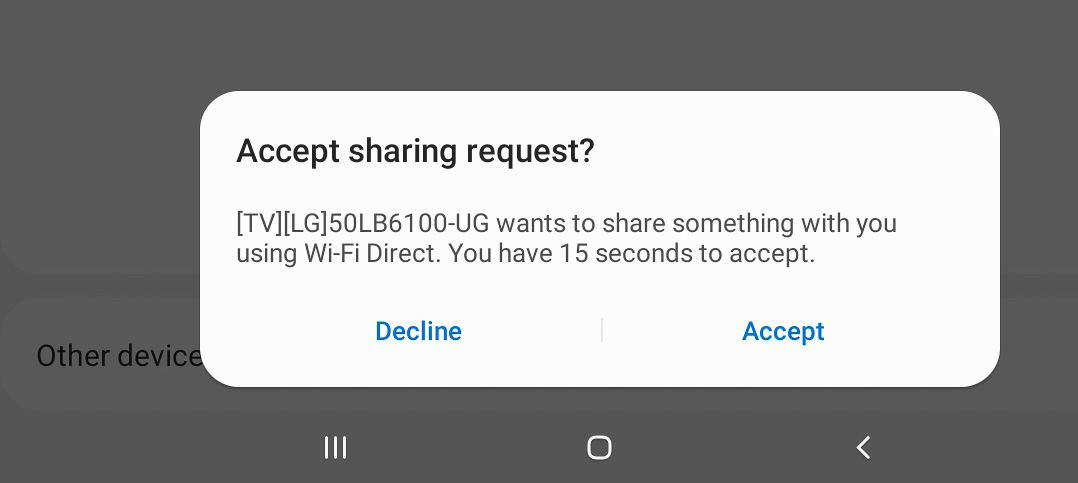
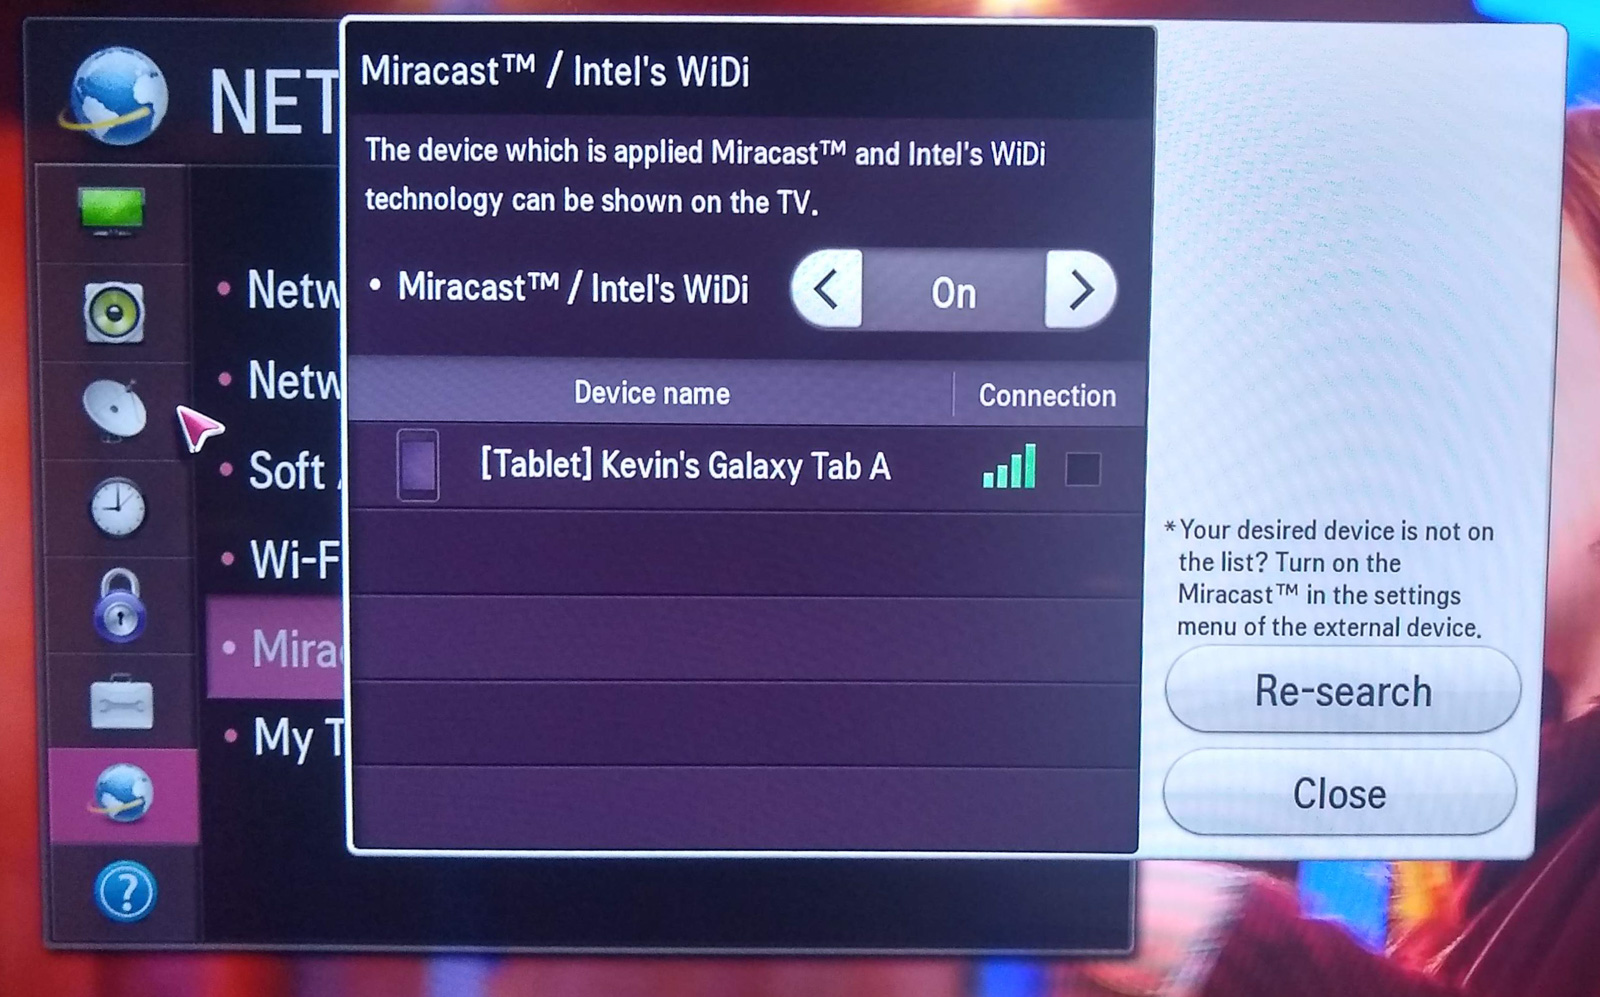
The following photo shows the activation of mirroring on a particular model of LG smart TV.  As you can see, the TV has identified that a Galaxy Tablet is nearby and enabled for casting/mirroring.  The tablet may then prompt to authorize the connection, shown in the next photo.
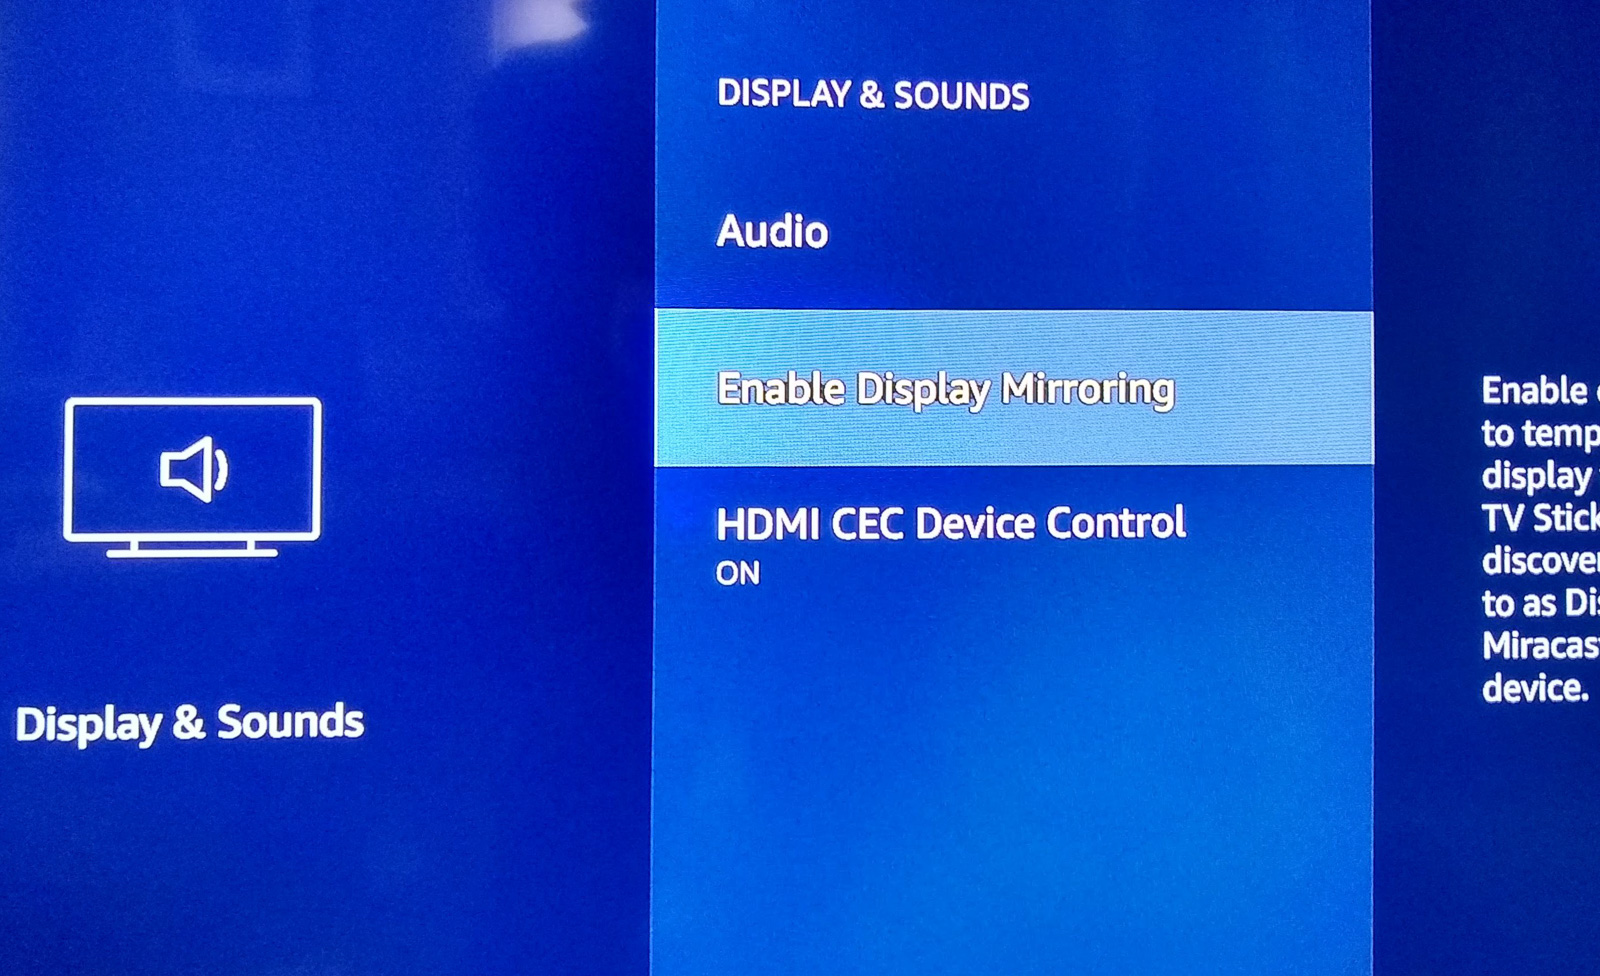
The next photo shows the activation of Screen Mirroring on Amazon Firestick.
Samsung

Smart View is Samsung’s brand of Miracast.  Smart Things is Samsung’s home automation, with the ability to control many smart home devices, including smart TVs.

In the TV on-screen menu, go to Connection Guide and enable screen sharing (screen mirroring).
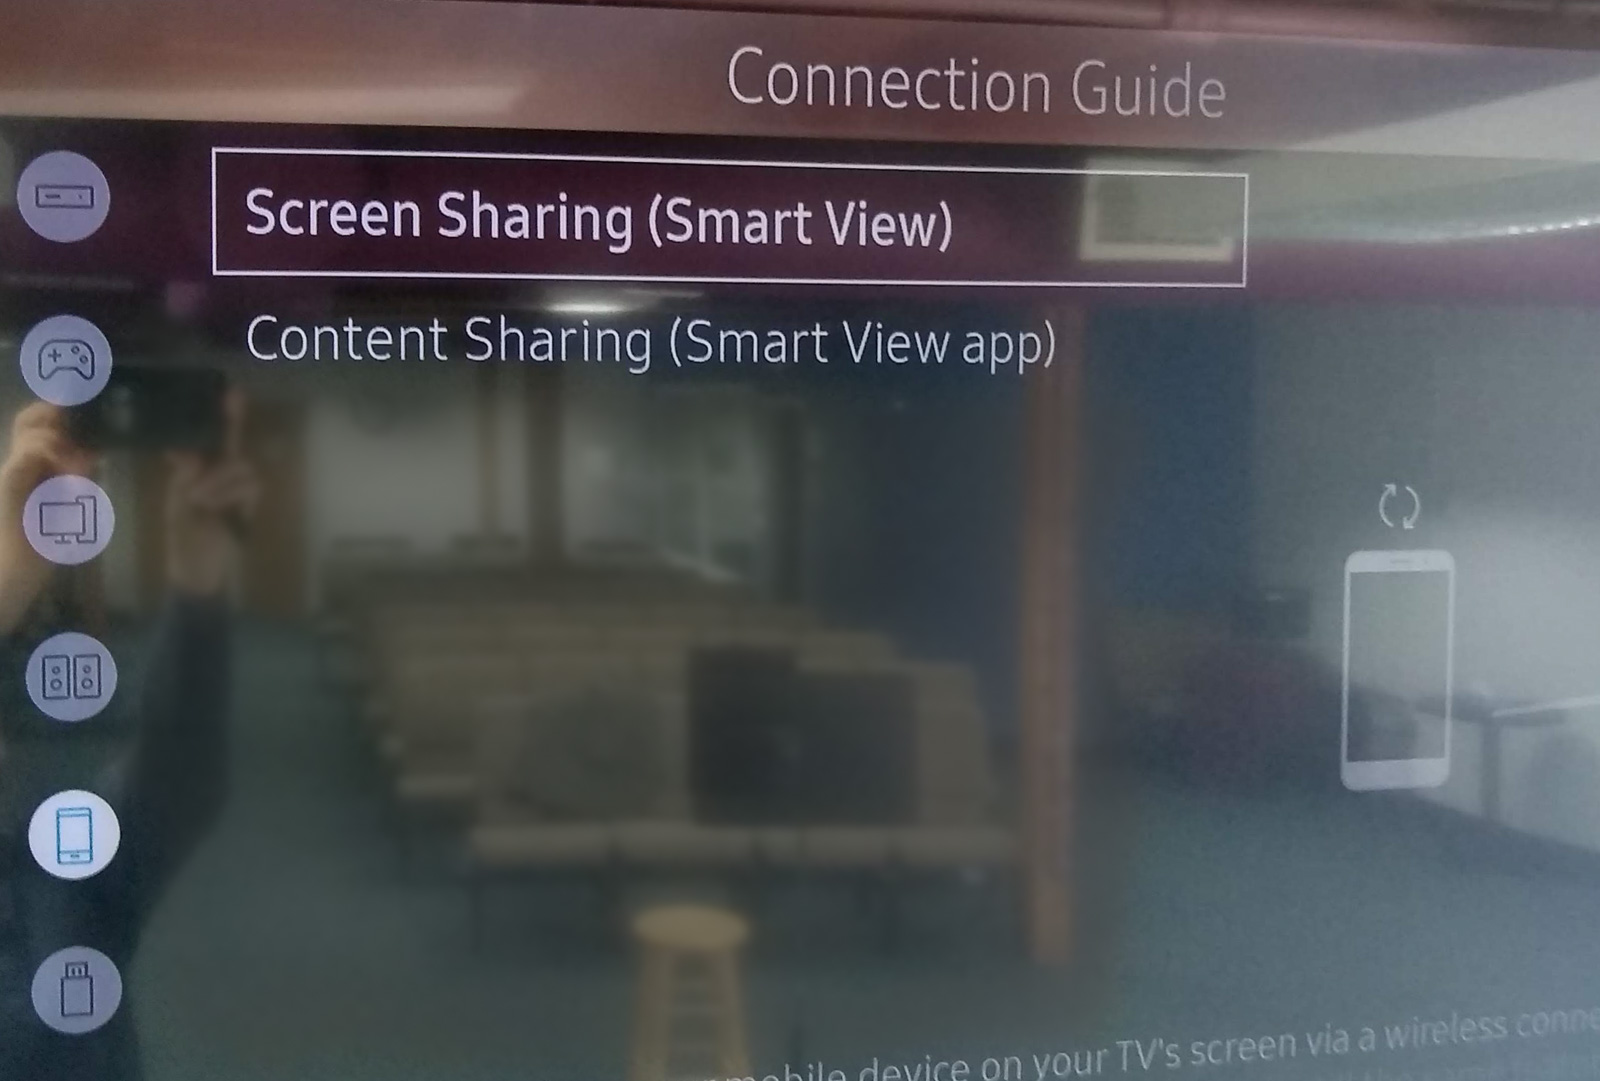
In the tablet settings, enable SmartView, which should then present a list of available destinations, including the nearby smart TV.  Easy peasy.
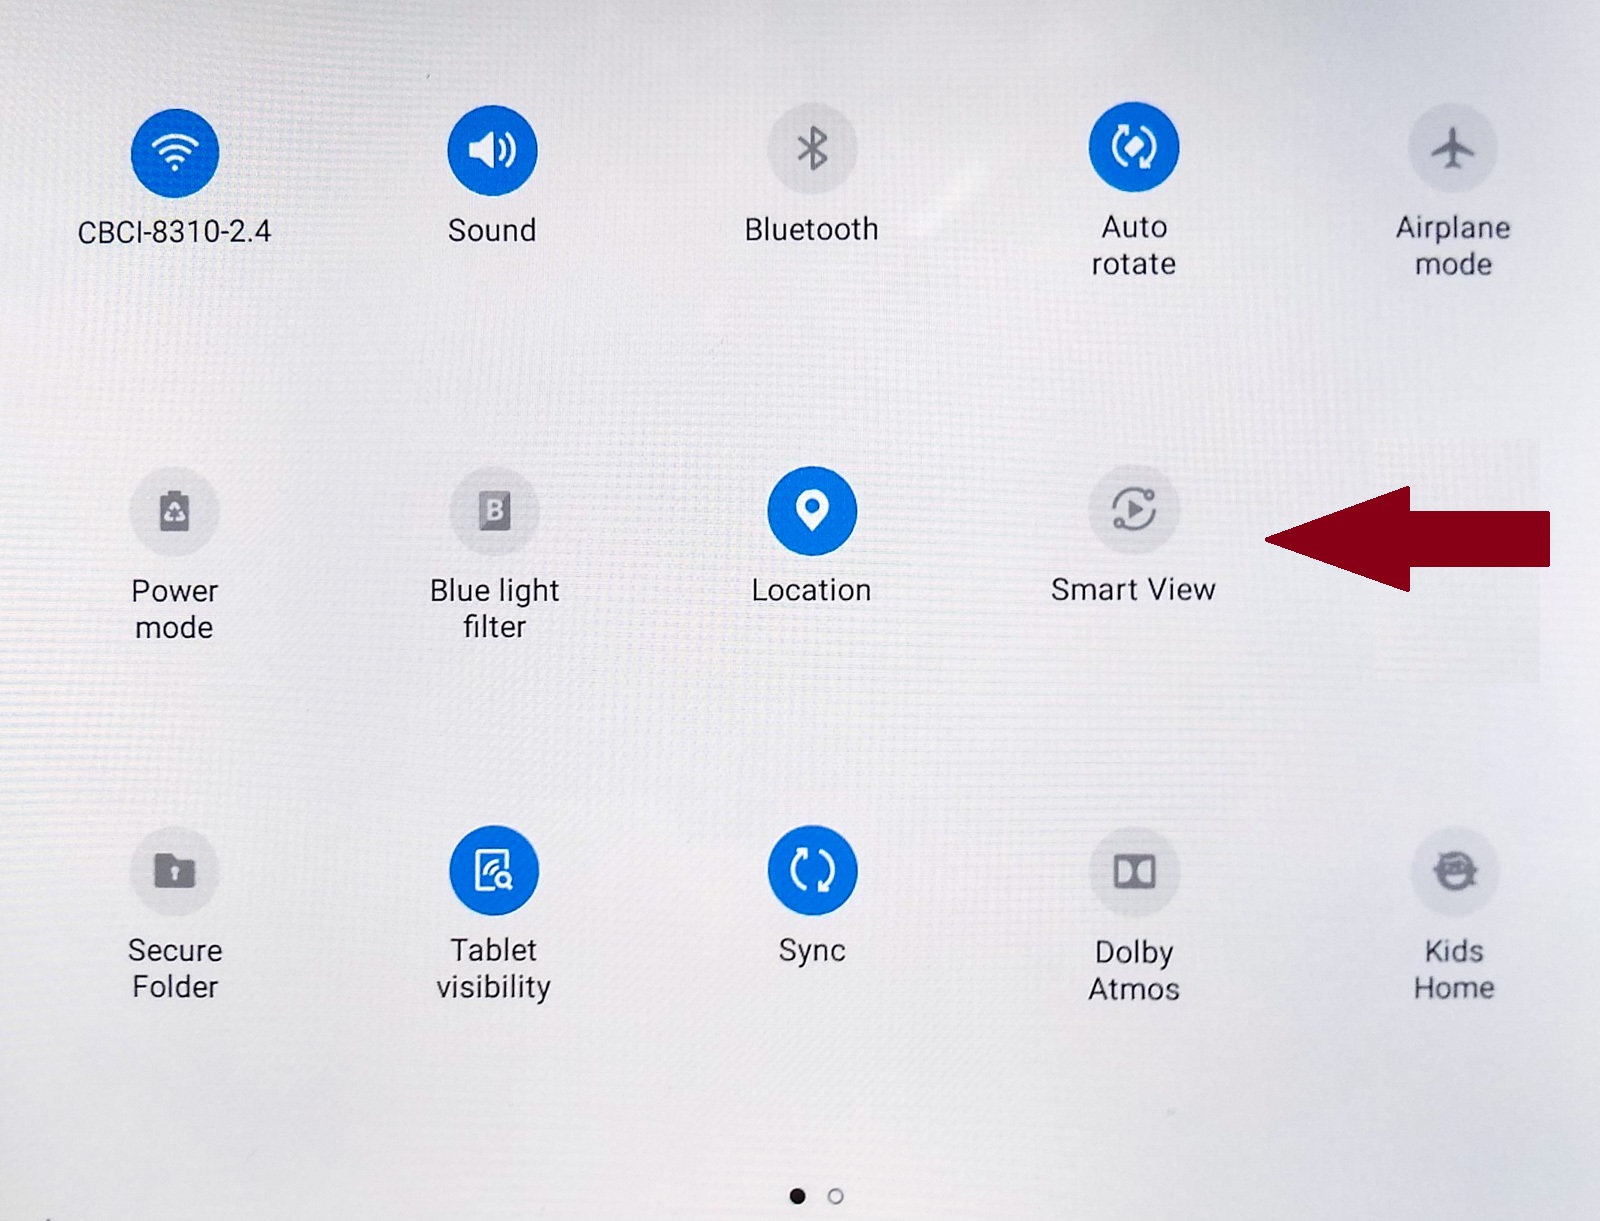
In one particular instance, I easily established mirroring from a Samsung tablet to a Samsung smart TV … but it eventually ceased for an entirely unknown reason and would not reactivate. I rebooted the tablet but that did not resolve the problem.  Restarting the TV also did not resolve the problem.  Seeing no resolution, I searched online to see if anyone else had encountered this problem and perhaps offered a solution.

In online discussion forums, a couple of separate people reported difficulty with S6 or S8 smartphones wherein the problem was solved by using the Samsung Smart View app instead of the phone’s built-in settings. However, the Android app store included a note suggesting a different app for connecting with newer model TVs – Samsung  Smart  Things. I installed that and tried it. Although this was also unsuccessful, it did report a useful help message: try unplugging the TV power (and then plug in again). To my surprise, that did resolve the problem.


Other protocols

  • Amazon Fling is very similar to Google Cast but never achieved wide acceptance
  • DLNA may be available in older products but not used in newer products
  • Intel WiDi (Wireless Display) was officially discontinued in 2016
  • DIAL (DIscovery And Launch)
How Many Megapixels Do I Need?

How Many Megapixels Do I Need?

Problem #1

A friend had trouble emailing photos from his smartphone. His photos were more than eight megapixels and he was trying to email two dozen of them in a single email. His email did not want to send an email totaling 400 megabytes. The resolution of his smartphone camera captured far more pixels than he needed and the files were … not small.

Problem #2

If you upload a small photo to an online service, particularly social media, that service will likely attempt to enlarge the photo … and you may not like the quality of the result.  While shrinking a photo typically does not have a negative impact on photo quality, enlarging can possibly have undesirable results because the enlarging process is attempting to invent pixels that did not originally exist.

Display on a smartphone

If you primarily look at photos on your phone, then 5 megapixels is more than you need.

Consider the display resolution of some popular smartphones:

  • Google Pixel 3 is 1080 x 2160 … 2.3 MP
  • iPhone X is 1125 x 2436 … 2.7 MP
  • Razor Phone 2 is 1440 x 2560 … 3.6 MP
  • Samsung Galaxy S9 is 1440 x 2960 … 4.2 MP

Print

Printing a photo onto paper is the most demanding application. As a general rule of thumb, high-quality printing requires between 240 to 300 pixels per printed inch. The bigger your print, the more pixels you need.

Example:  A 5-megapixel photo should print well up to 8×10 inches
(8×240) x (10×240) = 4.6 megapixels

Facebook

The recommended upload size is 1,200 × 630 pixels. You can certainly upload a larger photo, but Facebook will automatically shrink it.

Instagram

By design, Instagram favors square photos. You can post a rectangular photo, the Instagram default is a square crop. Upon first uploading your photo, you have an opportunity to undo that crop, but you cannot subsequently edit the photo to change it after your posting is complete.

The recommended size ix 1080 × 1080 pixels. You can certainly upload a larger photo, but Instagram will automatically shrink it.  If you upload a rectangular photo, it will be cropped to width 1080 pixels.

Twitter

Recommended upload size is 1200 × 675 (aspect ratio: 16:9): You can certainly upload a larger photo, but Twitter will automatically shrink it.

Display on a tablet

Consider three tablets.

  • Amazon Kindle Fire HDX 8.9” : 2560 × 1600 pixels, 8:5 aspect ratio
  • Apple iPad 10.2” (2019) : 2160 × 1620 pixels, 4:3 aspect ratio
  • Samsung Galaxy Tab A 10.1” (2019) : 1920 × 1200 pixels, 16:10 aspect ratio

If you size an image 2560×1600, it will display full-screen on the Kindle HDX 8.9” but may seem too large for both the iPad 10.2” and the Galaxy Tab A 10.1”.  Not to worry, the tablet includes the necessary smarts to dynamically make your photo fit the device screen without modifying your stored photo.

You can certainly store photos with higher resolution than the device display; the only consequence is that the photos consume more storage space than is necessary.

eBook, part 1 –  cover photo displayed in the ebook store

For the Kindle store, Amazon recommends 2500 x 1563 pixels.

eBook, part 2 –  photos inside the book

In large part, this comes back tablet display screens. As the Kindle and iPad (described previously) are similar regarding 1600 pixels in the smaller dimension, you might size your photos to 1600 pixels. Amazon recommends twice this, 3200 pixels, but I don’t know why.

Upon uploading your eBook to the Kindle store, your photos will be automatically compressed.  My latest ebook manuscript (with photos) was more than 12 megabytes before submitting, but Kindle compression reduced it to 4 megabytes.

The amount of royalty you earn from each book sale may be reduced because total eBook file size may incur a larger “delivery fee” per individual sale, perhaps fifteen cents per megabyte. An e-book with many high-resolution photos may incur a higher delivery charge and therefore reduce the royalties paid to the author.