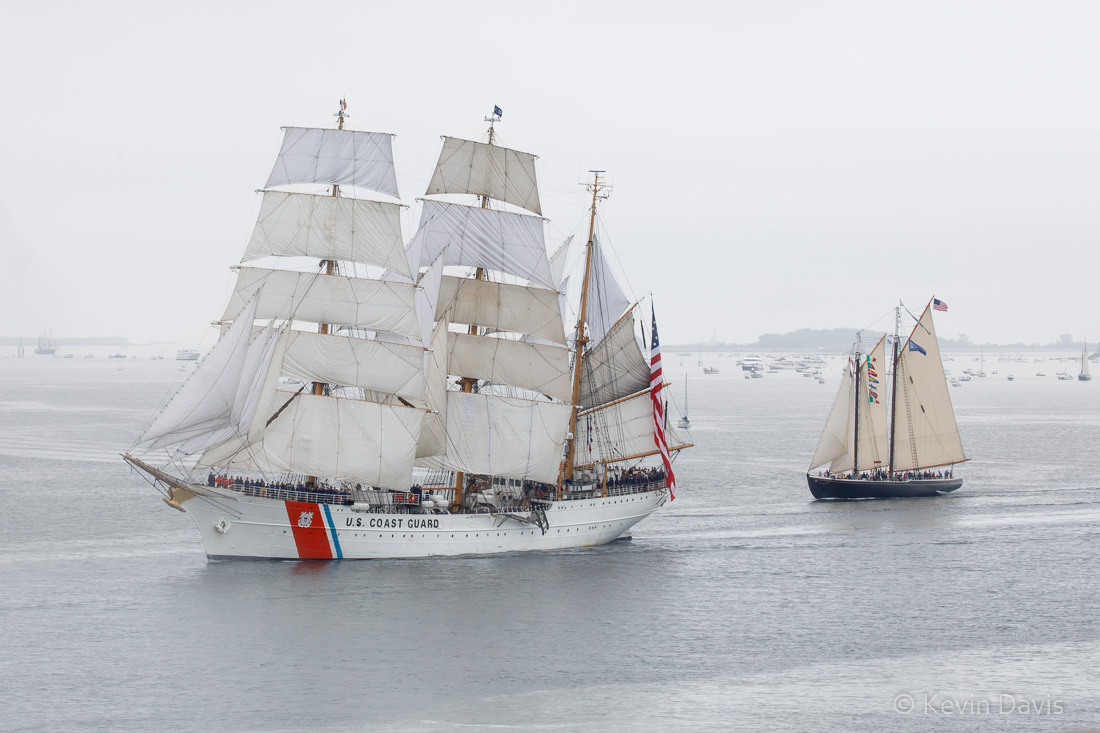
I first began photographing tall ships during SailBoston 2000. Since then, I have photographed tall ships many times from Philadelphia PA to Camden ME. SailBoston 2017 was not to be missed, being the largest gathering of tall ships in the northeast since 1976.
As the weather for the grand parade of sail was a big foggy, the resulting images were low contrast. If your camera is capturing JPEG images, then you might change the camera settings to increase the contrast. But for those of us who are sticklers for image quality and therefore capture RAW images, the camera setting for contrast doesn’t actually do anything. Here’s how I post-processed RAW images using Adobe Lightroom.
Original low-contrast image before post
(click on the image to see the full-resolution image.)
When lighting is low contrast, you have a choice of keeping that or compensating for it. If you choose to compensate, the most important step is usually to lower the black point. Essentially, low contrast implies that the darkest parts of the image render as a lighter tone and the brightest parts of the image render as less bright. Dark isn’t particularly dark and bright isn’t particularly bright.
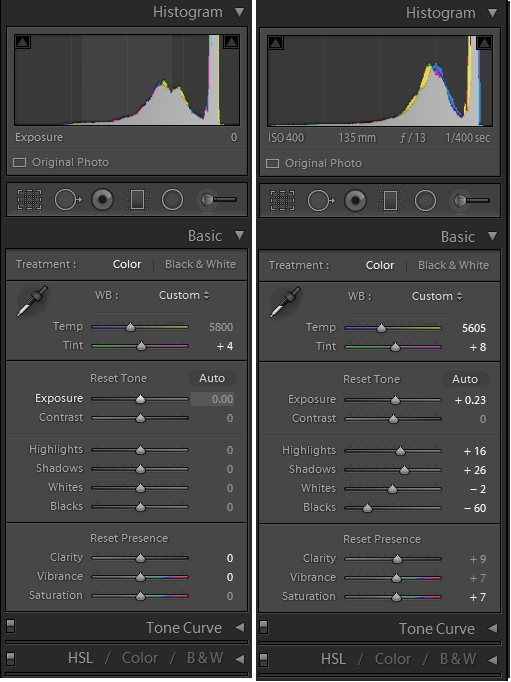
With the original settings shown on the left, notice that the histogram at the top shows none of the image information extends to the far left. None of the image falls into the leftmost one third, the region of darkest possible tones. To pull the dark tones to the left, use the black clipping slider control. The settings on the right show the modified histogram.
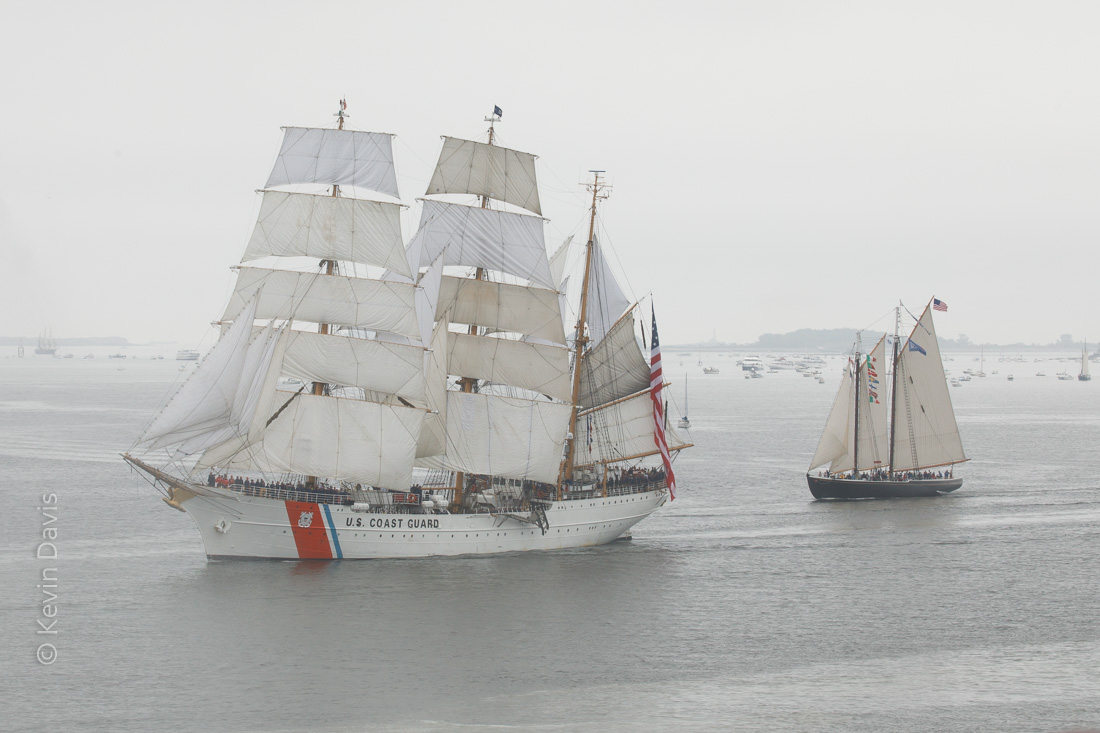
Adjustments in Adobe Lightroom
Lightroom divides tonality into five regions, black, shadow, midtone, hightlight, and white. If you hover your computer cursor over any of the five relevant slider controls, the corresponding region will be highlighted in the histogram.
Dragging the black point to -60 is relatively heavy-handed and tends to drag the shadow areas down. Although I have raised the shadow brightness here, that is primarily to hold the shadows closer to the original brightness, compensating for the drag of the -60 black point.
Further increasing the overall contrast, I have raised the overall exposure brightness and the highlights. And I have made minor adjustments in color, to compensate for a slight green cast and slight yellow cast.
In addition to the overall image adjustments, I have made a few local adjustments. The hull of the Eagle was bit dark, due to the angle of the sun; so I brightened the hull slightly. The sails of schooner Adventure picked up a slight blue cast from the environment; so I moved that color slightly toward yellow. The white stripes of the American flag also picked up a bluish cast; so I moved that color slightly toward yellow, reduced the color saturation, and added a touch of brightness.
Finally, the foreground water appeared to be less bright, perhaps due to shallow depth. I applied a gradient filter to the foreground and bumped up the brightness to match the rest of the image.
Maybe these adjustments seem like a lot of work. But the overall image adjustments can be quickly and easily copied to other images. If the natural light of the day hasn’t changed, these adjustments are appropriate for many images, not just the one. Wherever the light did change, I have to make small adjustments and then apply that set of adjustments to a group of images.
With more than fifty ships in the parade of sail, I shot 250 images. I don’t give detailed attention to every single image. Duplicating adjustments to a group of images is a necessary time saver. And, of course, I will give the most attention to my favorite images, those that might be submitted to publishers or printed for wall decoration.
If you are in the Boston area during August 2017, stop by Boston City Hall and check out my exhibit of tall ship photography at the Mayor’s Neighborhood Gallery (2nd floor).
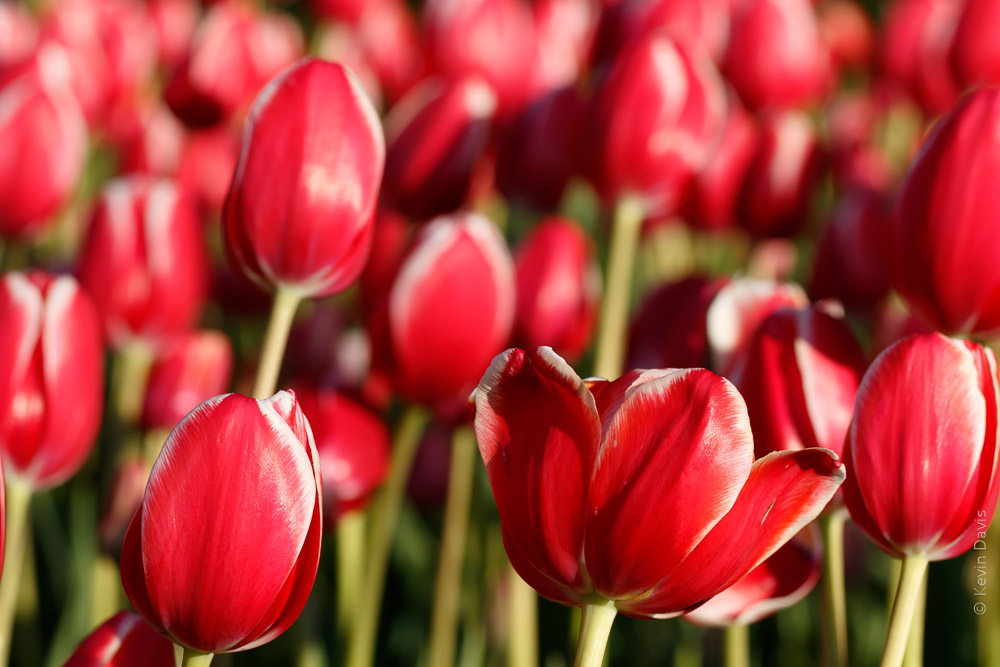
The tulips at Boston Public Garden. are an annual rite of spring. They are fun to photograph and I wanted to share some techniques with you.
This first image was shot at 7am on a Saturday morning. Early morning may be the only time when the garden isn’t swarming with people. To visually compress the distance, I used a 200mm lens.
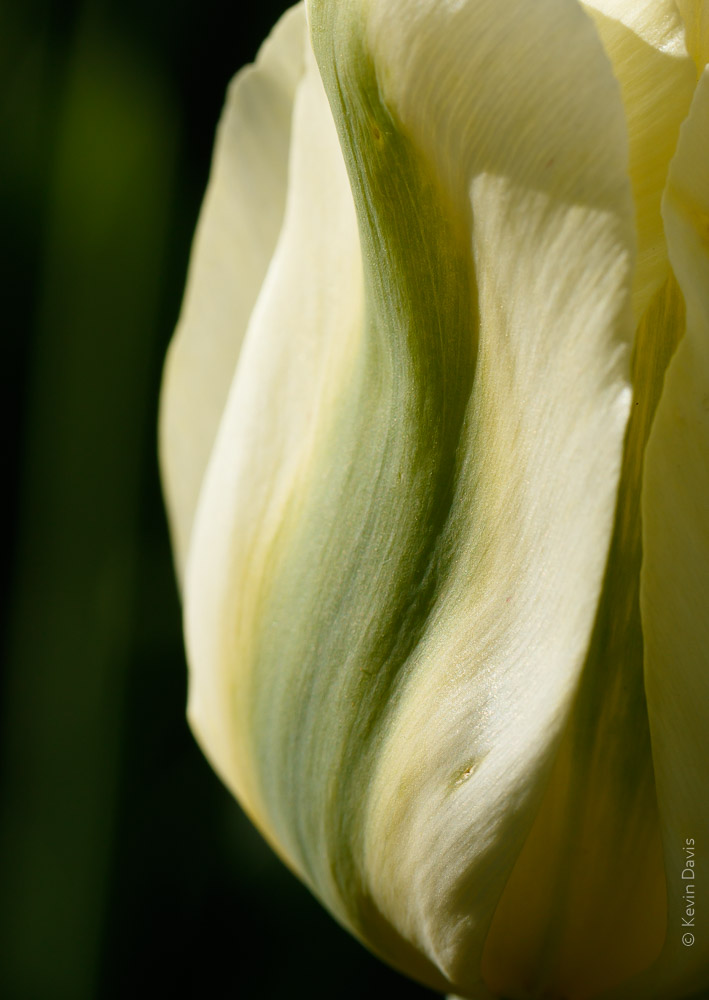
This next image is different for several reasons. Of course, this is a closer view. Using a 100mm macro lens at an aperture of f/7, the depth of field is shallow. I chose to fill the frame with flowers and exclude the surrounding environment. Also note that the light is very different. I shot this image after 6pm with the evening sun directly shining on the flowers from the side.
Getting even closer, the image becomes more abstract. The image is about color and texture; the concept of “tulip” begins to disappear. I specifically chose to use an evergreen shrub for the background, knowing it would fall away to black because this side of the shrub is in shadow. (You can dimly see a green tulip stem rising along the left side of the image.)
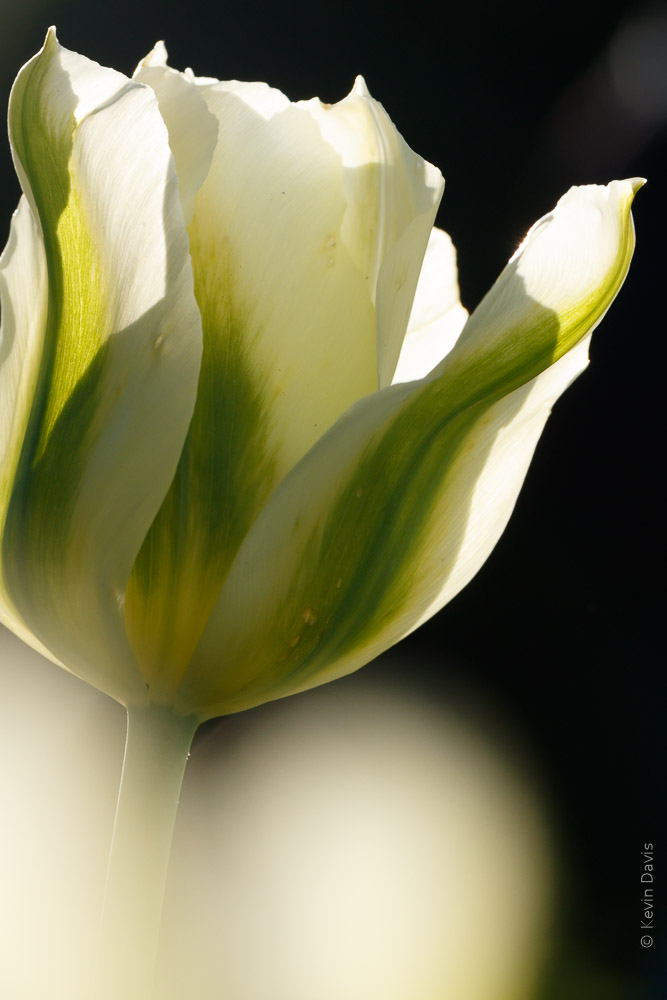
Taking a step back, not as close as the previous image, this is more obviously a tulip. Still working with the dark background, I’ve repositioned myself to achieve back-lighting from the setting sun.
Additionally, I chose to break a couple photography “rules”. Intentionally photographing through a foreground tulip creates a highlight in the bottom left. It was a gamble that I think paid off quite well. A viewer will naturally be drawn to the lower highlight and the upper highlight. After bouncing back and forth a few times, you eventually find the beautiful color and texture in between. I find that my mind dwells on this image longer than the others.
A combination of backlighting, dark background, and close-up abstract shape.
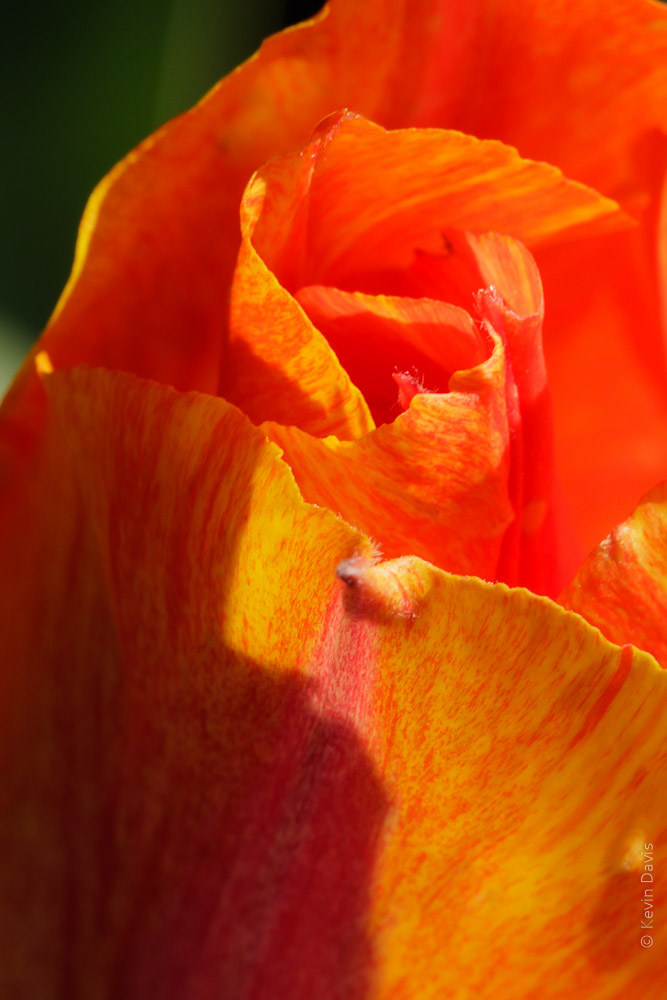
Upon thinking “how can I look at this subject with a different perspective?” I finished up the evening by looking down on the flowers from a steep angle, as the sun was soon to fall behind the buildings of Boston. I chose a more narrow aperture here, f 16, because I wanted to hold some depth of focus from foreground to background. And because a smaller aperture means less light entering the camera, I increased the ISO. Aperture priority, f/16, 1/160 sec, ISO 800, 100mm macro lens.
If you have a personal checking account, you can have your own photographs printed as custom backgrounds on your checks.
While some of my bills are payed automatically, either through my bank or credit card, I do still write checks for some things. Upon discovering that I only had one blank check remaining, I was about to order more through regular channels, but the price seemed a bit high. Searcing on-line, I found that other providers will print blank checks for far less money and you can order checks direct through their web sites.
Some companies allow you to upload your own photographs to be printed as the background image on your checks. Caution – some of those providers do not include security features, such as microprinting of the signature line. I found two providers that offer custom photo checks with security features, then researched them on-line to find positive/negative reviews. I selected one of these providers and then searched on-line for freely available discount codes. I found a discount code that saved me $3 per box of checks.
The photo I selected from my own catalog is shown here, an image of the Boston skyline.
Unfortunately, no guidelines were given how to size my photo appropriately. The web site did list specific file types that were acceptable and a maximum file size of 5MB.
Measure the height and width of your old checks. Then re-size your digital image accordingly. Personal checks (in the USA) are typically 6″ x 2.75″. I re-sized my photograph to slightly larger than 6″, thinking that the images are typically over-printed and then the paper is cut to a slightly reduced size. Set the print resolution to 300 dpi. Save the file as JPEG. Upload this file when the check-ordering web site prompts you to do so.
Choose a brighter image rather than a darker image. Text that is printed on the check will be difficult to see if the background image is too dark. The web site should show you a preview of the check with your photo and text. Upon seeing my check preview, I deleted the photo (the original shown here in this post), edited the photo to make it lighter, then uploaded the modified version.
To lighten a photo, raise the black point, which causes black to be rendered as grey instead of black. For example, in Photoshop, use either curves or levels. In Lightroom, in the Develop Module, use the Tone Curve. Simply drag the left-most point of the curve upward until it looks right to you.
Yoshino Cherry trees encircle the tidal basin at Washington D.C.
This week, I was thinking that the trees may bloom very early this year, particularly as a friend in N.Carolina reported that dafodils bloomed early, in mid-February.
Today, looking on-line at cherryblossomwatch.com
I see that the D.C. air temp through January and February this year has been warmer than the past six years.
As spring arrived particularly early in 2012, the Yoshino Cherry trees around the tidal basin bloomed early and disappeared BEFORE the opening of the annual Cherry Blossom Festival. Thankfully, I achieved a bit of photography the day before a spring storm blew away all the Yoshino flowers.
Historic first cherry bloom in D.C.
•2016: March 25
•2015: April 10
•2014: April 10
•2013: April 9
•2012: March 20
•2011: March 29
•2010: March 31
•2009: April 1
If you are a photographer or videographer and you are interested in the Mavic Pro drone primarily as a flying camera, then this article is for you. This is a run-down of camera controls and options, without discussing flight controls.
Documentation included with the Mavic Pro is minimal and help for the DJI Go app is non-existent.
First of all, let’s point out the obvious. The Mavic Pro has unmatched portability; it folds to a size that can fit in a large coat pocket. The gimbal that stabilizes the camera is probably the smallest in the world.
This drone can be flown using using the hand-held controller alone, or in conjunction wtih a smart-phone and the DJI Go app. You do need the Go app for access to numerous configurable options, but after configuring what you need, it is possible to fly with just the controller and no app. During flight, the Go app gives you a live video feed and camera exposure information, but you may not need to interact with the app except maybe to set the focus.
Not all available features shown here. These are just some features I wish to point out.
The Remote Controller
The hand-held controller includes quite a few camera controls, independent of any smartphone app.
Photo trigger (shutter button)
Start/stop video recording
Camera tilt
Exposure compensation
Custom button left (e.g. center focus)
Custom button right (e.g. AE lock)
5D button – up, down, left, right each has a different meaning that is configurable.
(For example, zoom in/out. It is a 2x digital zoom; there is no optical zoom.)
DJI GO app
The app shows real-time video and provides in-flight camera exposure information.
Real-time image view
Exposure histogram
Current exposure compensation setting (1/3 ev increments)
Over-exposure zebra stripes during video recording
Camera: ISO, shutter speed, white balance, remaining SD card number of photos
Video: resolution, FPS, remaining SD card recording time
The app provides extensive camera configuration options.
The app alerts you if a firmware update is available. The update can be applied with a simple touch; the download comes via your wi-fi, through the phone, down to the drone. The time to complete the upgrade was more than ten minutes and consumed about 18% of the drone battery charge.
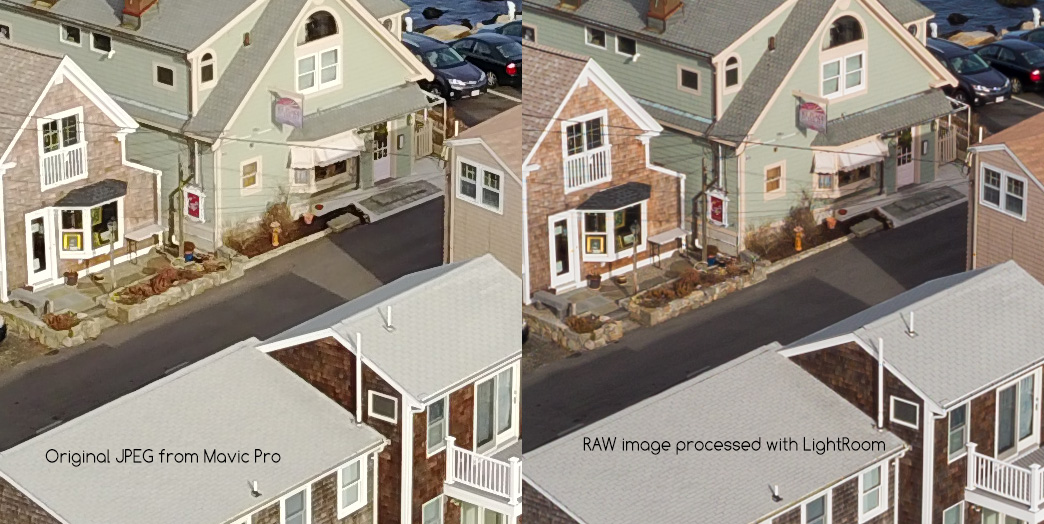
Bearskin NeckCompare JPEG to RAW
Photo Quality
For photos, you can shoot RAW, JPEG, or RAW+JPEG. Of course, I recommend either RAW or RAW+JPEG.
I shot the photo above (Bearskin Neck, Rockport MA) recently with the Mavic Pro set to record both JPEG and RAW. The second photo is a 200% crop from the center, comparing the original JPEG to the RAW file processed as I normally would in Adobe Lightroom. Overall, the JPEG is good. I think it is a bit green, looking at the short stone wall. Signs on the buildings are not legible in either case, but the JPEG is slightly worse than RAW.
With only a half dozen flights thus far, I have observed a couple specific image quality problems. For still photos, the very small image sensor is no match for a larger DSLR or MFT camera. I have read that the image sensor is Sony Exmore (wikipedia.org/wiki/Exmor), but I cannot confirm that. The maximum resolution is a respectable 12 megapixels, in 4×3 aspect ratio (4000×3000). You can choose to capture 16×9 ratio, but that is a crop down to 9 megapixels (I personally tested that just now; that’s real, not a guess.).
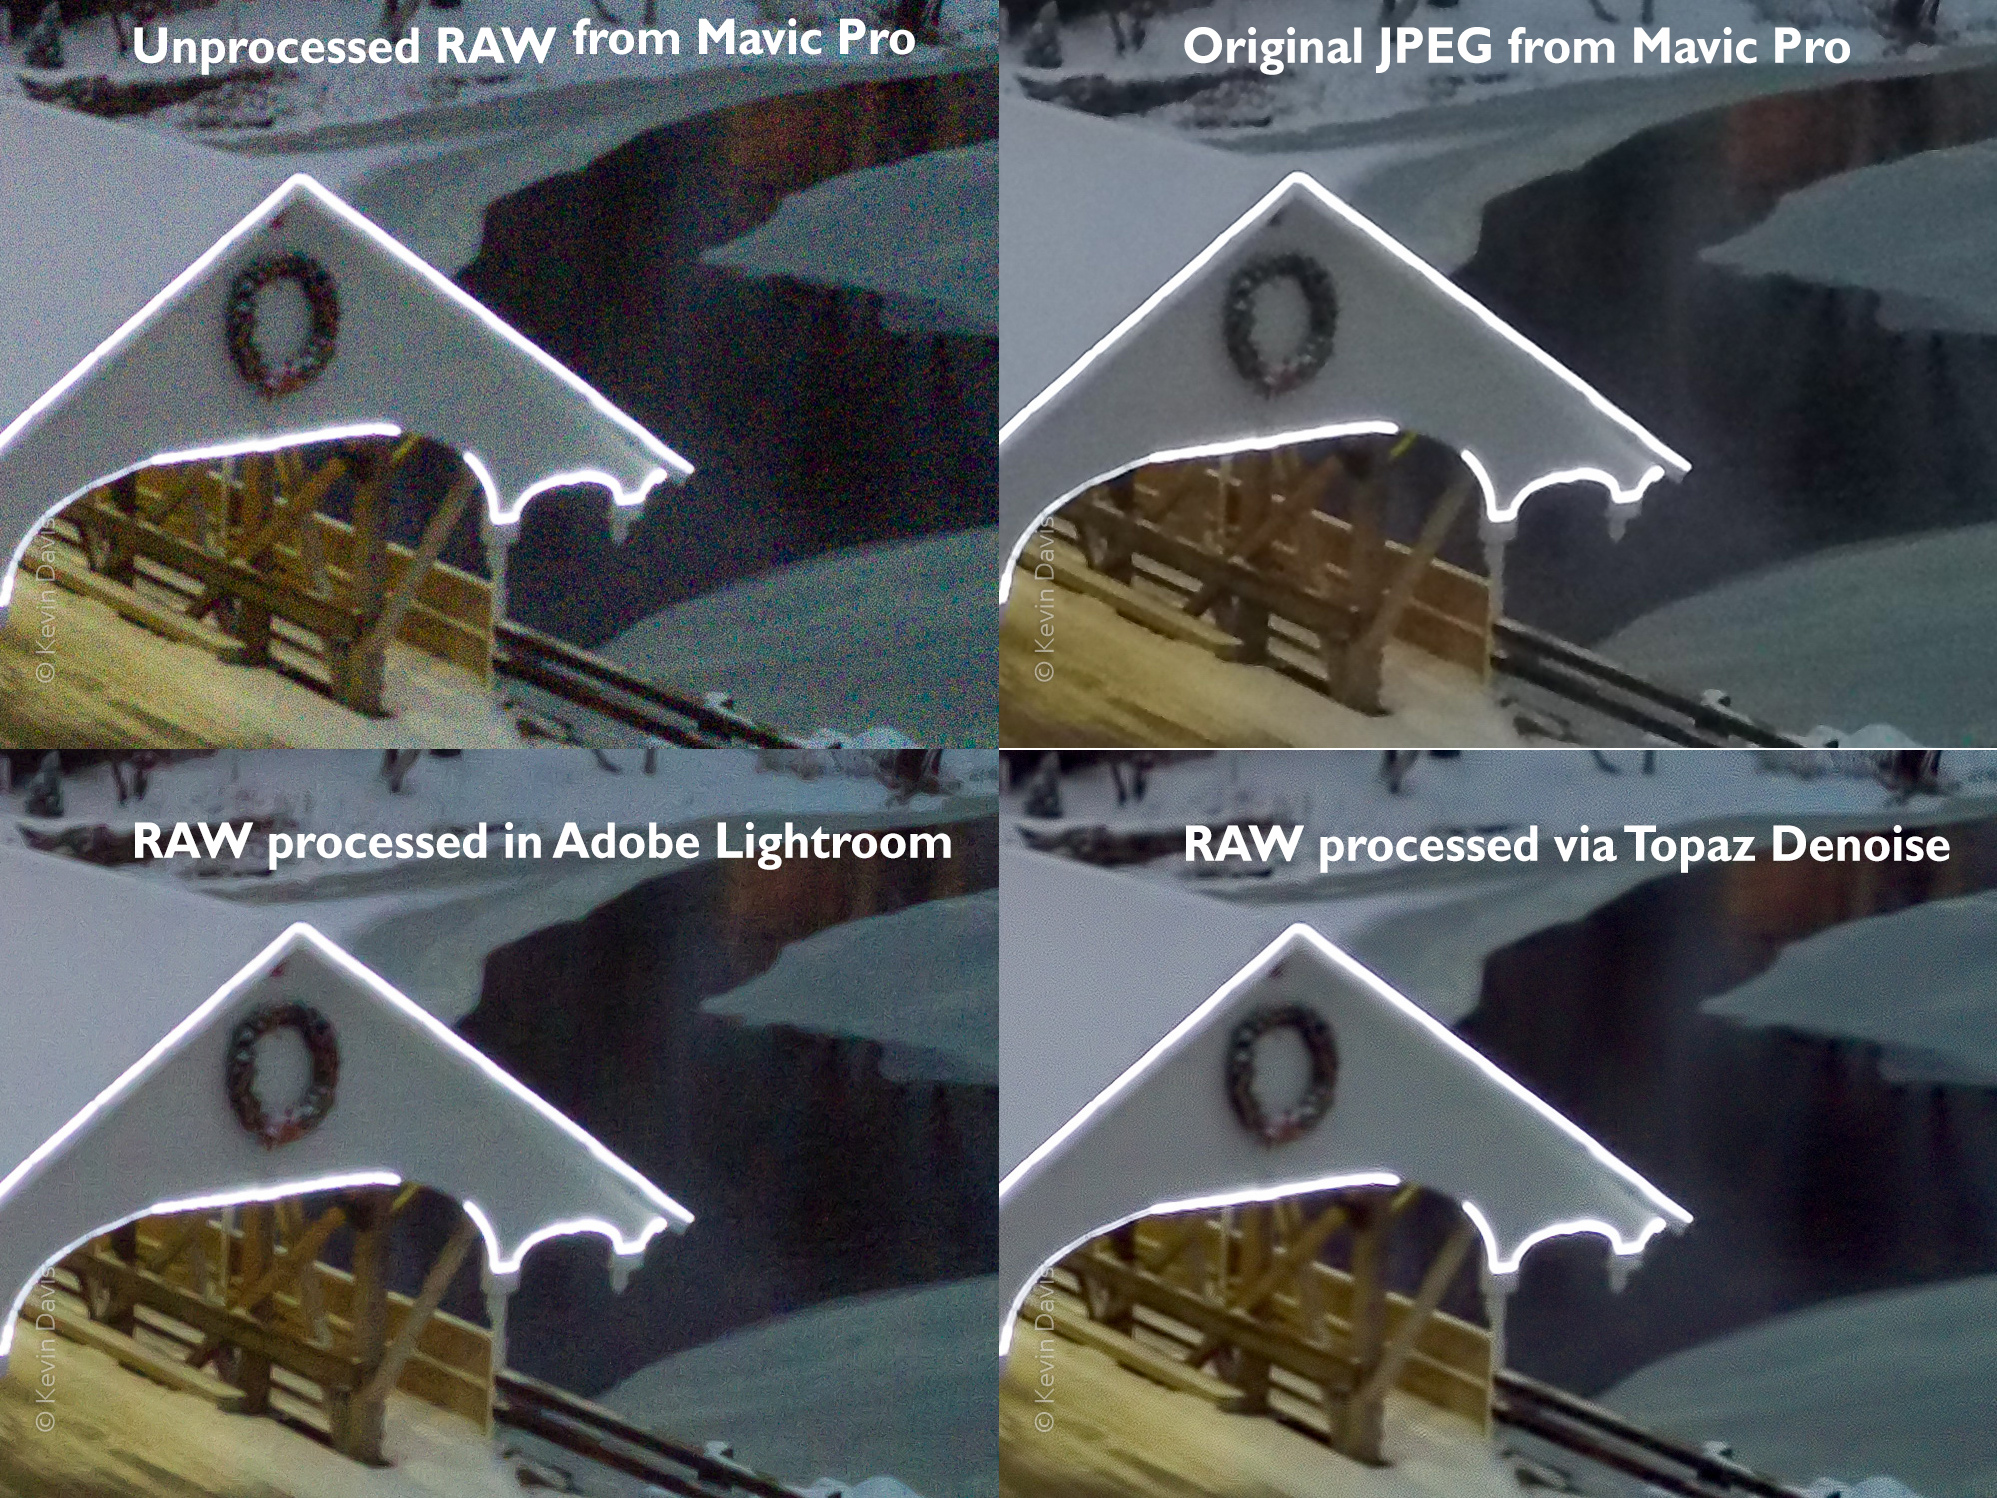
Photos can exhibit some amount of digital image noise at just about any ISO. Images shot during the low-light of dusk, around ISO 1600, exhibit a high amount of chroma noise. Samples are shown here below. For stills, Adobe Lightroom has the best noise reduction I know. While the JPEG processing in the Mavic does a reasonably good job of smoothing large areas, there is loss of detail inside the bridge. The Topaz Denoise plugin for Adobe is similar. Processing via Lighroom’s built-in noise reduction allows better control and retains better detail inside the bridge.
Video Quality
In good light, the video quality is probably on par with a GoPro Hero 3 or 4. Moire problems may occur when scenery includes detailed patterns, but I have not tested this with different capture resolutions. As with still photos, low light and high ISO exhibits a high amount of chroma noise. A product called Neat Video can do a good job of mitigating noise.
The video clip of the snowy mill (at the beginning of this article) was captured at 1080 without a problem. However, on a separate shoot, I did see a problem. Several people contributing to on-line forums have reported that 1080 does have problems, including a “pastel effect” which seems an apt description of the problem I saw. People experiencing problems at 1080 also report that the problem does not occur at higher 2.7K or 4K resolution. I have switched to shooting 2.7K and subsequently downsample to 1080 in post processing. However, the higher resolution does not support a frame rate faster than 30 fps; and downsampling does require additional compute time.
For video, I’ve been shooting the “None” color profile, modified with sharpness set to -1. Some pros are recommending two of the color profiles, DLOG (very flat) and ART (not as flat). Alternatively, some people have suggested color profile D-Cinelike and then customized to -2, -1, -1 (sharpness, contrast, saturation). All those suggestions create an intentionally flat result that necessitates some post-processing.
A clear plastic dome can optionally be used to protect the camera. Very first time I captured video with the Mavic Pro, I could see glare due to the plastic dome. Since then, I never fly with the dome attached. Potentially, I might use it if there some risk of water or dust in the air, for example, flying near a waterfall.
Pre-flight
Each time you fly, here’s the basic pre-flight steps:
1) Unfold the propeller arms and propellers
(Obviously, attach any propellers that you detached for transport/storage.)
2) Remove the camera gimbal clip
3) Optionally, connect your smart-phone to the hand-held controller
4) Turn on the controller and start the DJI Go app
5) Turn the antennae upwards, which is typically a 45-degree angle
6) Turn on the drone
7) To connect your phone with the drone, touch the “Camera” button on the DJI Go app
8) Check the aircraft status information, including available battery charge
9) If this is a different location than previous flight, calibrate the compass
10) Obviously, check your environment for obstacles or hazzards.
Make sure you are not in restricted airspace.
DJI includes a plastic clip to secure the camera gimbal when not in use. Always remove this clip BEFORE turning on the drone. If you fail to do so, the app warns of gimbal overload.
Initially, the Go app will display the “Aircraft Status”. Tap the “X” to close this display.
The DVD-R standard (pronounced: DVD dash R) pre-dates DVD+R (pronounced: DVD plus R). Today, most DVD players can read both. A DVD burner may be specific to one or the other. Use discs that are compatible with your burner.
DVD+R has a few technical advantages; notably, DVD+R supports both single layer discs and dual layer discs.
DVD-R discs are typically the least expensive.
What about DVD-RW, DVD+RW, and DVD-RAM ?
Rewritable discs (RW) can be erased and re-written. These discs contain a phase-change metal alloy. R formats utilize an organic dye (non metalic); once it has been written, it cannot be erased.
RW discs typically take more time to write/burn. DVD-RW or DVD+RW discs are commonly rated either 2x or 4x speed, while DVD-R discs are commonly 16x.
DVD-RAM discs are relatively uncommon or obsolete. DVD-RAM is typically not compatible with the DVD player attached to your television.
What is 2x, 4x, 8x, etc. ?
This indicates the speed at which the disc can be written.
Time to write an entire single-layer disc
2x = 30 min
4× = 15 min
8× = 8 min
16× = 5.75 min
What is dual layer ?
Dual layer discs have an embedded second layer, so have twice the storage capacity of single-layer. Some DVD burners can write both single-layer discs and dual-layer discs. A standard DVD player attached to your television likely does support dual-layer, unless it is a particularly old machine. Many Hollywood movie DVDs are actually on dual-layer discs.
Which should I use for compatibility with most DVD players ?
Most DVD players can read any R or RW disc. The following list begins with the highest compatibility.
(1) DVD-R should be compatible with 95% of all DVD players.
(2) DVD+R should be compatible with 85% of all DVD players.
(3) DVD+RW
(4) DVD-RW
Once again, DVD-R is typically the least expensive.
What about Blu-Ray ?
While Blu-Ray discs are the same physical size (as DVDs), Blu-Ray is higher density (more storage capacity), and capable of much higher data rates. For HD 720p or HD 1080 video, you need Blu-Ray.
DVD players cannot play Blu-Ray discs. Many Blu-Ray disc players can play both Blu-Ray and DVDs, but this is not universally true.
Which disc should I use to save computer files ?
For use on a single computer, you can use any disc that it can write. For sharing with other computers, single-sided single layer discs are the most compatible.
4.7GB – single sided, single layer DVD
9.4GB – double sided, single layer DVD
8.5GB – single sided, dual layer DVD
17.1GB – double sided, dual layer DVD
25GB – single layer Blu-Ray disc (BD)
50GB – dual layer Blu-Ray disc (BD)
I want a custom image on the top of the disc; How do I do that ?
There are three methods.
Inkjet printable disc label
Adhesive disc labels are generally frowned upon. Adding a label can cause problems for some DVD players. If you do apply a label, always use a donut-style round label and be very careful to insure the label is centered on the disc. An off-center label can cause a disc to wobble at high speed.
Inkjet printable disc
Most printable discs are plain white on the top surface. Some inkjet printers include the ability to print on discs. Alternatively, specialized disc printers are capable of printing many copies very quickly.
If the blank printable area extends almost to the center of the disc, this is referred to as “hub printable”. On a regular printable disk (not hub printable), the printable area stops about 3/4-inch from the center hole.
LightScribe disc
A LightScribe disc includes a reactive dye (in the top surface) that allows imprinting using a LiteScribe-capable DVD burner. In my experience, the print always fades, even to the point of disappearing.
Lightscribe has apparently been discontinued; both discs and burners are increasingly difficult to find.
When saving video for a disc, what video bitrate should I use ?
The ability of a DVD player to sustain playback at a given bitrate is highly variable from across different models.
You can choose variable bitrate (VBR) or constant bitrate (CBR). If you use VBR, then the average bitrate should be comparable to CBR. Here are very vague guidelines.
Many digital photography cameras have included the ability to record high-definition video, beginning with the Nikon D90 in 2008. The Canon 5D mk II (2009) was the first DSLR to be widely employed in film and television. Because video recording is usually accompanied by audio recording, these cameras necessarily include a microphone. But depending upon your own need for high-quality audio, the in-camera microphone can be a poor choice for professional quality.
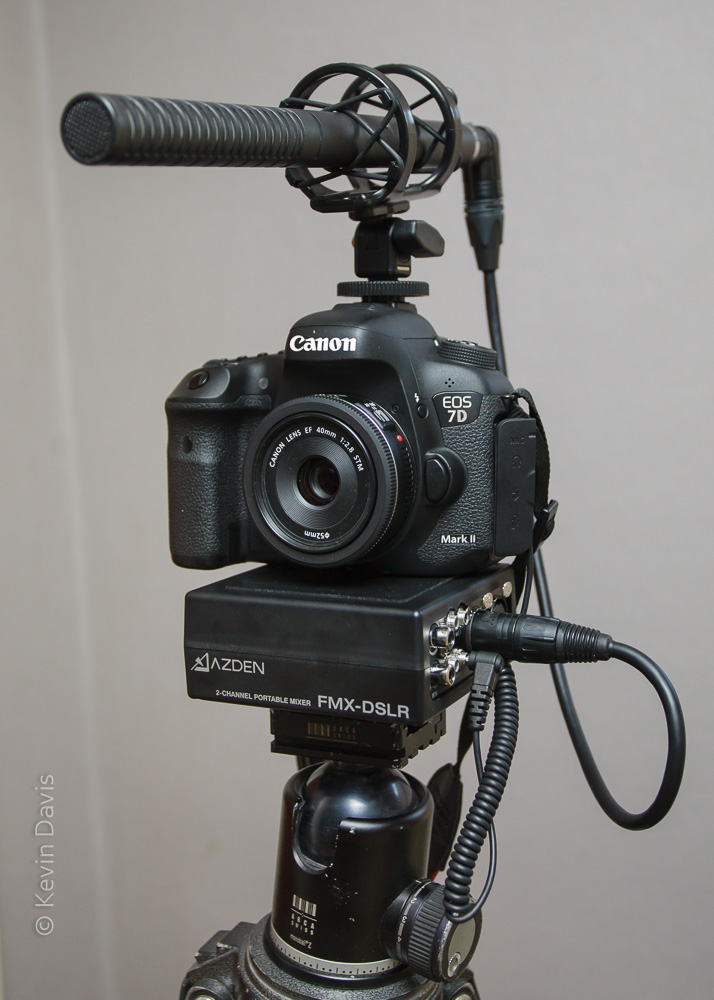
(For a larger view, click on the photo here.)
Film and television production typically record audio on dedicated audio recording equipment, rather than relying upon the video camera to record audio. The separate video and audio recordings are brought together in post-processing. However, in-camera audio recording is practical for one-person or two-person teams recording video at events or for ENG (electronic news gathering).
Broadly speaking, you have two choices: a “video mic” or a general-purpose microphone with a pre-amp. “Video microphones” include some small amount of amplification such that they connect directly to your camera, for example a DSLR, with no additional equipment required. This is a simple compact solution. Video mics are available from Rode, Sennheiser, and Sure.
Alternatively, if you employ an audio pre-amp, then you can use any microphones you want and can use different microphones in different situations. However, this adds another piece of equipment, making the total solution more bulky.
The photo here shows a general-purpose shotgun microphone, connected to a mixer/pre-amp, connected to a DSLR camera (Rode NTG2, Azden FMX-DSLR, Canon 7D mk II). The shotgun is mounted in a shock-absorbing mount that isolates the microphone from any camera noises, including operation of controls, auto-focus motor, or accidental knocking around.
Comparing this setup to the built-in camera microphone, there are four big differences. The external is directional, rejecting off-axis sounds, whereas the camera built-in mic is unidirectional, picking up sounds even from behind the camera operator. The external mic is cleaner, producing less unwanted background noise. And the external mic generally does not record camera noises, because it is mechanically isolated away from the camera. Lastly, as you can see in the photo, this is far more bulk than just the camera alone.
Power for the NTG-2 can be provided either by the FMX preamp or by an optional AA battery within the NTG-2. I have tested both setups and find no difference in audio quality. Either way is far better than the camera’s built-in microphone, particularly in situations where the audio source is quiet and requires significant gain.
You may be able to connect an external microphone directly into your camera without use of a pre-amp. Not all microphones require a pre-amp, but it is typically required for condenser microphones. Although I had partial success with this technique on a different camera, the combination of NTG-2 with Canon 7D mk II requires a pre-amp. In this specific case, I configure the camera internal gain setting to 25% and then use the adjustment knobs on the FMX. Alternatively, you can enable camera automatic gain; in this case, be sure to inform the pre-amp using the switch for this purpose.
Here is a short list of some popular audio pre-amps: Azden FMX-DSLR, Beachtek DXA, JuicedLink RM222, JuicedLink RA333, Sound Devices MixPre D.
Have you ever formatted a memory card and then realized that there were images on that card you needed? That’s exactly what I did recently on a video shoot. Acting as a one-man video and audio crew, I was rather hurried and hastily formatted the card that was already in the camera. Big mistake, but I realized my error immediately.
Vaguely, I thought there was a possibility of recovering data from the card IF I did not over-write the files with new images. So I immediately removed the card and replaced it, hoping that the data on the formatted card might still be in tact.
The trick here is knowing that most formatting is a “quick format” that doesn’t erase the entire card, but simply erases the index that locates files on the card. Special computer software can scan the memory card for files, even though the index has been trashed.
As I had never needed recovery software before, I research on-line to see what was available. To avoid a virus or spyware into my computer, I considered only applications that were recommended by reputable sources (such as PC Magazine or Tom’s Hardware Guide). The software I used is called Recuva and it did successfully dig up the lost files from the formatted card. While a few of the images were corrupted, the important images I needed were all just fine.
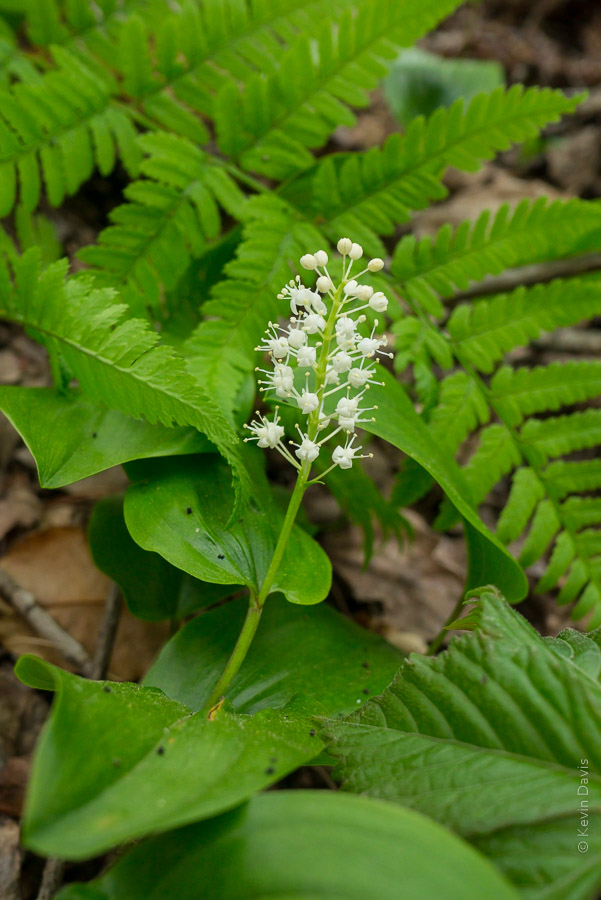
One of the most important aspects of wildflower photography is controlling the background. Finding a clean background, that is not distracting, can be challenging.
Controlling the background can sometimes be easy and sometimes difficult. Thinking about it just now, here are some considerations just off the top of my head.
Inspect around the flower to understand what will appear behind the flower
Choose if you want additional flowers in background or foreground
Watch out for distracting twigs or blades of grass; you can push them out of the frame
If the flowers are on long stems, you may be able to nudge the stem, either to achieve a better background or to place the flower in a more flattering light.
To fix a problematic background, consider placing some object behind the flower.
Consider placing the camera near the ground and shoot upwards at the flower
Consider filling the entire frame with the flower – no background
If you can’t achieve a good background, look for a different flower nearby
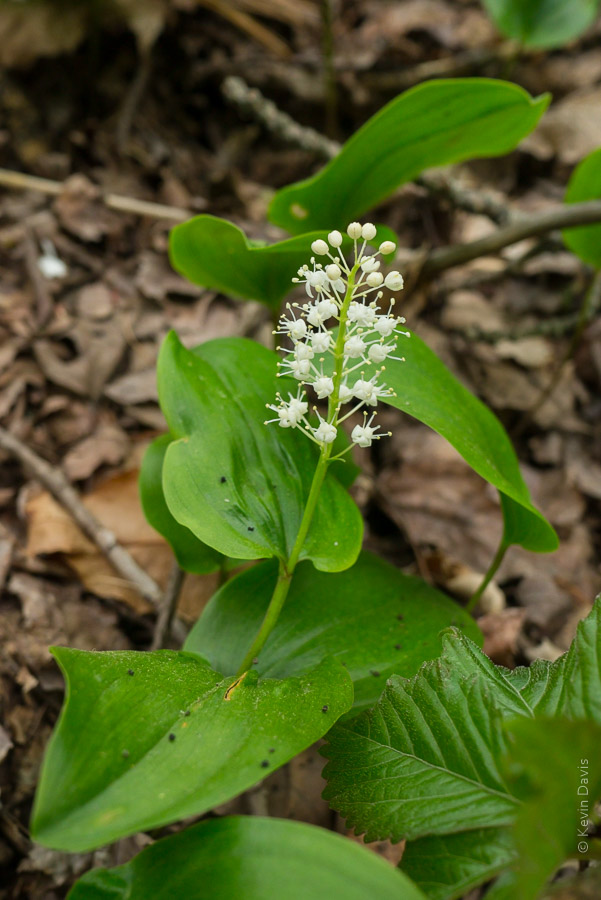
Canada MayflowerCanada Mayflower
One more thing … In your zeal, try not to trample the flowers. Leave them for someone else to enjoy.
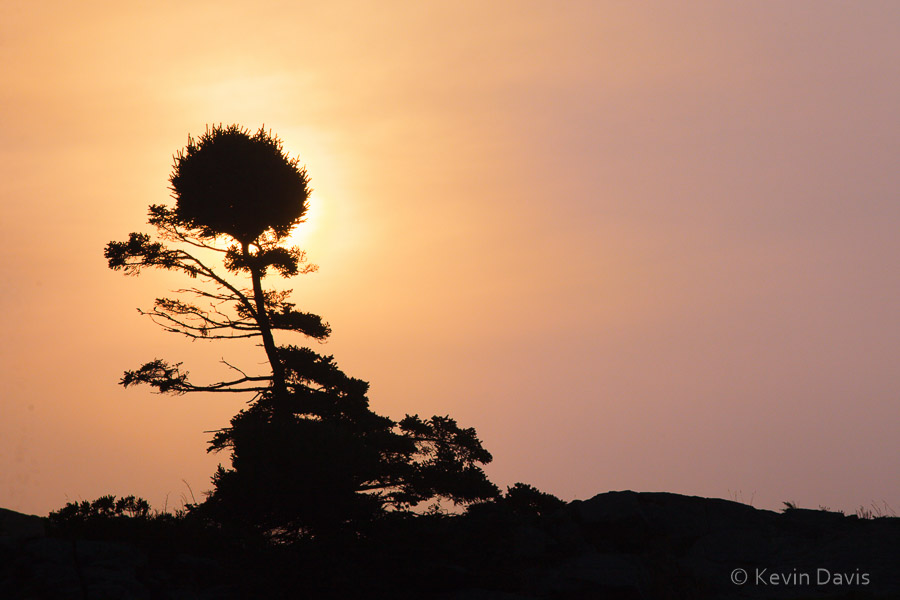
At 4:30am, I hiked out to the coastal headlands and arrived at White Head shortly before sunrise. Although the weather was hazy, the pre-dawn light in the sky was interesting and beautiful. As the sun rose to the horizon, the colors begain to fade and I believed the show was over, so abandoned my perch atop the cliff, 160 feet above the sea, and hiked north along the coast.
Fifteen minutes later, I spied this oddly shaped tree atop an exposed cliff and made the image shown here, a silhouette against a grey sky.
Balsam Fir silhouette
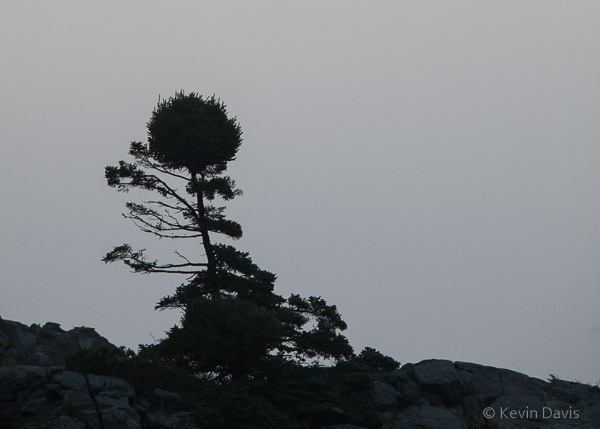
The hike to the north had brought me down to sea level and the cliffs now loomed above me. Unexpectedly, just to the left of the tree, the sun was beginning to rise behind the cliff. The show wasn’t over yet. The time was almost 6 a.m.
Scrambling along the coastal rocks, I positioned myself such that the tree was in front of the rising sun. The second shot here is 15 minutes after the grey-sky shot. Then, the final image is an additional 5 minutes later, about 6:20 a.m.