Fifteen years ago, this question was very significant (for most cameras) as an indication of wear and remaining functional life. If you were to purchase a used camera, you would certainly want to know the answer to this question. Today, this is not as true as it used to be.
Mechanical/moving parts are subject to some degree of wear. Metal parts suffer from friction. Plastic parts may become brittle. They eventually wear out. Get maintenance or get rid of it. But many of today’s digital cameras don’t have moving parts and do not suffer the same effects of wear. They have electronic sensors and electronic shutters.
Cameras have commonly remembered how many times the shutter has been actuated (how many photos have been captured). Through various means, you may be able to retrieve that information from a camera. In many digital cameras today, shutter count information may not be available at all. Furthermore, digital cameras are often used to capture video (rather than still photos) and the shutter count isn’t useful information.
That being said, I recently decided to sell a DSLR from 2015. Any DSLR certainly has mechanical parts and the shutter typically has an expected lifespan. As I had used this camera for still photography (not video), the shutter count is useful information. But retrieving this information from the camera proved a bit difficult. Here are several methods that generally might succeed, but in the case of my camera, I found that only one of these methods succeeded.
If you have software that shows EXIF information within an image, every digital photo may include the shutter count. Didn’t work. While all digital cameras report EXIF, not all cameras include shutter count in that data. (Online comment: “Last camera from Canon with shutter count in EXIF was EOS 1D II N.”)
Some websites: you upload an image from your camera and it will read shutter count from the EXIF information Didn’t work. See explanation above.
FreeShutterCount (freeware) Requires installing some 3-rd party USB drivers … no thanks (I’m not going to risk installing some unverified USB drivers on my computer.)
EOSinfo (freeware) Doesn’t work with my camera model.
EOS Digital Info (freeware) Doesn’t work with my camera model.
DIRE Studio Shutter Count (freeware) Apple/Mac only; I don’t have any Apple/Mac devices.
Tornado EOS Multiple people have reported this software contains malware.
An online search for “expected shutter lifetime Canon EOS cameras” tells me that this camera model should happily provlde 200,000 shutter actuations without any problems. My camera has 30,000 shutter actuations.
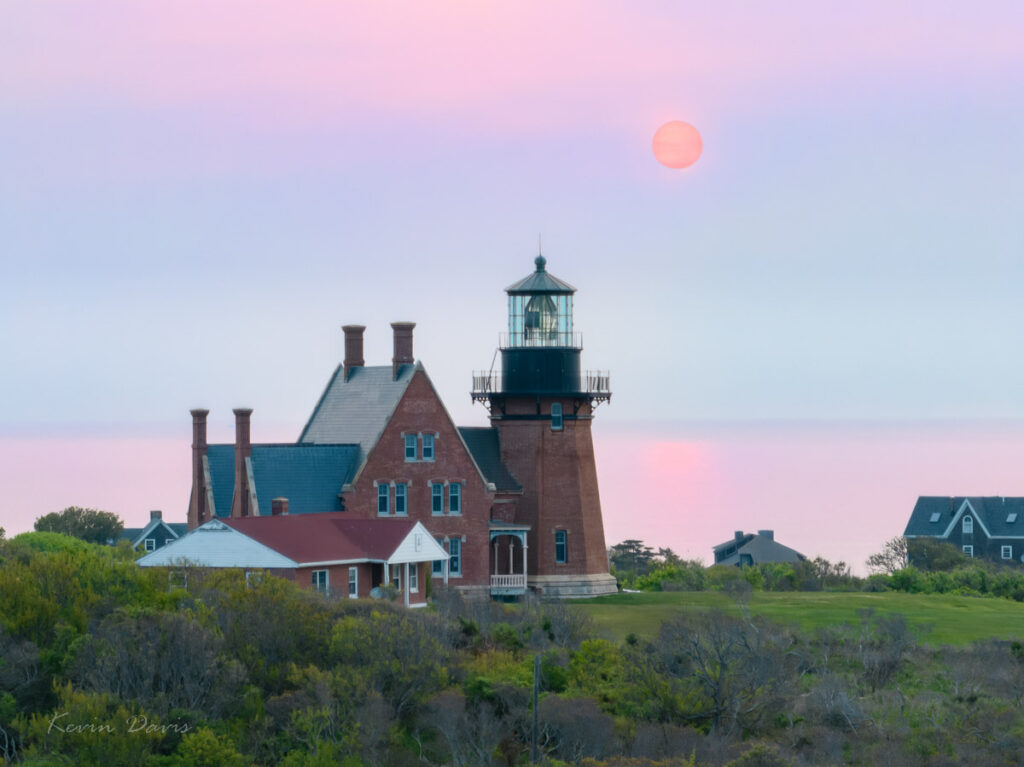
At the time for sunrise (about 5:39 am), the skies were entirely a grey haze and the sun did not show. After waiting four or five minutes with a drone in the air, I abandoned hope and packed up my gear. Walking back toward the road, only then did I see the red disc had risen through the haze. For a brief moment, I pondered whether to simply enjoy the spectacle or quickly re-deploy my gear; I chose the latter.
In retrospect, the haze was more than just morning fog; it was smoke in the atmosphere from Nova Scotia wildfires that month. ‘Cause that will filter light unlike normal morning fog.
Mostly (not completely), I’ve learned not to be disappointed when sunrise doesn’t manifest brilliant colors. That’s challenging because arriving at a location before sunrise implies effort to get up early enough to travel to my intended location. In this particular case, I had to travel by bicycle … before dawn. Because getting a car onto the island is a bit difficult, I left my car on the mainland. And although motorized scooters are common on the island, they are prohibited by law at this time of day.
I love the season of flowering trees; sadly, in the northeast, the season only lasts maybe six weeks.
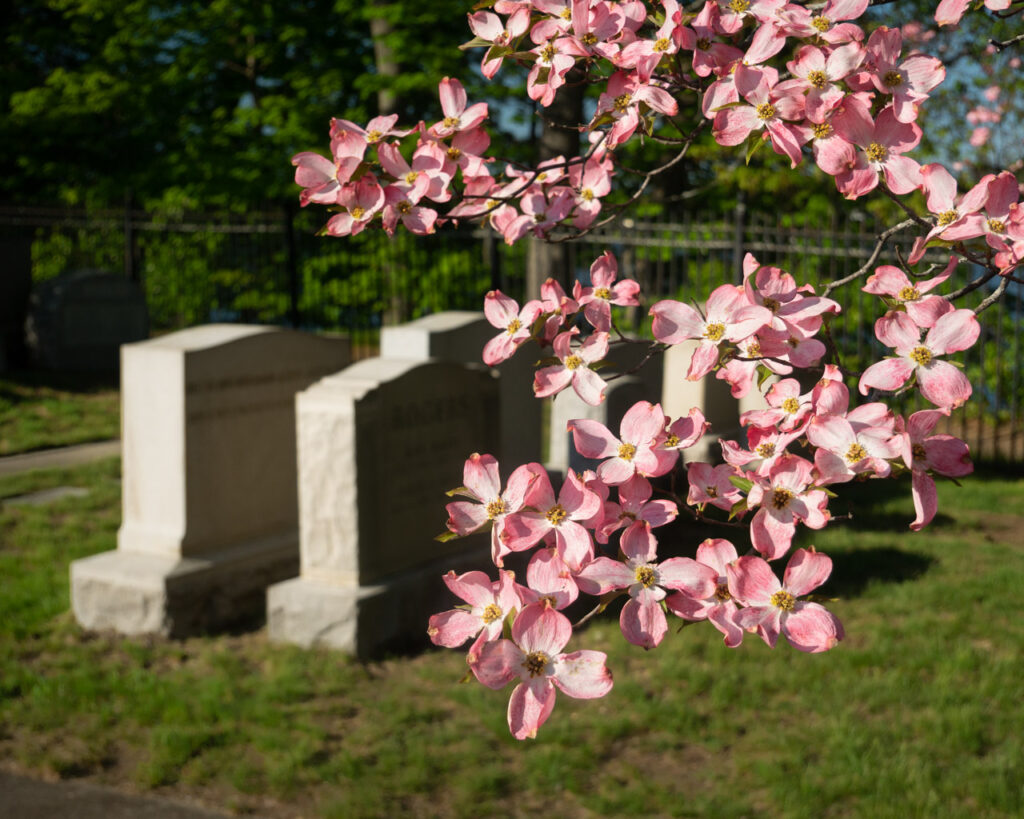
Ornamental flowering trees are commonly planted in many different spaces ranging from residential gardens to corporate office parks. One category that commonly hosts plantings of beautiful trees is cemeteries. While it may seem odd to some people, I’ve seen people of all sorts and ages strolling through cemeteries, even having a picnic. Last weekend, I visited a cemetery in Wakefield. Although the crabapple trees had all dropped their colorful petals, I counted more than two dozen dogwood trees in bloom.
From that short excursion, I wanted to share a comparison of two images of the same tree but photographed with wide-angle lens and a telephoto lens. There are a few reasons why you might choose to use one or the other. When in doubt, shoot them both.
The first reason you might choose a telephoto lens is because you can’t get close enough to your subject. I personally encountered that scenario a couple weeks ago, stopping to photograph cherry trees in bloom at a cemetery where the gates were locked. I photographed from outside the fence using a 100mm lens.
The second reason you might choose to use a telephoto lens is to control the background. The narrow field of view may enable you to exclude elements from the background. And a wide-angle lens can include more background, for more environmental context. In the two photos I’ve shared here, both the telephoto and the wide-angle image do show the environment context, but a telephoto also allowed me to exclude the tombstones entirely.
A third reason to choose either telephoto or wide-angle is depth perception. Wide-angle lenses commonly exaggerate distance; multiple subjects in the photograph appear to be farther apart, compared to using a longer/telephoto focal length. Conversely, telephoto lenses tend to compress distance, making multiple subjects (at different distances from the camera) appear closer together.
Lastly, when you have multiple subjects at very different distances, a telephoto lens combined with a small aperture may allow blurring the background – if that’s the effect you’re seeking to create. Both the images here employ an aperture about f\4.5.
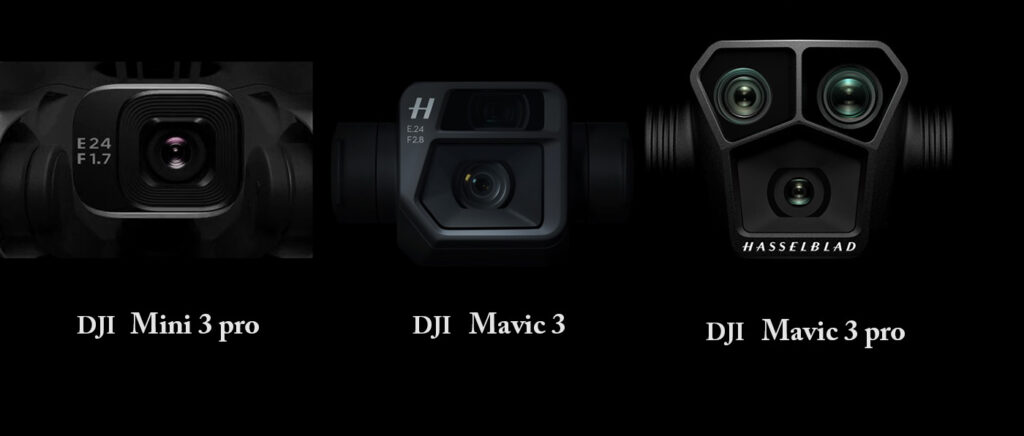
I have one surpassing criteria for an aerial drone …. image quality. This month, DJI introduced two new iterations of their drones, the Inspire 3 and the Mavic 3 pro. Personally, the first thing I need to know is how the camera compares to previous models. Lacking actual real photos from a new drone that I have not used, I must begin by comparing camera specifications. Digging up information can be surprisingly difficult because I’m seeking very specific fundamental parameters and sifting out the chaff is tedious.
Someone online recently asked which was the best for photography (which I presume excludes video). My answer was this: “Two words – variable aperture.” But I confess that I am particularly interested in the new 70mm lens with resolution of 48 MP.
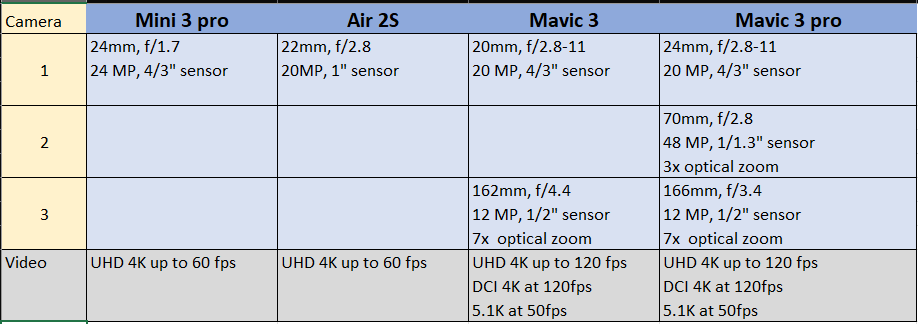
I dug through the camera specifications online and composed this simple table of just the fundamental parameters.
Years ago, still-photo quality was my only concern, but today video quality is also a factor. Frankly, for the purposes of the video that I shoot, video quality is comparable across most DJI drones. I personally do not need 120 fps, nor do I require 5.1K. I do require DLOG recording.
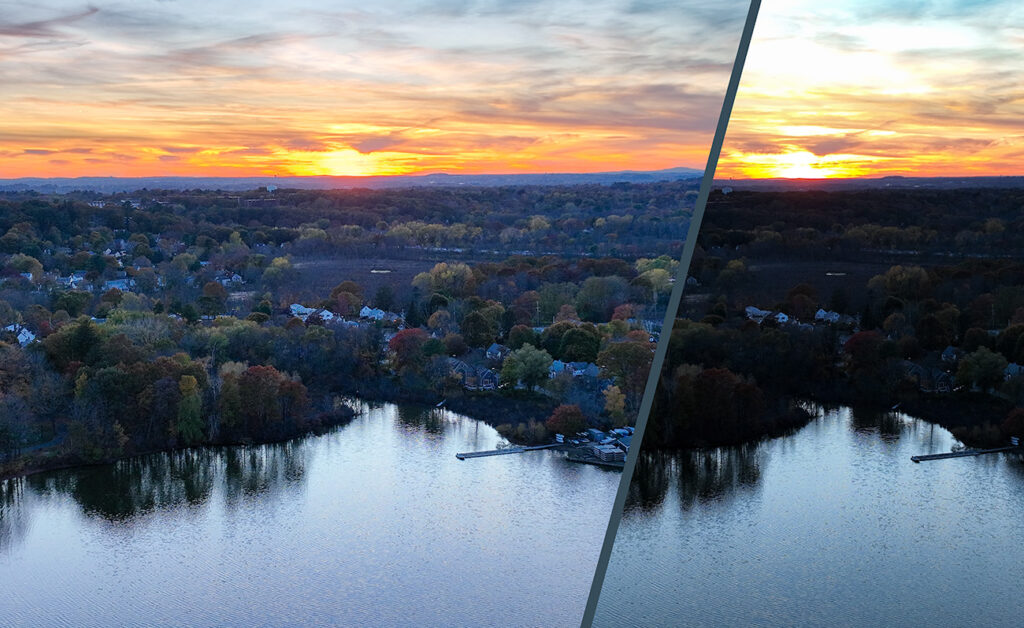
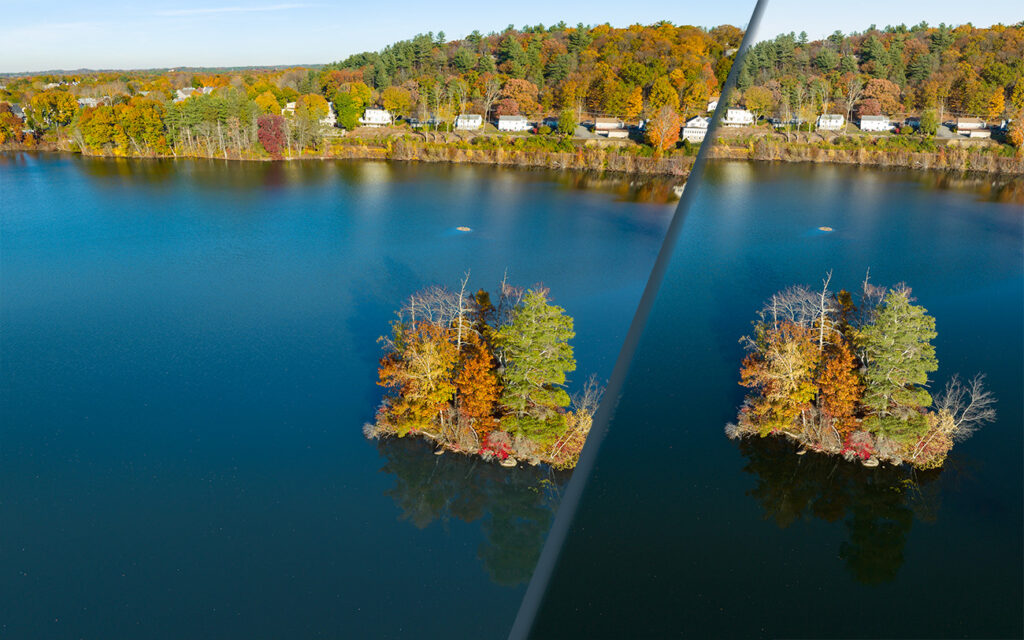
A camera’s image sensor has one job – to record light. However, sensors generally can only capture a limited range of light from shadows to highlights. When the actual range exceeds the sensor’s ability, that’s “high dynamic range” or HDR.
Here are two recent examples where the range of light exceeded my camera sensor’s ability. The first is a sunset. No surprise – the highlights are super bright. The second example is less obvious – the surface of a lake reflects blue sky in some areas and elsewhere the light simply falls off to black.
The solution is the same. Capture multiple exposures and then combine them together as a matter of post-processing. Many cameras have this post-processing and a built-in option. Even my smartphone camera includes that feature. The results may be disappointing. My own experience with camera built-in HDR processing is 50/50 at best. The end result is so commonly disappointing that I routinely don’t trust the camera to do it. Instead, I do HDR post-processing using software in a desktop computer.
This technique generally requires that the camera doesn’t move when capturing the separate exposures. The composition of the two captures is exactly the same. If the camera moves slightly, that is commonly not a problem because the two can be aligned during post.
This technique doesn’t work with video. When shooting video, the camera angle usually changes during the shoot; to shoot the scene a second time will result in a different video composition. Two captures will never align. For video, the solution to HDR is different – capture the shot just once but use a special camera mode that is very low-contrast, often referred to as DLog. Straight out of the camera, that shot looks truly awful. It must be post-processed, expanding the contrast range to something that appears correct.
Some cameras today are using memory cards that did not exist ten years ago. It is time to again survey the state of memory cards. The last time I wrote about memory cards was 2014.
While many online comments assume Compact Flash (CF) memory cards are antiquated simply because they are larger than SD cards, that’s not true. CF might be considered as antiquated because of limited speed of data transfer – how fast can data be written to the card. CF cards, like older SD cards (UHS-I), may be “slow” when compared to some other card technologies.
For the past ten years, SD (secure digital) cards have dominated the market for cameras and other electronics. Unfortunately, labelling on SD cards can be quite cryptic. A single card may state: 250MB/s, UHS-II, U3, Class 10, V60.
“C” is original speed class C2 (2 MB/sec), C4 (4 MB/sec), C6 (6 MB/sec), and C10 (10 MB/sec).
“V” is video speed class V6, V10, V30, V60 and V90.
Memory cards are a form of NVRAM (Non-Volatile Random Access Memory). That implies two things. When the card is removed from electrical power, the data stored on a memory card does not disappear. That data can be accessed randomly; reading and writing is Not limited to serial or linear order.
Faster is better … maybe
There are two reasons but possibly neither reason is important to you.
Capturing video
When capturing video, the data rate out to your memory card will vary depending upon which codec and configurable parameters available with that particular codec. Let’s vaguely consider two examples, assuming the picture resolution is Ultra-High Definition video (a.k.a. UHD or 4K) and 30 frames per second:
H.264 is maybe 4 MB/sec (32 Mb/s) write to your memory card
Apple Pro Res 422 can be more than 60 MB/sec (480 Mb/sec) write to your memory card
Capturing bursts of high-resolution photos.
If a camera is going to produce RAW images of file size 30 MB each and you hold down the shutter release, capturing ten frames per second, that’s 300 MB/sec. The camera buffers the images internally until they can be saved to the card. The question is then: how much time before that writing is complete and you can press the shutter release again?
Under the hood
The most important difference between memory card technologies is what you can’t see.
The foundation of SDXC is UHS bus
The foundation of CF is Parallel ATA (PATA) bus interface.
The foundation of CFast is SATA III bus interface.
The foundation of XQD is PCIe.
The foundation of CFexpress is PCIe.
Next Generation is here
CFast is quickly fading away in our rear-view mirror. Some contemporary cameras do still employ these cards, including Blackmagic URSA and the Canon EOS C700.
Second generation XQD 2.0 debuted in 2012. Jointly developed by SanDisk, Sony and Nikon, XQD apparently defeated CFast but has not gained wide adoption. While XQD has been employed in a handful of Nikon cameras, it surprisingly has not appeared in Sony cameras. Perhaps the only non-Nikon camera to use XQD was the XF IQ4 by Phase One.
CFexpress was developed by a broad consortium of companies and, unlike XQD, does not incur licensing fees paid to Sony. Second generation CFexpress type B has the same physical size as XQD but can transfer data faster. Cameras currently supporting CFexpress cards include Canon EOS R5, Nikon D6, Nikon Z9 and Sony α7S III.
XQD and CFexpress can support 6K video and 8K video recording. CFexpress and XQD share the same physical size and durable packaging. Some Nikon Z-series cameras support either in the same card slot.
Consumer cameras will likely continue to use SDHC/SDXC/SDUC cards for several reasons.
Average consumers do not require durability/ruggedness of XQD and CFexpress.
Average consumers are not shooting 6K or 8K video
SD UHS-II cards are far less expensive than XQD and CFexpress cards
The very brief list
SDHC (SD High Capacity): between 4 and 32 GB;
SDXC (SD Xtreme Capacity): up to 2 TB;
SDUC (SD Ultra Capacity): up to 128 TB.
Data Speed
SDHC/SDXC/SDUC UHS-I: 104 MB/sec
SDHC/SDXC/SDUC UHS-II: 312 MB/sec
SDHC/SDXC/SDUC UHS-III: 624 MB/sec (The only product I can find is Sony SF-G Series Tough SDXC, $188)
CF (Compact Flash): up to 155MB/sec
CFast: up to 600Mb/sec
XQD: up to 1000MB/sec
CFexpress type A : up to 1000MB/sec
CFexpress type B : up to 2000MB/sec (To date, the fastest card has max write 1600MB/sec and max read 1700 MB/sec)
CFexpress type C : up to 4000MB/sec
Physical size
SD card is 32.0 × 24.0 × 2.1 mm
XQD is 38.5 x 29.8 x 3.8 mm
CFexpress Type A is 20 x 28 x 2.8 mm
CFexpress Type B is same as XQD
CFexpress Type C is 54 x 74 x 4.8 mm
Card Readers
Card readers that support both XQD and CFexpress are very rare. I found one that cost $150.
CFexpress type-A and CFexpress type-B are physically different. Card readers likely support one of these, not both.
Some card readers have multiple slots to accept different card formats. Such readers may only recognize one card at a time; if you insert two cards at the same time, it may only recognize the first card inserted.
To mention a few
The top two brands I have trusted are Lexar and SanDisk. Second tier Transcend. Third tier Kensington. While PNY probably deserves a spot in the top five, I’ve never actually owned a PNY card.
In 2017, Micron sold the Lexar brand. And, according to multiple reports online, a new brand, ProGrade Digital, was founded by some of the old Lexar leadership team.
With all digital cameras, my general practice is to capture RAW images instead of JPEG. Particularly when photographing with DJI Mavic 3 aerial drone, I not only capture RAW but additionally I frequently utilize exposure bracketing and HDR post-processing.
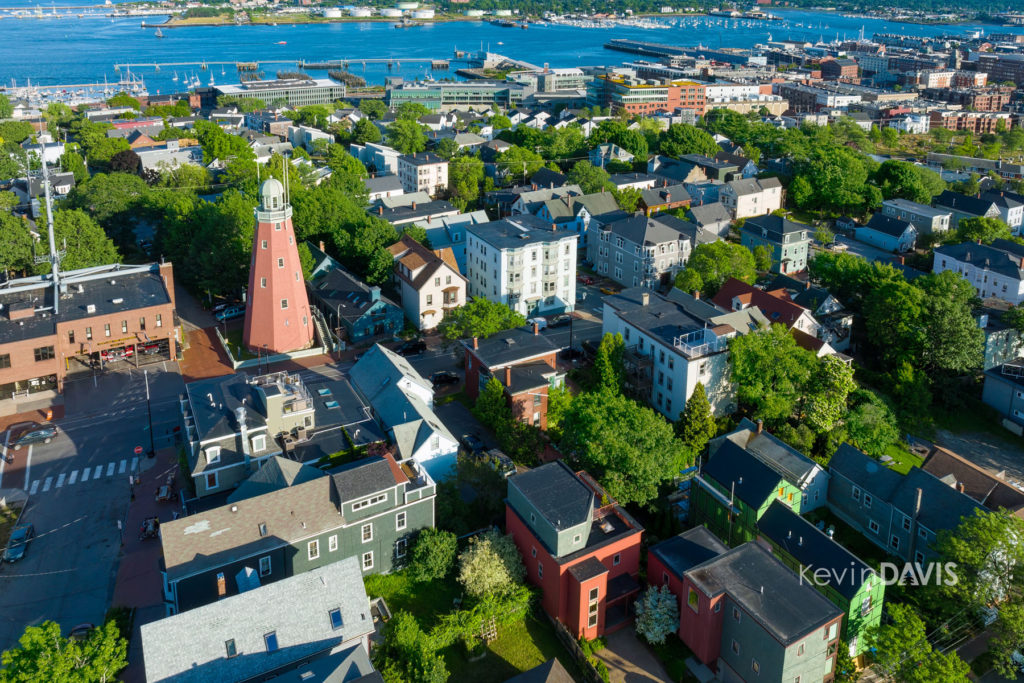
Portland Maine
The image shown here is the result of post-processing with Adobe Photoshop.
Having used the original DJI Mavic Pro, Mavic 2 pro, and Mavic 3, all have exhibited similar difficulty holding fine details in the highlights. This commonly occurs with architectural details under full sun; highlight details are easily lost. My solution is to use exposure bracketing and HDR post-processing; this means the original capture includes the best exposure, then two other exposures, one that is a bit brighter and one that is a bit darker. For the example, the photo here. I expected in advance that the highlights were at risk of getting lost; in retrospect, yes it was true.
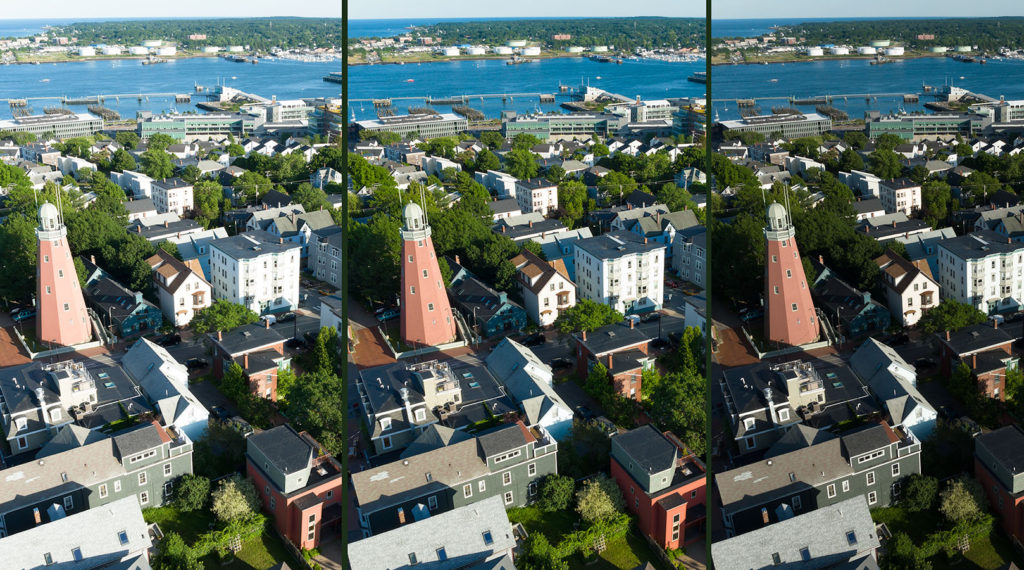
The original three exposures are shown below. The best exposure is in the middle. As has been typical of Mavic 1,2, and 3, architectural details in white buildings have not been fully captured. The second problem is that the green trees are too dark. That second problem can be remedied in post-processing without much difficulty. However, if details in the highlights are blown out, recovering this can be difficult or impossible.
Initially, I perform basic adjustments in Adobe Lightroom and then open all three using “Open as layers in Photoshop”. That opens the three separate files as ProPhoto RGB (16-bit color depth) and with the adjustments made in Lightroom. Once opened in Photoshop, select all three layers and choose “Auto-align layers” in case the drone may have moved slightly between exposures. The best exposure I move to the bottom layer. From the other two exposures, I select specific parts of the image and these are overlayed over the bottom layer, effectively replacing problem areas.
Because the darkest exposure has retained all details in the highlights, I select the brightest areas from this exposure. Typically, this can be accomplished with either Photoshop’s built-in “Color range” selection. Once that selection is made, I often need to tweak it a bit, manually deselecting some areas that were selected but I don’t want those areas selected. Then feather the selection and convert it to a layer mask.
Using the brightest exposure, I similarly selected the green trees. That proved to be more difficult and I spent much time tweaking that selection. This selection is also converted to a layer mask. This replaces the overly dark trees in the base layer with a brighter version. Of course, you might use tools such as brightness or tone curve to lighten the trees in the base image, but the underexposed trees are more prone to luminance noise. Leveraging the brighter exposed trees does not suffer from noise, but is a bit more work to achieve.
There are alternative methods. I sometimes use Raya Pro by Jimmy McIntyre.
The final image is a composite assembled from three separate exposures of the same scene. I save this layered file as TIFF, but you can also save it as PSD (Photoshop format). I may merge all layers and export a JPEG file, but I keep the layered file. Commonly, I do return to this file and make further adjustments. For example, I may decide later that one or more of the exposures has noticeable noise or is not sufficiently sharp. The layered file allows me to make adjustments to the individual exposures.
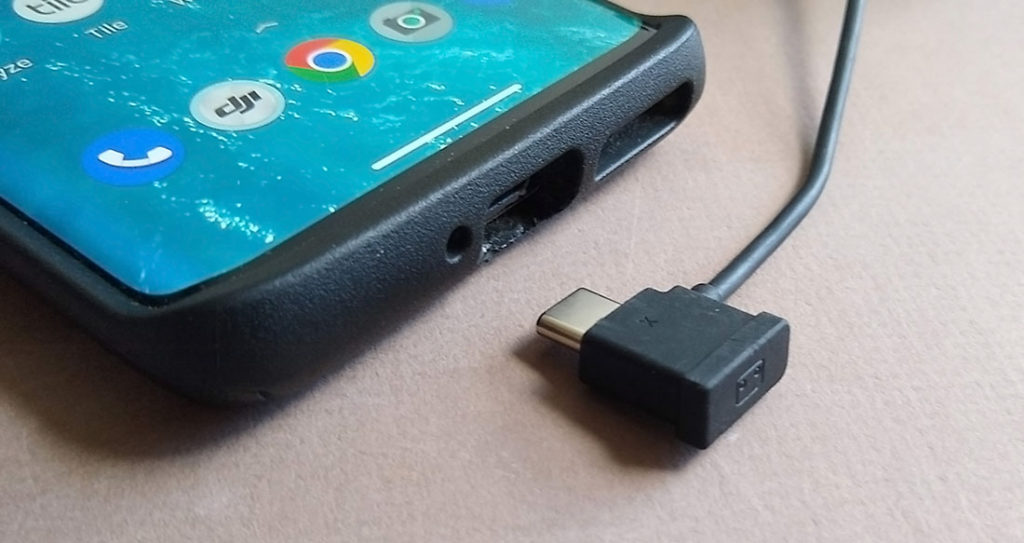
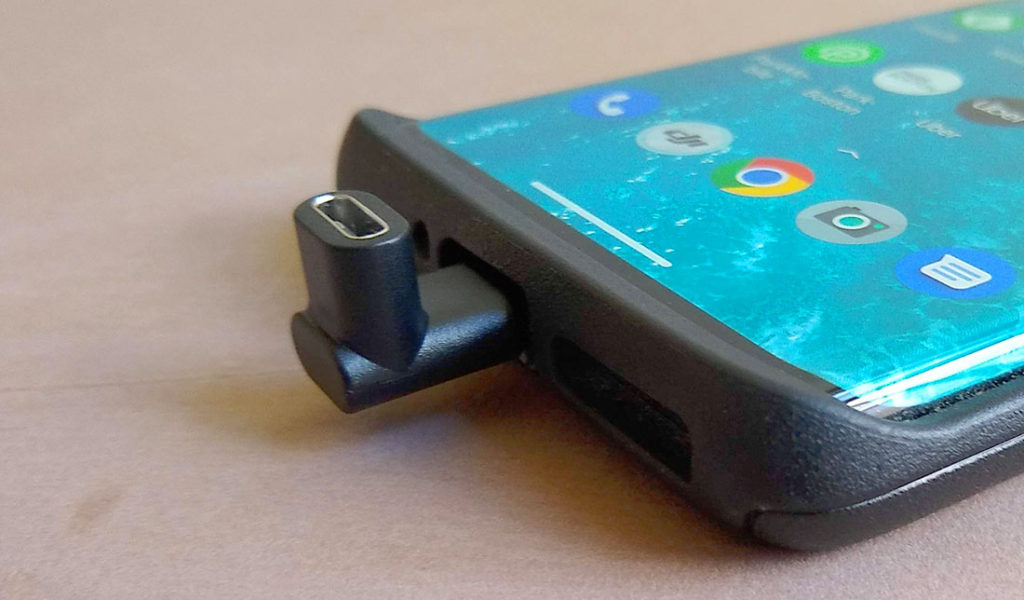
The standard hand-held remote controller for several DJI aerial camera drones is RC-N1. (These drones include DJI Mini 2, Mini 3, Mavic 3, Mavic Air 2 and 2S.) While this controller includes a small USB cable that hides when not in use, the cable commonly cannot be attached to a smartphone if that phone has a protective case. It fits any phone with a USB-C port but not if there is a protective case on the phone.
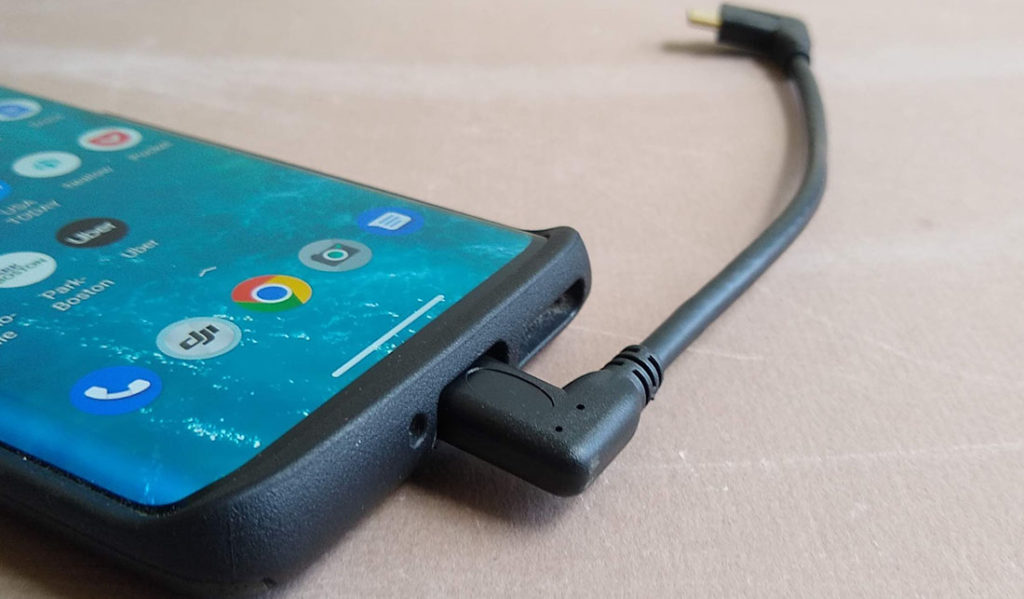
Here are two products that solve that problem. One is an adapter and the other is a replacement cable.
I keep the adapter in my drone carry bag for when I might need it. As it is quick and easy to attach, there is no need to leave it attached at all times.
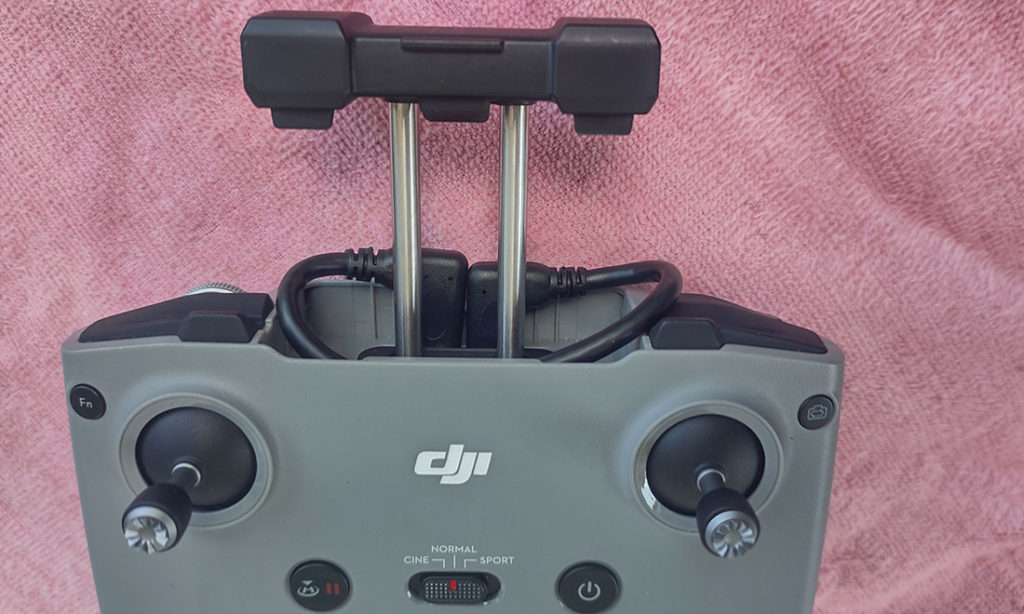
The replacement cable is a bit thicker and bulkier than the standard DJI cable; it does not store nicely in the folded controller; see the photo here. You can decide for yourself if this is acceptable.
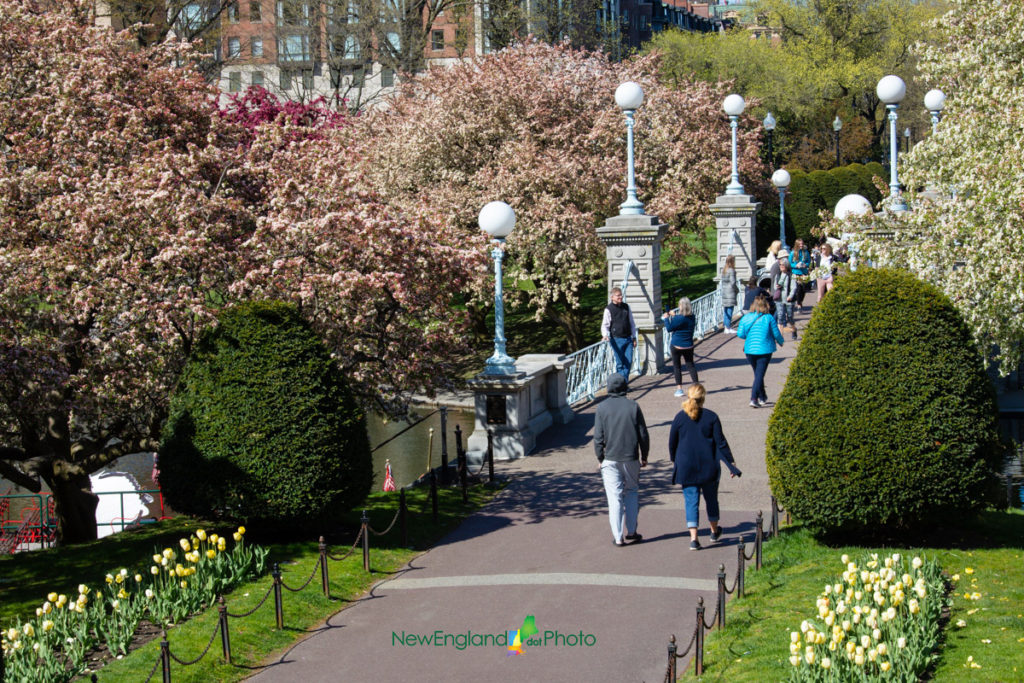
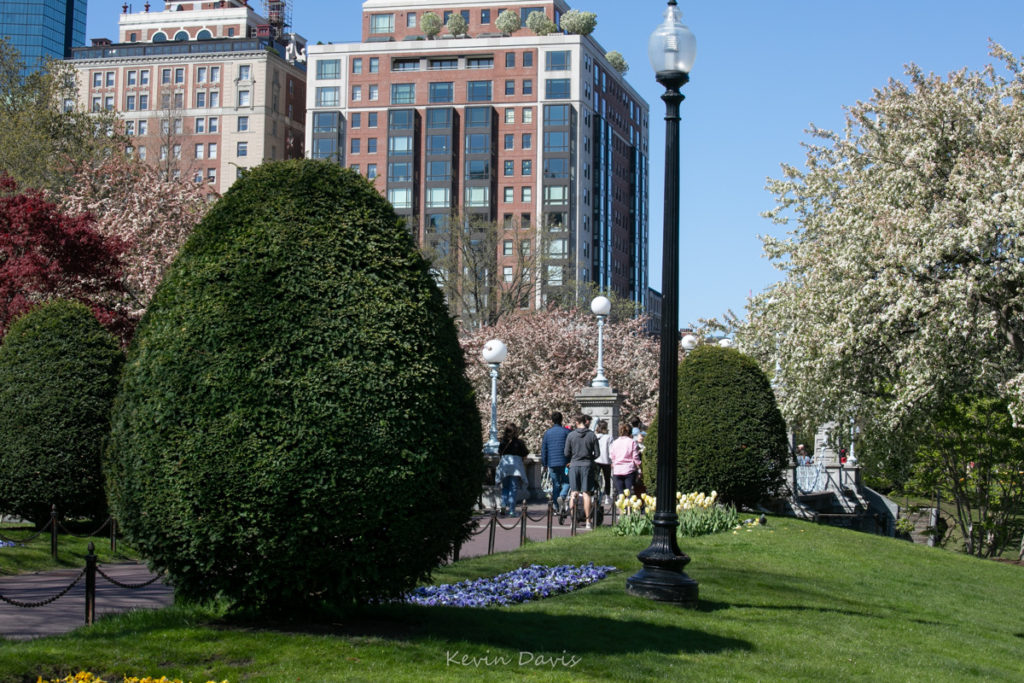
This photo was carefully planned, for the time of year (trees are in bloom), the location, and a somewhat unusual downward angle. The human experience here (Boston Public Garden) includes sky and nearby skyscrapers. I chose to eliminate the sky and skyscrapers through use of a high camera position looking down. However, elevating the camera can be a difficult problem if there is nothing to stand upon.
One of my favorite photographic tools is a telescoping pole with a camera mount at the top. Combined with a camera equipped with wi-fi, the camera can be raised up to 20 feet and operated from a mobile app on a smartphone.
A telescoping pole is often the best choice for a camera height of ten to twenty feet. To photograph from a height of forty feet or two hundred feet, I can use a small aerial drone. While a drone can be used at altitudes of fifteen or twenty feet, that could readily be a distraction and a nuisance to people who are trying to enjoy the park.
On multiple occasions my photographic intentions have been thwarted by the presence of utility wires strung upon poles. While I could have flown an aerial drone above the wires, I instead chose to use a telescopic pole and place the camera twelve to eighteen inches below the wires. Personally, I don’t want to fly a drone that close to wires. Unlike a drone camera, a pole-mounted camera can’t move suddenly and potentially collide with wires.
For comparison’s sake, I shot the same scene with the camera at eye-level. The location I chose for my photo was occupied by a nine-foot-tall shrub. The pole-mounted camera enabled shooting over the top of this shrub in the foreground.
Every year, I see some images shared online that viewers believe to be real but are digital creations that are not real. In many cases, the digital artist wasn’t trying to fool anyone but the image is shared without stating that it is digital art.
A friend showed me a “photo” that impressed him … reported to be a blue whale passing under a cable-stay bridge. As the length of the whale was similar to the length of the bridge, I did not believe it and suggested this was not a real photo. My friend seemed offended and asked “why would you question this photo?” Even the largest whale on earth simply isn’t that big. Later looking up details online, an adult blue whale may grow to a length of 100 feet. The bridge in the photo is the Samuel De Champlain Bridge and the section of the bridge in the image amounts to a length of approximately 1800 feet.
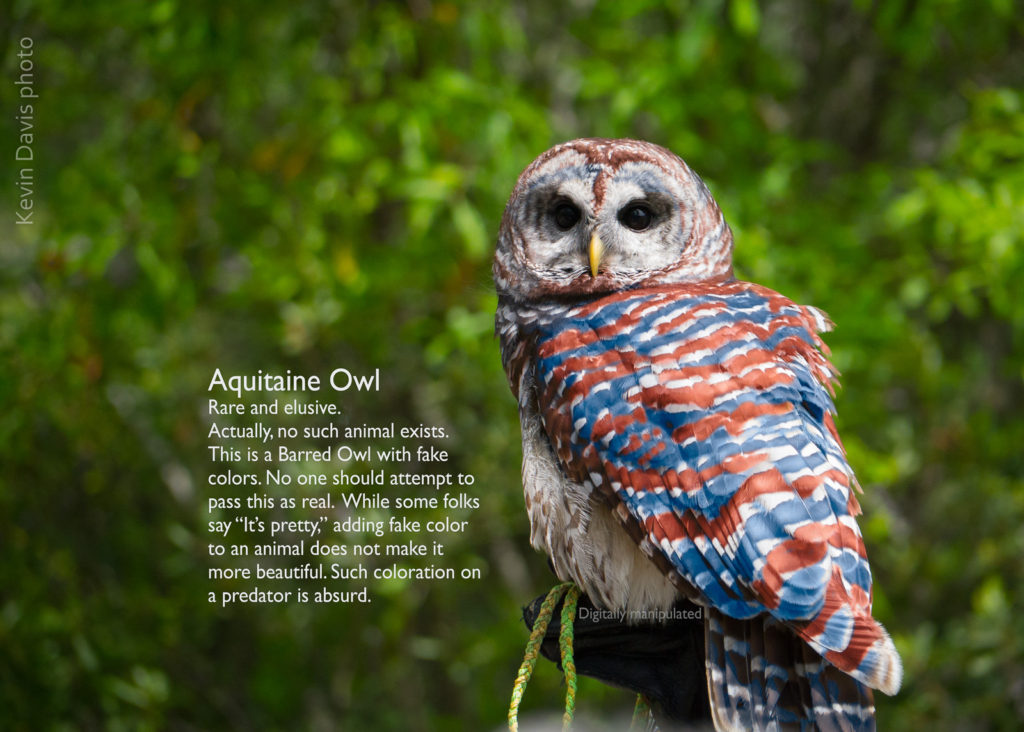
On several occasions, friends have share photos online of a bright red owl, sometimes identified as a Madagascar Red Owl. Commonly people believe they are sharing a real “photo” and are stunned by the beauty of the bird. The immediate problem is that owls are birds of prey and will not be highly visible to their prey; an owl should blend into its environment. To this point, at least seven years ago, I modified one of my own images and declared it to be an Aquitane Owl with blatant caption explaining that the coloring isn’t real and should never be misrepresented as real.
Some tropical birds are brightly colored; as a general rule, owls are not.
I have seen a few images that raised doubts, but a little research told me that the colors are not untrue, but perhaps digitally amplified. For example a black leopard with distinctive spots (not entirely black). And then there is a brown zorse (zebra horse) – apparently completely real.