Winter Boots

If your photography travels this winter will take you down a trail or up a mountain, here’s a short summary of winter footwear for both warmth and safety.

Winter boots are also known as snow boots or pac boots. These are designed for walking, snowmobile, hunting, snowshoeing, etc.  The fit is typically loose and comfortable.

Mountaineering boots are very stiff and the soles have little or no flex.  The biggest reason for this is to allow the use of crampons. Truthfully, most mountaineering boots are designed with emphasis on ice climbing, to the detriment of walking comfort. Most feel rather big and clunky (like the shoes of television character Herman Munster). Some have a plastic shell much like ski boots. Perhaps the most important thing to know is that not all “winter” mountaineering boots have insulation for warmth.

Some insulated boots can have insulation that is removable; some don’t. If you intend to do any winter camping, choose boots with removable insulating liner. Overnight, keep the liners close to your body so they don’t freeze up.

Insulated mountaineering boots range in price from $250 to $850. However, it is not impossible to score a pair of boots on sale for under $200. You can also get used boots at stores that accept trade-ins.

Crampons (pointy metal teeth that attach to the bottom of your boots) are most often designed for ice climbing, but some are designed for trekking (hiking/walking). Crampons for climbing typically have 12 points (teeth), though some have 14. Trekking crampons typically have only 10 points.

Not all crampons fit any boot. Crampons attach to your boots either via straps or a metal bar at the front and rear. Straps can be attached to just about any winter boot or mountaineering boot. However, it is important to note that some crampons have more flex than others. If you plan to use crampons on non-rigid winter boots, look for strap-on crampons that have a good deal of flex in the middle.

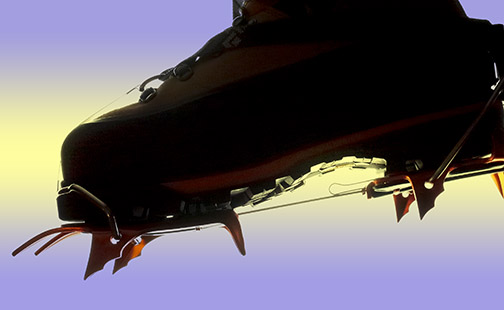
“Step-in” crampons clamp onto your boots with a metal bar or clamp at the toe and heel, requiring mountaineering boots designed for this.  See the photo attached to this post. 

Some “hybrid” crampons (also called semi-step) have a metal bar/clamp at the heel and a strap at the toe.  But as with full-step-in crampons, your boot must have the proper design to accept this type of crampon.


Mo’ Gitzo

This week I took advantage of a trade-in program offered by Manfrotto and Gitzo, to replace my small tripod with smaller “traveller” model, small enough to pack in a suitcase.

I tend not to be brand-loyal about anything, though I have owned three Gitzo tripods. I looked at Giotto when they began offering carbon fiber tripods a couple years ago, but I did not like the fact that the leg locks require more turning compared to Gitzo. This week I looked at tripods by Fiesol (www.feisol.net); solid lightweight carbon fiber construction and 30% less expensive than Gitzo. However, with a trade-in and a rebate, the cost of a Gitzo was reduced to a price akin to Feisol. Price no longer a differentiator … I bought my fourth Gitzo. (www.gitzo.com)


In the trio of tripods shown here, notice that two do not have a center column. I personally like this configuration because the tripod can lower all the way to the ground without the center column getting in the way. The big model 410 shown here is quite heavy and is overkill for most applications. The mid-size tripod is carbon fiber, to replace the big heavy 410. The small one with center column was just replaced, but I could not justify the large price tag without trading-in the one shown here. The old tripod was more than 20 years old, made in France before Gitzo was purchased by Vitec Group.

River Video using a DSLR and CineMover

Recently travelling through northern New Hampshire, I was driving along the Ammonoosuc River shortly before sunset.  This short video is a compilation of shots all filmed that evening along the river.  The key scene is a dolly move along a metal bridge. 

Driving that evening, I was looking for photo opportunities along the river when I spied the new bridge next to the old bridge.  Then I noticed the long smooth railing and and remembered that I had the CineMover dolly with me. 

 The CineMover is an inexpensive dolly created by J.G. Pasterjak.  Take a look for yourself here:

http://moveyourcamera.com

The CineMover is designed with vertical wheels and horizontal wheels, ideal if you have a long flat rail with a square profile.  However this railing here did not entirely favor the CineMover as the railing shape is basically a half oval.  There is nothing here to insure that the wheels track straight.  Additional care was required because the rail had a significant dent that could easily cause the rig to jump a bit.  But after several attempts, I managed to keep the rig mostly level along the 12 or 15 feet of uninterrupted rail; this move is not flawless, but it is pretty nice shot!

Panasonic Lumix G3

A picnic this week provided opportunity for my fIrst test drive of the Panasonic Lumix G3.
I am very pleased with the ease of use and the image quality. I was super impressed by the face-detection auto-focus and the LCD-touch-screen focus selection.

 Shown here is my favorite shot, Balasankar dishing up a nice overhand serve.  As you can probably guess, I am holding the G3 over my head for this shot.  An articulated/swivel display screen is very helpful for overhead shots and also down-on-the-ground shots.  I quickly learned to love this feature on the C-5060 (very few cameras had this feature back in 2004/5) and I absolutely required it for a replacement camera. The 3-inch swivel-touch-display on the G3 is a sweet upgrade.

ISO 800, f\6.3, 1/800 sec, auto white-balance
Shot as JPG  (not RAW)

(click the image for a larger view)


And here are a couple more shots with the same 14mm lens (equivilent to a 28mm on a full-frame DSLR).


Camera Upgrade – Panasonic G3

Across two decades, I have owned/used three film cameras, two digital cameras, and one video camcorder.  Recently, I acquired a new camera to replace my old digital compact.  The new camera is a Panasonic Lumix G3. 

The G3 is a relatively compact camera with interchangeable lenses.  It is half the size of my Canon DSLR.  The G3 is a Micro Four-Thirds camera.   Because Four-Thirds and Micro Four-Thirds are both open standards (jointly developed by Olympus and Panasonic), the camera can accept lenses from different vendors, such as Olympus, Panasonic, and Leica.

The biggest reason I replaced the old compact camera is poor low-light performance.  The old camera had a maximum ISO of 400 and was prone to a good deal of chromatic noise.  The new G3 has a maximum ISO of 6400 and the noise is far less than the old camera at ISO 400.  

The ability to record images in low-light is largely a matter of the image sensor.  Most small cameras employ small image sensors, which perform poorly in low light.  In recent years, some small-to-medium size cameras have been employing larger image sensors.  The G3 features a Four-Thirds sensor, which is about six times larger than the sensor in the old C-5060 and is half the size of the image sensor in my DSLR.  G3 has three times more pixels than the C5060, while the image sensor size is six times larger. So the individual pixels are larger; and, theoretically, larger pixels can take in more light.   But this is theory; the proof is the actual image quality.


Colorado Wildflowers book

Here is the new wildflower book (the images are from 2007, but I just created the book this month).   The link below provides a preview of the book.   It is a thin little book with 36 wildflower images.  (Yes, you can purchase copies here via this link.)

This book is PoD (publish on demand) via Blurb.  Specifically, Blurb refers to this 6×9 format as a “trade” book.    The paper thickness is “text” weight rather than the heavier paper typically used for photo books.   Until this year, Blurb offered the trade format only for black&white books, but they now offer color. 

This particular book is 40 pages, meaning 20 double-sided papers.  Why?  Because Blurb pricing is based on 20-page increments.  A book with 22 pages cost the same as 40 pages, but a book with 42 pages would cost a bit more.


Different Light

In some parts of the world, the weather is known to change quickly and people often say: If you don’t like the weather … wait a few minutes.  With regard to outdoor photography, the same thing can often be said about the quality of the light:  if you don’t like the light … wait a few minutes.


Case in point, the attached photos of Purple Fringe.  The first shot was captured in open sun near mid day.  Bright light like this causes not just shadows, but hard-edged shadows (transition from light to shadow is crisp rather than soft).  This is sometimes refered to as hard light.

For the second image, I simply waited for clouds to obscure the sun, resulting in soft light.  This eliminates the harsh shadows, but the image looses overal contrast. 

Keep in mind that light can change quickly and can greatly impact the mood of an image.  The second image here was captured 3 minutes after the first image.

Typically, I prefer soft light or side light.  I prefer the second image.  (Many outdoor photographers will tell you that mid-day hard light is “bad light”.)

However, both images suffer from cluttered background of grasses.  Perhaps I was so enamored with this amazing flower that I did not pay attention to the background.  I don’t recall.  A lower camera angle might have helped eliminate the grasses from the photo, but likely not enough. Perhaps the only recourse here is to walk away from this plant and find a different Purble Fringe with less grass nearby.


When the Light is not quite what you want

Friday evening, as Hurricane Irene thrashed the coast of Florida, the weather in New England was clear and the warm glow of the setting sun raked across the land.  I went a short distance down the road to photograph the river.   But, to my surprise, the light on the weeds and grasses was largely back-lit and unflattering.  So I planned to return and try again Saturday morning, as the weather forecast called for overcast clouds.

Soft light / overcast sky

As expected, the morning provided soft diffuse light and I snapped a few images.  To get a bit of elevation above the river, I used two familiar tools.  One, a portable telescoping ladder.  Two, a tripod fully extended and raised far over my head.  The latter requires a bit more shutter speed to compensate for the unstable camera perch. 

A bit later, after returning home, the sun was peeking through the clouds and I considered repeating my brief excursion in different light.  But, in the end, I did not.

As you can see in the image here, the soft light features no distinct shadows.  This is not automatically good or bad.  A diffuse light avoids high contrast and specular reflections, but it can also reduce sense of  shape and depth.  A moderate light from the side (side light) will wrap around a subject and enhance the subject shape.  But too much and the shadows may be too dark, loosing all details.

When dealing with natural light (not electronic flash), sometimes we can anticipate the light we want.  But sometimes, the light really is not doing what we expect or want.  When that happens, sometimes the right thing to do is simply try again after the light has changed.


Park Wildflower Project

multiflora rose

Working at an office park, anyone with an inclination towards the outdoors world … simply has to get out of the office and walk.  In this course, I discovered that numerous wildflowers grow around the periphery of the park.  Being both photographer and sometimes amateur naturalist,  I began photographing and cataloging the various flowers. 

That was the humble beginning of what I will refer to as the Park Wildflower Project.  My catalog is more than 60 species …  but I’m not done yet.  I find it necessary to return frequently.  From year to year, the species can vary.  (This year, Common Tansy has invasively taken over the northwest meadow.)  I find flowers that I have not seen before;  and I no longer find some of those that I have seen.

 For identification, I rely primarily upon two books.  For a quick visual reference, I like “Wildflowers in the Field and Forest” by Clemants and Gracie.   But that’s not always enough.   Newcomb’s “Wildflower Guide” is absolutely essential !


CreativeLive.com

If you have not yet heard of CreativeLive, you are really missing out!
Free training on a wide variety of subjects: studio portraiture, food photography, wedding photography, film-making with DSLR, Photoshop, Lightroom, Final Cut Pro, making eBooks.   Great instructors such as Art Wolfe, Zack Aris, Vince Laforet.

This weekend’s 3-day class is taught by Gail Tattersall, director of photography for film and television (http://galetattersall.com).

It’s simple.  Go to CreativeLive.com, see what classes are coming soon.
Four ways to learn

  • to attend in-person (Seattle WA), you can apply per each class
  • watch live for free on the internet
  • watch re-broadcast free at the end of the day
  • purchase video download

The internet video stream is available in two different sizes, standard and low-bandwidth.
A smart phone or iPad should handle the low-bandwidth stream just fine.

If you want to have the video permanently, you can purchase video download.  In fact, this is how CreativeLive operates as a buisiness.  The content is so good, many people pay for the video. 

I’ve been happily learning from CreativeLive classes ever since their first 3-day class more than a year ago.  Back then, there were some technical glitches (e.g. loss of audio), but those days seem to be long gone.  The reliability of the internet video stream has been really solid.  More important, their instructors and class content have been stellar.

www.creativelive.com

.