If you are a photographer or videographer and you are interested in the Mavic Pro drone primarily as a flying camera, then this article is for you. This is a run-down of camera controls and options, without discussing flight controls.
Documentation included with the Mavic Pro is minimal and help for the DJI Go app is non-existent.
First of all, let’s point out the obvious. The Mavic Pro has unmatched portability; it folds to a size that can fit in a large coat pocket. The gimbal that stabilizes the camera is probably the smallest in the world.
This drone can be flown using using the hand-held controller alone, or in conjunction wtih a smart-phone and the DJI Go app. You do need the Go app for access to numerous configurable options, but after configuring what you need, it is possible to fly with just the controller and no app. During flight, the Go app gives you a live video feed and camera exposure information, but you may not need to interact with the app except maybe to set the focus.
Not all available features shown here. These are just some features I wish to point out.
The Remote Controller
The hand-held controller includes quite a few camera controls, independent of any smartphone app.
- Photo trigger (shutter button)
- Start/stop video recording
- Camera tilt
- Exposure compensation
- Custom button left (e.g. center focus)
- Custom button right (e.g. AE lock)
- 5D button – up, down, left, right each has a different meaning that is configurable.
(For example, zoom in/out. It is a 2x digital zoom; there is no optical zoom.)
DJI GO app
The app shows real-time video and provides in-flight camera exposure information.
- Real-time image view
- Exposure histogram
- Current exposure compensation setting (1/3 ev increments)
- Over-exposure zebra stripes during video recording
- Camera: ISO, shutter speed, white balance, remaining SD card number of photos
- Video: resolution, FPS, remaining SD card recording time
The app provides extensive camera configuration options.
- auto/manual exposure
- ISO (100 to 6400)
- shutter (up to 1/8000)
- AE lock
- touch screen for AF spot
- touch screen for exposure spot
video menu ___
- NTSC or PAL
- size&fps (e.g. 720p @ 120fps, 4K @24fps)
- White balance (auto, sun, cloud, custom, etc)
- Style (brightness, contrast, tint)
- Color (none, D-cinelike, D-log, Art, Vivid, etc)
photo menu ___
- Aspect ratio (4:3, 16:9)
- Image format (jpeg, raw, jpeg+raw)
- Photo drive (single shot, AEB-3, AEB-5, HDR, interval)
- White balance (auto, sun, cloud, custom, etc)
- Style (sharpness, contrast, saturation)
options menu ___
- show real-time histogram
- orientation (portrait/landscape)
- lock gimbal when capture
- over exposure warning
- anti-flicker (50Hz, 60Hz, auto)
- format SD card
The app alerts you if a firmware update is available. The update can be applied with a simple touch; the download comes via your wi-fi, through the phone, down to the drone. The time to complete the upgrade was more than ten minutes and consumed about 18% of the drone battery charge.


Photo Quality
For photos, you can shoot RAW, JPEG, or RAW+JPEG. Of course, I recommend either RAW or RAW+JPEG.
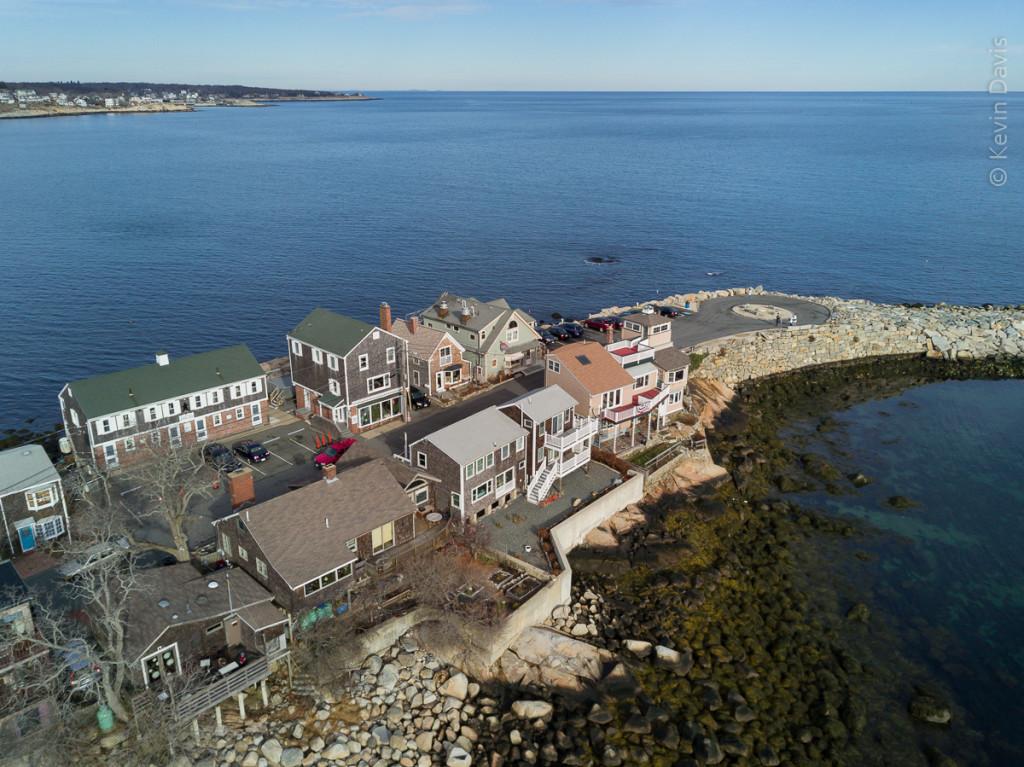
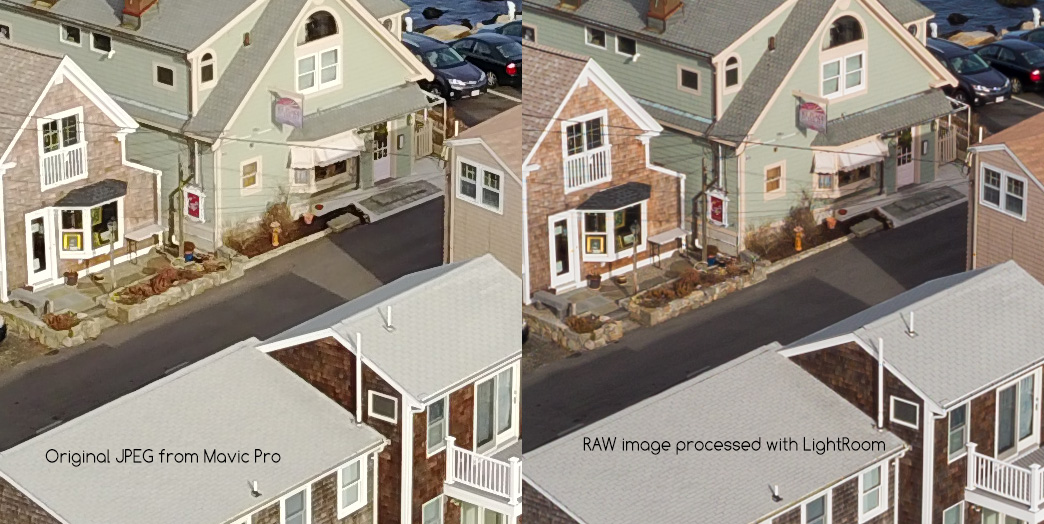
I shot the photo above (Bearskin Neck, Rockport MA) recently with the Mavic Pro set to record both JPEG and RAW. The second photo is a 200% crop from the center, comparing the original JPEG to the RAW file processed as I normally would in Adobe Lightroom. Overall, the JPEG is good. I think it is a bit green, looking at the short stone wall. Signs on the buildings are not legible in either case, but the JPEG is slightly worse than RAW.
With only a half dozen flights thus far, I have observed a couple specific image quality problems. For still photos, the very small image sensor is no match for a larger DSLR or MFT camera. I have read that the image sensor is Sony Exmore (wikipedia.org/wiki/Exmor), but I cannot confirm that. The maximum resolution is a respectable 12 megapixels, in 4×3 aspect ratio (4000×3000). You can choose to capture 16×9 ratio, but that is a crop down to 9 megapixels (I personally tested that just now; that’s real, not a guess.).
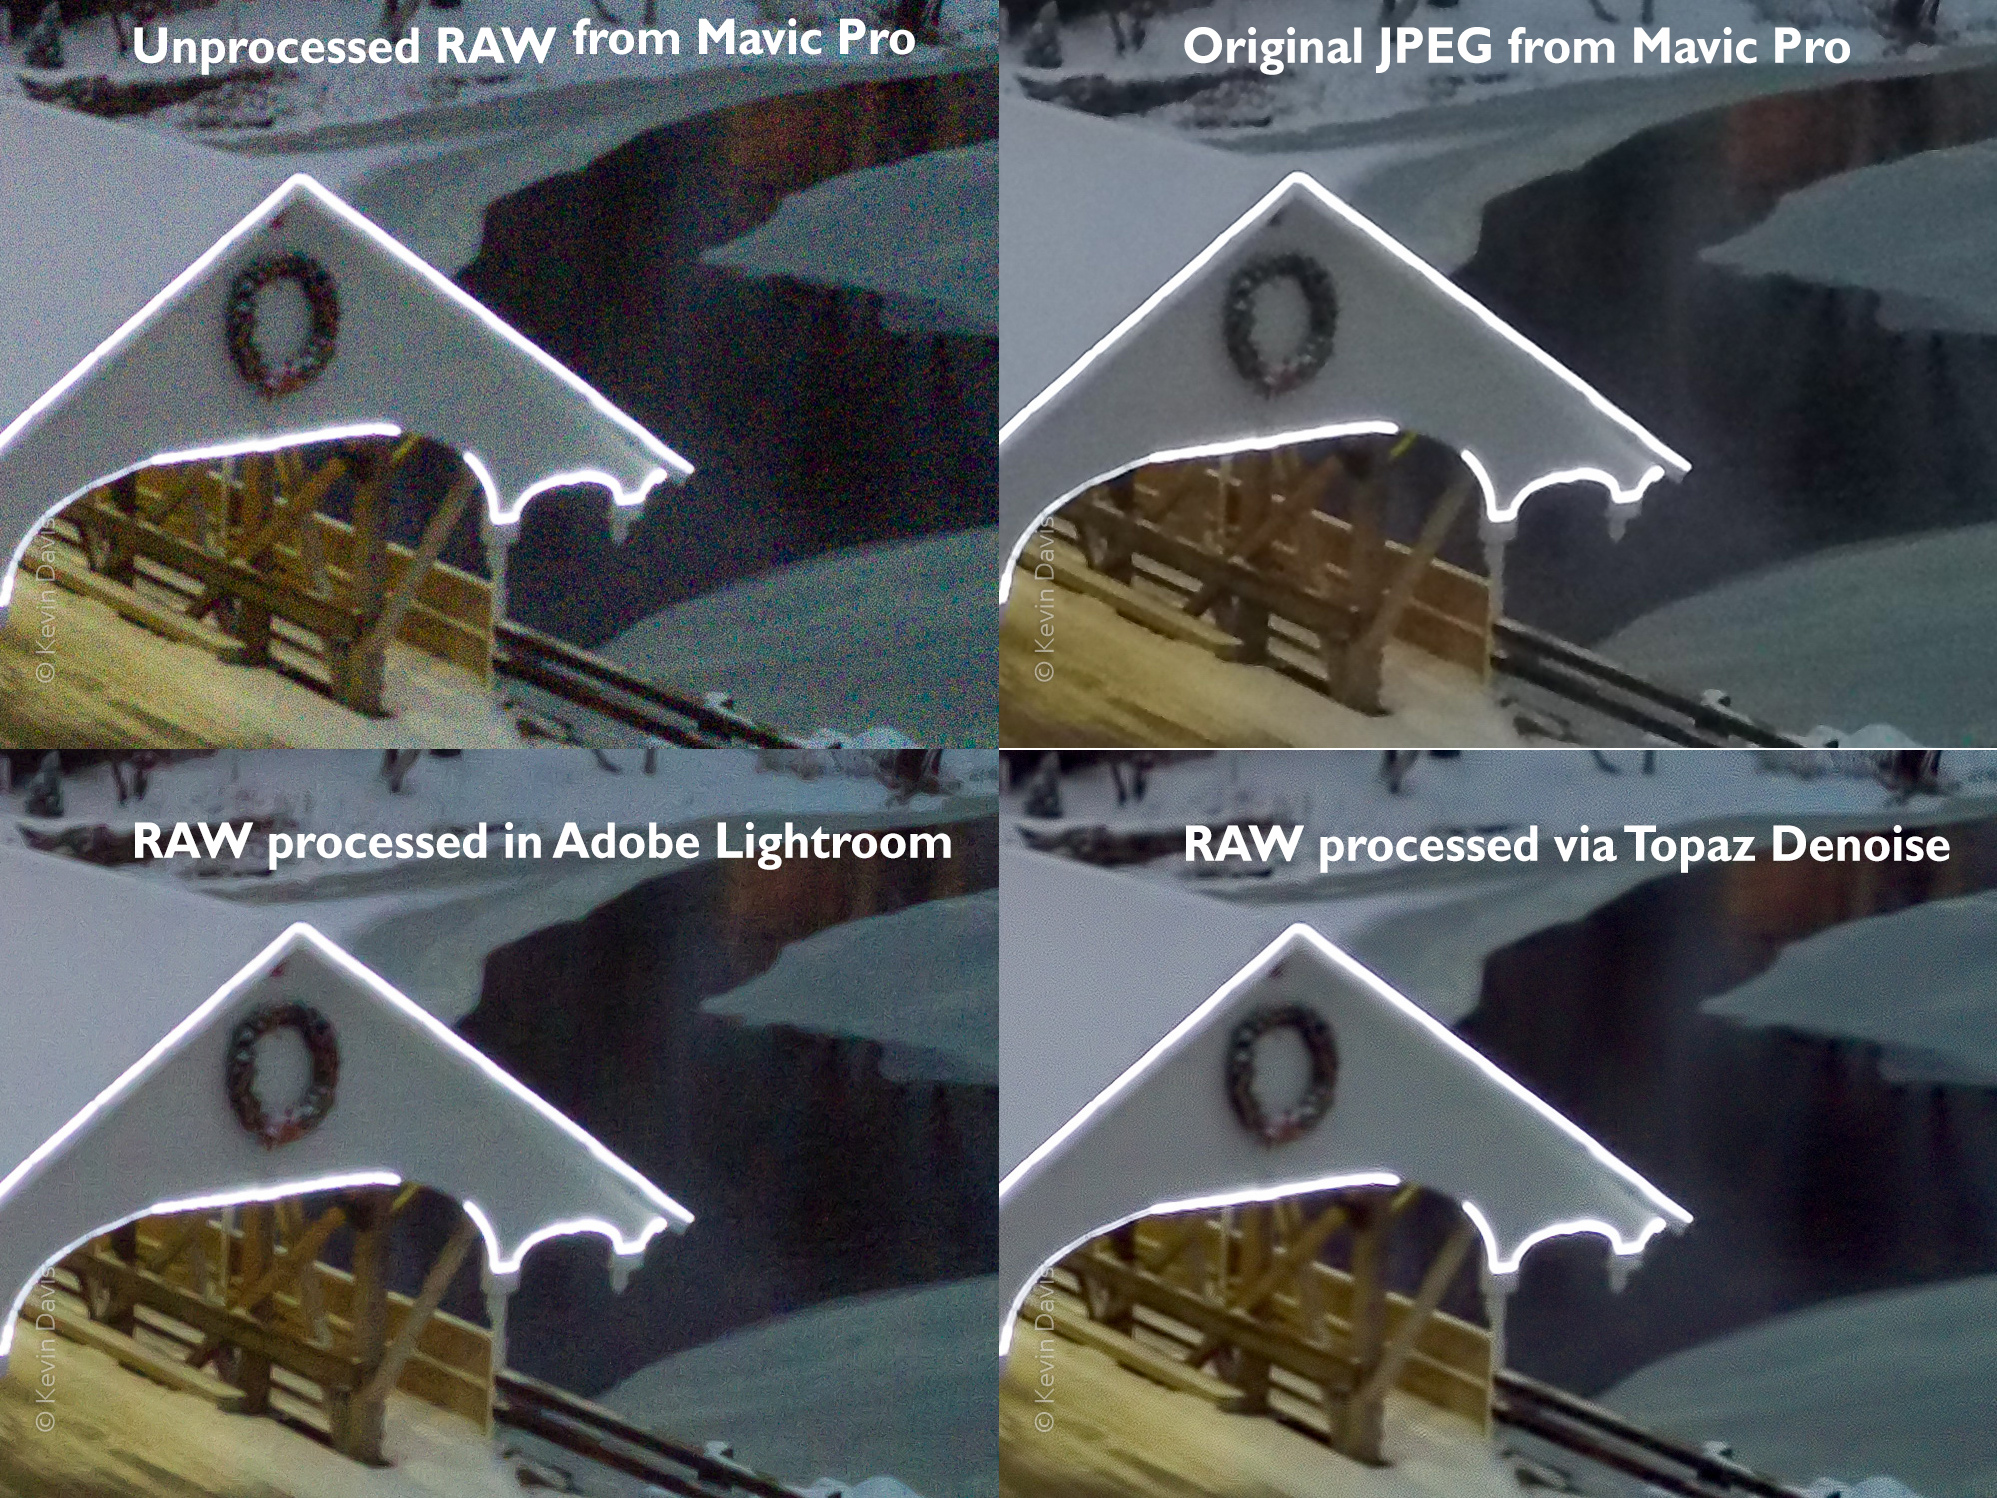
Photos can exhibit some amount of digital image noise at just about any ISO. Images shot during the low-light of dusk, around ISO 1600, exhibit a high amount of chroma noise. Samples are shown here below. For stills, Adobe Lightroom has the best noise reduction I know. While the JPEG processing in the Mavic does a reasonably good job of smoothing large areas, there is loss of detail inside the bridge. The Topaz Denoise plugin for Adobe is similar. Processing via Lighroom’s built-in noise reduction allows better control and retains better detail inside the bridge.
Video Quality
In good light, the video quality is probably on par with a GoPro Hero 3 or 4. Moire problems may occur when scenery includes detailed patterns, but I have not tested this with different capture resolutions. As with still photos, low light and high ISO exhibits a high amount of chroma noise. A product called Neat Video can do a good job of mitigating noise.
The video clip of the snowy mill (at the beginning of this article) was captured at 1080 without a problem. However, on a separate shoot, I did see a problem. Several people contributing to on-line forums have reported that 1080 does have problems, including a “pastel effect” which seems an apt description of the problem I saw. People experiencing problems at 1080 also report that the problem does not occur at higher 2.7K or 4K resolution. I have switched to shooting 2.7K and subsequently downsample to 1080 in post processing. However, the higher resolution does not support a frame rate faster than 30 fps; and downsampling does require additional compute time.
For video, I’ve been shooting the “None” color profile, modified with sharpness set to -1. Some pros are recommending two of the color profiles, DLOG (very flat) and ART (not as flat). Alternatively, some people have suggested color profile D-Cinelike and then customized to -2, -1, -1 (sharpness, contrast, saturation). All those suggestions create an intentionally flat result that necessitates some post-processing.
A clear plastic dome can optionally be used to protect the camera. Very first time I captured video with the Mavic Pro, I could see glare due to the plastic dome. Since then, I never fly with the dome attached. Potentially, I might use it if there some risk of water or dust in the air, for example, flying near a waterfall.
Pre-flight
Each time you fly, here’s the basic pre-flight steps:
1) Unfold the propeller arms and propellers
(Obviously, attach any propellers that you detached for transport/storage.)
2) Remove the camera gimbal clip
3) Optionally, connect your smart-phone to the hand-held controller
4) Turn on the controller and start the DJI Go app
5) Turn the antennae upwards, which is typically a 45-degree angle
6) Turn on the drone
7) To connect your phone with the drone, touch the “Camera” button on the DJI Go app
8) Check the aircraft status information, including available battery charge
9) If this is a different location than previous flight, calibrate the compass
10) Obviously, check your environment for obstacles or hazzards.
Make sure you are not in restricted airspace.
DJI includes a plastic clip to secure the camera gimbal when not in use. Always remove this clip BEFORE turning on the drone. If you fail to do so, the app warns of gimbal overload.
Initially, the Go app will display the “Aircraft Status”. Tap the “X” to close this display.
- Overall status … Latest Firmware
- IME … normal
- Compass … normal
- Motor ESC status … normal
- Radio Channel Quality … good
- Flight Mode
- Remote Controller mode
- Aircraft battery
- Remote Controller battery
- Remaining SD card capacity

Interesting review.
The biggest issue I’ve found with the Mavic is flare from the sun. It seems more prone to this than the DJI Phantom 3 was. Its winter here so the sun is lower in the sky – I’m hoping it’ll be less of an issue in the spring when the sun is higher!
It’s probably not sun flare, but reflections form the propeller. Try a flight without the gimbal cover.
Thanks a lot for sharing such a fantastic post with beautiful images. I really like to appreciate it. Keep posting more update on your page.
Ken,
I appreciate your review. After spending days researching and looking at posts from others it’s really unfortunate but the mavic pro which I own has noise for stills. Nothing new to you. For some reason my LR doesn’t seem to fix noise but makes it worse. I called it mottling in the shadows as the colors looked broken up. It exists less in daylight shots noticeable mostly in sky areas. I looked at upgrading to the P4P but will wait for DJI to come out with something new. On a recent dusk/night shoot a lot of noise showed up but Topaz denoise helped. I have to tell clients now that there are limitations with drones as you cannot go large on the files for reproduction. I guess it’s better than a helicopter. Have you flown the P4P at all?
No, I have not tried the P4P. It is tempting for the camera alone but rumor is that the Mavic 2 will get the camera in 2018. I will likely upgrade to Mavic 2, but I could be swayed toward something else that offers focal length options. And variable aperture would be nice; the need for ND filters in bright light is annoying.
I have read another rumor, that quality control suffered as DJI struggled to meet demand for Mavic Pro, but early production did not have these problems. I did pre-order the Mavic before it was available.